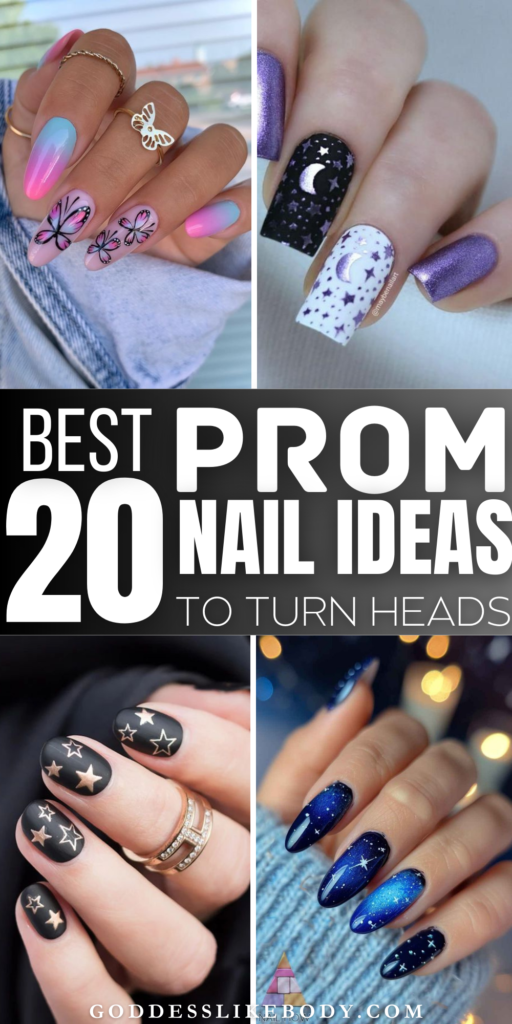
20 Stunning Prom Nail Art Ideas for The Big Night
As you gear up for your big night, exploring Prom Nail Art Ideas can unlock a trove of breathtaking designs to elevate your look. With the 2024 prom season fast approaching, the blend of fancy nails, acrylic nails, and press-on nails offers a multitude of creative avenues to express your personal style.
Whether you’re pairing your nails with a nail ideas for black prom dress or seeking inspiration for a prom manicure that complements your outfit’s color, style, and pattern, these curated prom nail designs act as your guide to achieving a harmonious, stunning look on your prom night.
Let your fancy nails be more than just an accessory; make them a reflection of your unique taste and the perfect addition to your prom ensemble.
Busy? Save this pin for later.
1. Glossy Midnight Blue
Dive into the elegance of Glossy Midnight Blue, a prom nail art idea that blends sophistication with a hint of mystery.

Whether you’re looking for a subtle touch or a glamorous statement, this shade is versatile enough to enhance any prom attire.
Styles
Popular Styles: From liquid blue marble nails to navy blue French manicures and minimalist line designs, there’s a style to match every preference.
Related Topics and Suggestions
Holographic and Sapphire Nails: For those wanting to add an extra sparkle to their prom night.
Square Nails and Blue Nail Designs: Offers a modern twist to the traditional prom nail look.
Nail Polish Colors: Explore various shades of blue to find the one that best fits your prom theme and dress.
2. Galaxy Glam
To achieve the mesmerizing Galaxy Glam look for your prom night, start with a solid black base using thin layers to ensure even curing. This sets the perfect backdrop for the cosmic effect.

Step-by-Step Guide:
Base Preparation: Begin by applying a base coat of Jimmy gel to prep the nails, ensuring a smooth canvas.
Black Base Color: Apply two coats of a black base color. Allow each layer to cure properly to avoid smudging.
Glitter and Effects:
Add a layer of reflective glitter from Beauty Innovations to introduce depth and shimmer.
Use cat eye gels from Madame Glam in various colors. Activate the magnetic properties with a magnet to create a starry sky effect.
Finishing Touches:
Apply Milky Bath from Daily Charm for a subtle milky white base that enhances the galaxy theme.
Finish with a no-wipe top coat to seal in the design and add a glossy shine.
3. Geometric Play
Key Styles and Techniques:
Color and Design Variety: Geometric nails are versatile, featuring everything from monochrome schemes to vibrant, multicolored patterns. Popular designs include black and white grids, negative space art, and colorful Tetris shapes.
Tools and Application: Achieving precise geometric patterns often requires specific tools such as a D liner brush for sharp lines and a base gel for placing decorative elements like crystals and caviar beads, ensuring each design component is perfectly placed according to the curvature of the nail.
Inspirational Tips: For those inspired by historical art, the geometric style can also channel the essence of Mondrian’s paintings with primary colors and bold lines. The process involves a meticulous application of colors, ensuring they do not bleed into each other by curing each layer before proceeding.
4. Ombre with Butterfly Accent
Ombre with Butterfly Accent nails combine the soft gradient of ombre with the delicate detail of butterfly decals, creating a look that’s both enchanting and sophisticated.
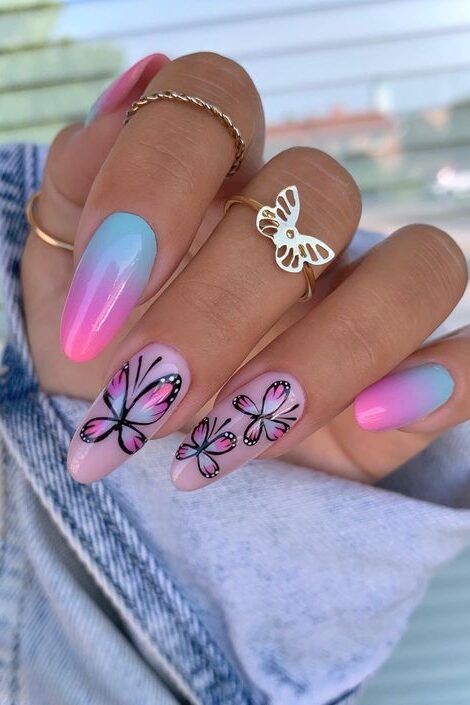
Techniques
Neon Pigments: Used by nail artists for the butterfly details, neon pigments stand out against the ombre background, giving a vibrant pop of color that is both eye-catching and stylish.
Application Tips
Base Preparation: Start with a clean, buffed nail surface. Apply a base coat to protect your nails and enhance the adherence of the ombre and decals.
Applying Ombre: Use a sponge to dab on the transition colors gently. For a prom-appropriate look, shades of blue like sky blue or light blue are perfect. Blend until you achieve a seamless gradient.
Butterfly Decal Placement: Once the ombre base is dry, apply the butterfly stickers. Position them strategically to complement the flow of the ombre. Seal everything with a top coat to ensure longevity and a glossy finish.
5. Watercolor Marble
Watercolor marble nail art is a stunning choice for prom, blending intricate designs with a splash of creativity.
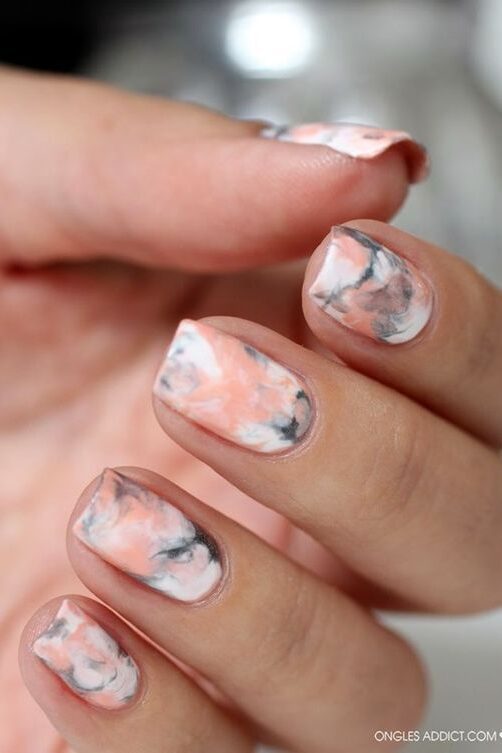
This technique involves several materials and methods, each contributing to the unique, flowing patterns that mimic the natural swirls of marble combined with the softness of watercolors.
Technique 1: Easy Marble Design
Base Coat: Start with a base coat of milky white gel polish and cure it under a nail lamp to set the stage.
Color Application: On a tile, apply three gel colors and gently swirl them with an orange wood stick to create a marble effect.
Design Transfer: Using a gel brush, scoop up the swirled colors and apply them to the nail in a zigzag motion, ensuring the colors blend seamlessly on the nail.
Technique 2: Two-Color Marble Design
Initial Steps: Similar to the first technique, begin with a base coat of milky white gel polish and cure it.
Swirl Creation: Place two gel colors on a tile and lightly swirl them with an orange wood stick.
Application: Carefully place the swirled colors onto the nail, allowing the colors to naturally flow onto the nail plate for an elegant marble look.
Technique 3: Full Nail Marble Design
Base Preparation: Apply and cure a base coat of milky white gel polish.
Color Striping: On a tile, stripe four different gel colors.
Marbling: Scoop the striped colors with a gel brush and apply to the nail, using zigzag motions to spread the colors evenly across the nail.
Each of these techniques offers a unique take on the watercolor marble effect, ideal for a prom night where every detail counts.
Remember to clean your brush after each swipe to maintain the clarity of the colors and to create distinct light and dark areas for added depth and dimension.
6. Double French
Double French manicures offer a chic twist on the classic French tip, featuring two distinct color arcs that add an extra layer of sophistication to your prom nails.

Key Variations and Styles
All Black Everything: Embrace the elegance of black with this bold, single-color variation.
Barely-There Pastels: Soft pastel tones make for a subtle yet stylish statement.
Milky Neutrals: Ideal for those who prefer a muted, sophisticated look, perfect for any elegant attire.
Split In Two: A creative take that splits the tip with two contrasting colors.
The Double Swoop: Features pear-toned accents swiped over a base summer shade for a vibrant look.
Pink Perfection: A monochrome pink approach for a uniformly chic appearance.
Diagonal Rainbows: Adds a playful touch by applying a second hue at the bottom corner of the nail.
Print That Again: From cow to zebra, any print adds a funky twist to this double tip design.
Double The Glitter: For those who love sparkle, adding shimmer to both the top and bottom tips enhances the glam.
Carbon Copied Chrome: Incorporates a reflective chrome finish for a futuristic feel.
Negative Space French Ombré: Begins an ombré effect right from the negative space, blending it into the double tip.
Tips for Perfect Execution
Preparation: Start with a clean, well-prepped nail for the best results. Apply a base coat to protect your nails and enhance the polish’s adherence.
Technique: Use a fine-tip brush or striping tape to achieve clean, crisp lines that define the double French look.
Finishing: Always seal your design with a top coat. This not only adds a glossy finish but also extends the life of your manicure, ensuring your nails look fabulous throughout the prom night.
This modern rendition of the French manicure allows you to play with colors and patterns, ensuring your nails are as unique as your prom night ensemble.
7. Mismatched Mani
Embrace the eclectic charm of the Mismatched Mani, a trend that allows for a playful yet sophisticated expression on your prom night.
Inspired by Taylor Swift’s Eras Tour, where each nail represented a different musical era, this style involves wearing different polish colors or designs on each finger. Here’s how you can achieve this look:

Key Steps and Tips:
Grounding Tone: Choose a neutral color for three out of five fingers to create a cohesive look amidst the variety.
Color Palette: Opt for three to four colors. Starting with an analogous color theme is a smart choice. Select shades that are next to each other on the color wheel for a harmonious appearance.
DIY Techniques:
At Home Application: This manicure can be easily replicated at home, costing no more than a regular salon manicure.
Stickers and Pens: For those who want to add detailed designs, Nails.Inc’s Mani Marker Nail Art Pens and Inked by Dani Nail Art stickers offer great tools for DIY enthusiasts.
Monochrome and Contrast: A monochrome approach can be striking. Alternatively, using contrasting colors on each hand can create an eye-catching effect.
This approach not only showcases creativity but also ensures your nails are a standout feature of your prom ensemble.
8. Bling Ring Accents
Bling ring accents offer a dazzling way to elevate your prom nail art with a touch of glamour and uniqueness.

Using a variety of materials such as neon rings, glow in the dark powder, and rhinestones, you can create a customized look that truly stands out.
The flexibility in the design process means there’s no set rule on how to apply these accents, allowing for a personal touch that reflects your style.
Key Materials and Application Techniques:
Base and Accent Colors: Start with a neutral base like cover peach nail polish. For the bling ring accent, use Zula bling adhesive to attach rhinestones or neon rings to the designated nail, typically the ring finger for added emphasis.
Mylar and Glitter: Apply green mylar for a shimmering background effect that changes hues based on the underlying color. Sprinkle 420 glitters for an extra sparkle that catches the light beautifully.
Sealing the Design: It’s crucial to apply a top coat over your nail art. This step ensures all small decorations are securely sealed and prevents any snagging on fabrics, which is especially important during your prom night.
Tutorials and Inspirations:
Essie’s Accented Ring Finger: Utilize “Plumberry” for a rich red-pink base and “Good as Gold” for striking gold accents. This combination is perfect for a sophisticated yet bold look.
Swarovski Crystals for a Touch of Elegance: Incorporate different sizes of Swarovski crystals (SS 16, SS 9, SS 5) along the nail’s curve for a refined sparkle that enhances your overall prom attire.
French Ombré with a Twist: Adapt the classic French ombré by adding a single gem on the bling ring finger, merging traditional elegance with modern flair.
9. Gradient French
Gradient French manicure, also known as French ombré, offers a subtle yet stunning twist on the traditional French tip.

Unlike the classic sharp white tip, this design features a soft fade from a pink-nude base to white tips, diffusing the contrast for a more sophisticated look. Popularized by its versatility and timeless appeal, the French ombré has garnered over six million views on platforms like TikTok, proving its widespread popularity.
Step-by-Step Guide to Creating Gradient French Nails
Base Preparation: Start with a clean, buffed nail surface and apply a base coat to protect your nails.
Apply Base Color: Paint your nails with a pink-nude polish and allow it to dry completely.
Prepare the Sponge: On a makeup sponge, apply the pink-nude polish at the base and white polish at the top.
Dab the Gradient: Gently tap the sponge onto your nails, starting close to the cuticle with the pink side and moving towards the tip with the white. The key is to blend the colors smoothly to create the gradient effect.
Repeat for Opacity: Depending on the desired intensity, you may need to repeat steps 2-4.
Finish with Topcoat: Seal your design with a topcoat to enhance the durability and glossiness of your manicure.
Examples and Variations of Gradient French Designs
Classic Take: A traditional approach where a vibrant white tip fades into a soft petal pink base.
Subtle Sheer: Features a barely-there pink fading into a glossy white tip, perfect for a minimalist yet elegant look.
Berry Ombré: A bold variant that blends deep blue, red, and violet shades, ideal for those wanting to make a statement.
Chrome French Ombré: Incorporates a metallic finish, transitioning from a cherry blossom-pink to an eggshell white.
Hot Pink Ombré: A fun, summer-ready style with a striking pink gradient.
The beauty of the Gradient French manicure lies in its adaptability; it can be tailored to match any prom dress or personal style, making it a go-to choice for a polished, prom-ready look.
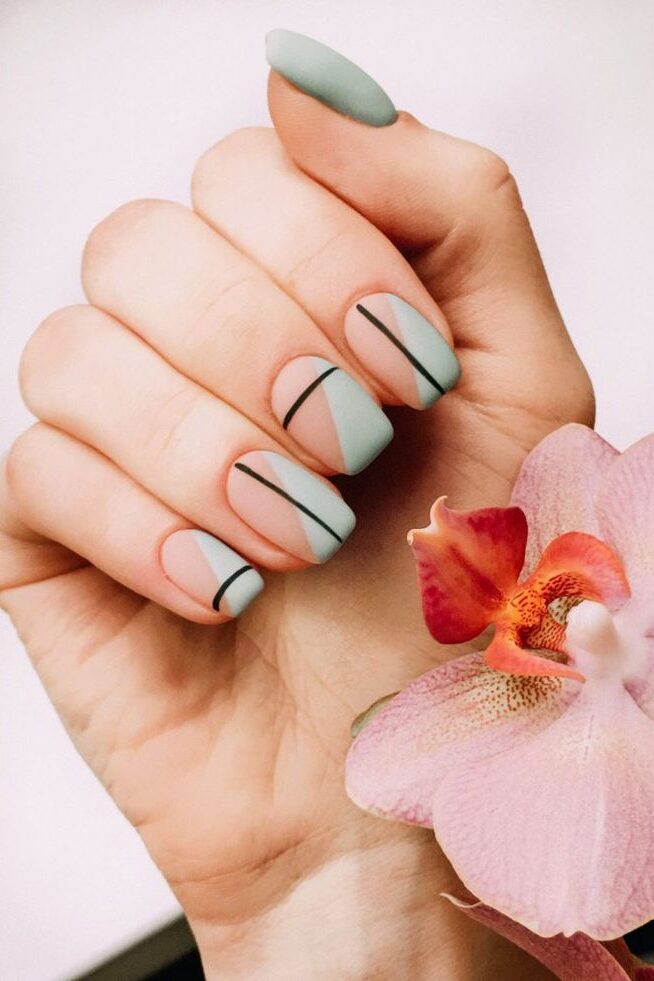
10. Crossed Lines
Explore the striking beauty of crossed lines in nail art, a design that combines elegance with a touch of edgy sophistication.

Step-by-Step Guide to Creating Crossed Lines Nail Art
Base Preparation: Begin by applying a clear base coat to protect your natural nails.
Choose Your Base Color: Apply a base color of your choice and allow it to dry completely. Popular choices include stark white or a bold black to make the crossed lines stand out.
Applying Striping Tape: Place striping tape diagonally across each nail to create a triangle shape on one side of the nail.
Painting the Design: Use a contrasting nail polish color to paint the exposed area. Popular color combinations include black and gold or navy and silver.
Remove the Tape: Carefully peel off the tape to reveal crisp, clean lines.
Add More Lines: With a thin nail art brush, create another line intersecting the first at a 90-degree angle. This cross effect can be enhanced with additional colors if desired.
Seal the Design: Apply a top coat to ensure a glossy finish and to protect your design.
For those seeking a tribal-inspired twist, Eden Univer and Pixie Polish offer a vibrant tutorial using bright colors like turquoise and purple.
This design incorporates thick criss-cross lines, outlined with contrasting colors to highlight the dynamic intersection of lines. The addition of small triangles on either side of the nail adds a unique decorative element that is both eye-catching and stylish.
If you’re looking for a more subtle approach, consider starting with a French manicure in pink as the base. Overlay this with crossed lines in a V-shape using a gray color, and accentuate these lines with a black striper brush for definition.
For a touch of glamour, outline parts of the design with glitter acrylic paint that dries clear, leaving a sparkling effect.
Place a small rhinestone at the center of the crossed lines for a final embellishment that brings a luxurious feel to your prom nails.
11. Animal Print Prowess
Unleash your wild side with Animal Print Prowess, a trend that continues to capture the imagination of fashion enthusiasts and has made a significant mark on prom nail art in 2024.
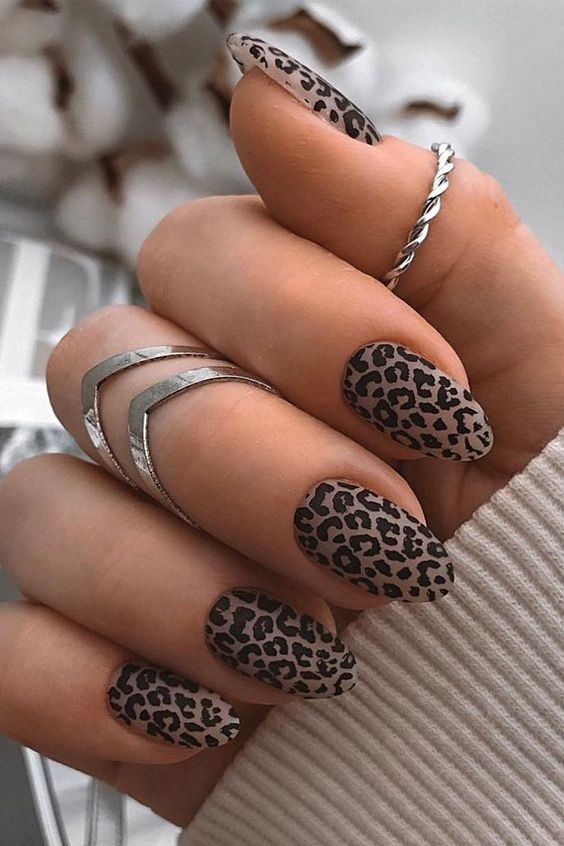
From leopard spots to zebra stripes, these designs bring a touch of the exotic to your prom night ensemble. The popularity of animal prints on platforms like TikTok and Instagram, where they’ve garnered millions of mentions, reflects their widespread appeal.
Popular Animal Print Designs
Leopard Print: Classic and elegant, leopard print nails are a perennial favorite. Incorporate colors like deep reds and chocolate browns for a luxurious look, or try neon leopard for a more vibrant twist.
Zebra and Tiger Stripes: For a bold statement, opt for zebra or tiger stripes. These can be styled in traditional black and white or played up with jewel-tone purples for a pop of color.
Miscellaneous Prints: Other trendy options include croc print, pastel snakeskin, and abstract tortoiseshell. Each offers a unique flair that can be tailored to match your prom dress and accessories.
12. Negative Space Stars
Negative space manicures offer a chic and modern twist to traditional nail art, leaving parts of the nail unpainted to create unique, eye-catching designs.

One striking example is the negative space star design, which can easily be replicated at home. This style involves using nail art stencil stickers strategically placed to expose parts of the natural nail, creating a starry pattern against a colored backdrop.
Technique and Variations
Stencil Use: Apply the stencil sticker to the lower third of the nail, ensuring parts of the natural nail are visible.
Color Application: Paint over the upper two-thirds of the nail, above the stencil, with your chosen polish, such as a deep blue or classic black.
Detailing with a Brush: For a more hands-on approach, use a small detail brush dipped in nail polish remover to etch out star shapes or other patterns, creating a stark contrast with the colored sections.
Mattifying Finish: Apply a mattifying top coat over the entire nail to enhance the visual impact of the negative space and to give the design a modern, sleek look.
Style Adaptations for Prom Attire
White Outfits: Pair with minimalistic designs featuring subtle swirls in negative space to complement the elegance of white dresses or suits.
Earth Tones for Green Outfits: Opt for floral designs in earth-toned colors to enhance green dresses or suits, tying in a natural, organic aesthetic.
Vibrant Touches for Princess or Pink Attire: Introduce pops of bubblegum pink and orange in your negative space designs to match princess dresses or pink suits, adding a playful yet chic element to your prom look.
13. Glitter Flame French
For a dazzling twist on traditional French manicures, the Glitter Flame French style offers a fiery blend of sparkle and elegance, perfect for enhancing your prom night look.
This technique combines the classic simplicity of a French manicure with a burst of glitter, creating a captivating visual effect.
Step-by-Step Guide:
Preparation: Begin by rounding the back end of the nail, buffing down the edges, and filing the free edge for a smooth base.
Base Coat: Apply a base coat of your choice to protect the nail and enhance the adhesion of subsequent layers.
French Tip Base: Use a flesh tone or white polish to create the classic French tip. Clean any excess polish from the sides for a neat finish.
Glitter Application: Apply a layer of holographic glitter from Ocean Nail Supply around the smile line of the French tip. Add a layer of gold glitter from Artsy Fartsy Crafts over the holographic base to create a gradient effect.
Sealing the Design: Use a specific top coat designed for glitter applications to avoid contamination and ensure a glossy finish. Cure under a lamp and then wipe off the inhibition layer.
Application Techniques:
Glitter Types: Utilize a combination of holographic and gold glitters to achieve a multidimensional look.
Top Coat: Opt for a top coat that is compatible with glitter to prevent it from bleeding into the gel.
Curing and Cleaning: Ensure each layer is properly cured under a UV or LED lamp and clean up any stray glitter with a lint-free wipe.
14. Draped French
Draped French manicures elegantly combine the classic charm of French tips with the artistic flair of draped fabric designs.

This style uses gel polish and shellac to create a flowing, fabric-like appearance on the nails, making it a sophisticated choice for prom night.
Customization Options
Customization with Colors and Patterns: You can choose from an array of colors and patterns to personalize your nails. Whether you prefer glitter, pastels, or bold hues, there’s an option to match your prom outfit and personal style.
Techniques and Tips for Draped French Manicure
Using Full Cover Tips: For those looking for a quick fix, full cover tips are available in various sizes from local beauty supply stores or online. These tips can be applied easily and are perfect for last-minute preps.
Accent Designs: Add unique touches such as maple leaf accents for thematic events or choose from fall-inspired designs like geometric patterns in autumnal hues, moons, stars, or 3-D glitz to make your nails stand out.
Nail Shape and Length Adaptability: The draped French design works well with different nail lengths and shapes, allowing you to maintain your personal style while adding a touch of elegance.
15. Confetti Ombre
Confetti Ombre nails blend the playful spirit of confetti with the smooth transition of ombre, making them a standout choice for your prom night.

This design typically utilizes a spectrum of bright colors like hot pink and neon pink, emphasizing a festive look. The process involves layering ultra-fine sparkles and colorful confetti within the gradient, achieving a dazzling effect that catches the light with every movement.
Key Techniques
Base Preparation: Start by prepping the nails. This includes cleaning, dehydrating the nail surface, and applying a base gel to ensure a smooth canvas.
Applying the Confetti: Use Synergy precision applicator tubes to place confetti strategically along the nail, focusing on creating a dense pattern at the base that thins out towards the tip.
Ombre Effect: Blend the confetti with a feathering technique using concealer pink gel, smoothly transitioning into the clear or lightly tinted upper nail area.
Curing and Sealing: Employ a low heat mode for comfort and cure the gel under UV light for a full 60 seconds to secure the design. Finish with a high-gloss top coat to encapsulate the confetti and enhance the ombre effect.
Nail Shapes and Styles
Stiletto and Coffin: These longer shapes provide a larger canvas for the confetti ombre, allowing for a more dramatic gradient.
Round and Almond: Ideal for a subtler confetti effect, suitable for those preferring a more classic prom look.
Square: Offers a modern twist, with the flat tip serving as an excellent stage for showcasing the vibrant confetti details.
16. Neon Accent French Stripe
Neon Accent French Stripe nails offer a bold and vibrant twist on the classic French manicure, incorporating striking neon colors and dynamic stripe patterns to create a modern and eye-catching nail design.
Key Elements and Techniques:
Base Preparation: Begin with a clear base coat to protect your natural nails and provide a smooth canvas for the design.
French Tip Foundation: Apply a neutral or light-colored polish as the base for the French tip. Opt for shades like soft pink, nude, or white to create a contrast with the neon accents.
Neon Stripes: Using neon nail polishes in vibrant shades such as electric blue, neon green, hot pink, or fluorescent yellow, carefully paint thin vertical stripes on each nail. These stripes can be evenly spaced or varied in width for added visual interest.
Accent Details: To further enhance the design, consider adding accent elements such as glitter, rhinestones, or metallic foil between the neon stripes. These details can add depth and texture to the overall look.
French Tip Definition: Once the neon stripes are dry, redefine the French tip using a fine-tipped brush dipped in white polish or a contrasting neon color. This step helps to sharpen the line between the natural nail and the neon accent.
Top Coat Application: Finish the design with a glossy top coat to seal in the colors and provide a smooth, shiny finish. This step also helps to protect the nail art and prolong its longevity.
Styling Tips:
Color Combinations: Experiment with different combinations of neon shades to create a custom look that complements your personal style and outfit for prom night.
Nail Shape: Consider the shape and length of your nails when planning the design. Longer nails provide more space for intricate patterns and details, while shorter nails may benefit from simpler designs with fewer stripes.
Statement Nails: For a more subtle approach, designate one or two nails as statement nails and decorate them with additional embellishments or unique patterns, such as chevrons or polka dots, to create focal points within the design.
17. Metallic Drip Art
Metallic Drip Art offers a stunningly unique approach to prom nail art, combining industrial chic with a touch of elegance.

This style is perfect for complementing silk dresses or suits, particularly when paired with sophisticated matte manicures that feature gold embellishments. Here’s a step-by-step guide to achieving this eye-catching look:
Step-by-Step Guide:
Base Preparation: Start by applying a base coat of cat eye polish, which serves as a great foundation for the metallic elements to adhere. This is followed by DIAMI nail tips for a smooth canoe shape.
Creating the Drip Effect:
Apply Nryan 3D painting gel using a long liner brush to sketch the initial outline of the drip design.
Enhance the texture by applying Jin.B Crazy Top in a squiggly pattern around the nail, which is then cured to set the design.
Metallic Finishing Touches:
Seal the design with a top coat to ensure durability and enhance the shine, making your nails ready for the big night.
Techniques:
Base and Textures: Cat eye polish and Tiny Pudding gel are used to create depth and define lines, ensuring the metallic drips stand out against the base color.
Detailing Tools: A dotting tool and a stubbier brush are essential for adding detailed textures and final touches to the drip design.
Finishing and Care: Don’t forget to apply cuticle oil after completing the manicure to nourish the cuticles and keep your nails healthy under the glamorous design.
18. Color Blocking
Color blocking in nail art is a trend that adds a vibrant and bold aesthetic to your prom night ensemble. By using two or more contrasting colors, you can create a visually striking effect that stands out.
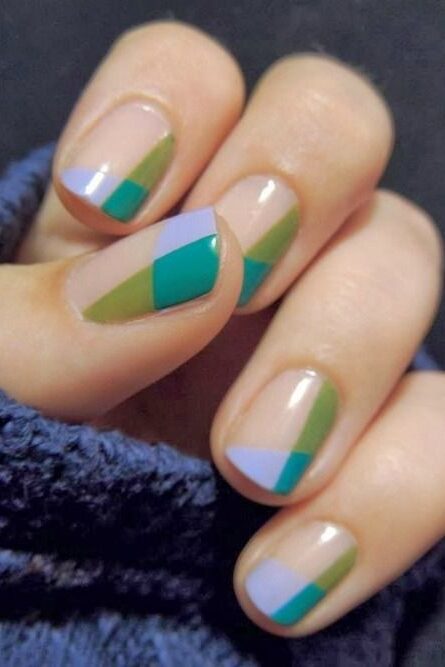
A popular design is the Checkered Nail Art, which incorporates a checkerboard pattern using alternating colors for a playful yet sophisticated look. Another chic option is the Half and Half Nails, where each nail is painted in two distinct colors, dividing the nail into contrasting halves.
For a modern twist on the classic French manicure, try the Black + Gold Tips. This design features elegant black tips over a shimmering gold base, offering a glamorous update to the traditional style.
If you’re looking for something that captures the essence of spring, the Nude and Teal Nails design combines a subtle nude base with vibrant light teal accents, perfect for adding a pop of color.
19. Textured Glitter French
For those looking to dazzle at prom with a sophisticated yet sparkly manicure, the Textured Glitter French manicure is a stellar choice.

This design pairs beautifully with elegant attire such as red dresses or tuxedos, offering a minimalistic dual-color French manicure accented with glitter lining. Here’s how to achieve this look, whether you’re visiting a salon or doing it yourself at home.
Application Steps
Preparation: Start by thoroughly prepping your nails. This includes cleaning, filing, and applying a base coat to ensure optimal adhesion and long-lasting wear. Avoid getting the product on your cuticles to prevent lifting and ensure a professional finish.
Dipping Process:
Base Coat Application: Apply DipWell’s Base & Finish powder and Step 1 Bond to create a strong foundation.
Dipping in Glitter Powder: Use DipWell’s Winter Disco Silver glitter dip powder to dip your nails, creating the textured glitter effect.
Activating and Sealing: Apply Step 3 Activator followed by Step 4 Sealer to set the glitter and add a glossy finish.
Curing and Finishing Touches: Cure the nails under a light if required and apply a top coat to seal in the design and add extra shine.
Customization and Tips
Color Variations: Customize your manicure with different shades of base colors or glitters to match your prom outfit.
Pro Tips: Throughout the application process, follow the PRO TIPS provided in DipWell’s tutorials to achieve the best results. These tips help in perfecting the technique, ensuring that each step is executed with precision.
20. Marble Accent French
Marble Accent French manicures blend the timeless elegance of French tips with the artistic swirls of marble designs, offering a sophisticated choice for your prom night.
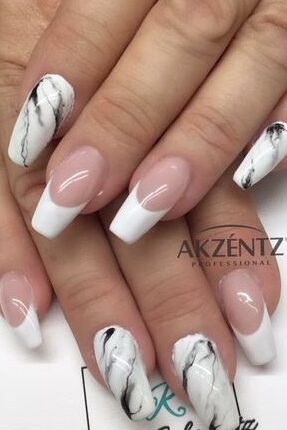
Techniques for Marble Accent French Manicure:
Base Coat: Start with a clean, prepped nail and apply a base coat to protect your nails.
French Tip Application: Paint the tips with a classic white or a shade that complements your chosen marble color.
Marbling Effect:
Apply drops of your chosen marble colors – consider Gelcare UV Gel Nail Polish in shades like Emerald or French Alps.
Use a fine brush or a toothpick to swirl the colors gently to create the marble effect.
Quickly apply a top coat to smooth out the design and add a glossy finish.
Time Required: Whether at a salon or home, expect to spend about an hour to perfect your Marble Accent French manicure.
This style not only enhances your prom night ensemble but also adds a unique artistic touch to your overall appearance, ensuring your nails are as memorable as your evening.
Conclusion
As the prom season draws near, the right choice in nail art can significantly boost your confidence and complement your attire for the big night.
The exploration of various nail art designs, ranging from the elegance of Glossy Midnight Blue to the intricate patterns of Double Dutch Braid Nail Art, offers a world of creativity and style.
Each style, whether it’s the cosmic allure of Galaxy Glam or the subtle sophistication of Marble Accent French manicures, has been designed to enhance your prom night’s look and bring a personalized touch to your ensemble.
Choosing the perfect prom nail art is not just about matching your dress but also about expressing your individuality and style.
Whether you opt for the dazzling sparkle of Textured Glitter French manicures or the modern twist of Color Blocking, these designs ensure your nails make a statement.
Remember, the beauty of your prom night lies in the details, and selecting the right nail art plays a crucial role in creating a memorable, cohesively styled appearance.


You May Also Like
77+ Stunning Butterfly Nail Ideas and Designs of 2024
18 Cute Black & White Summer Nail Ideas to Dazzle Everyone