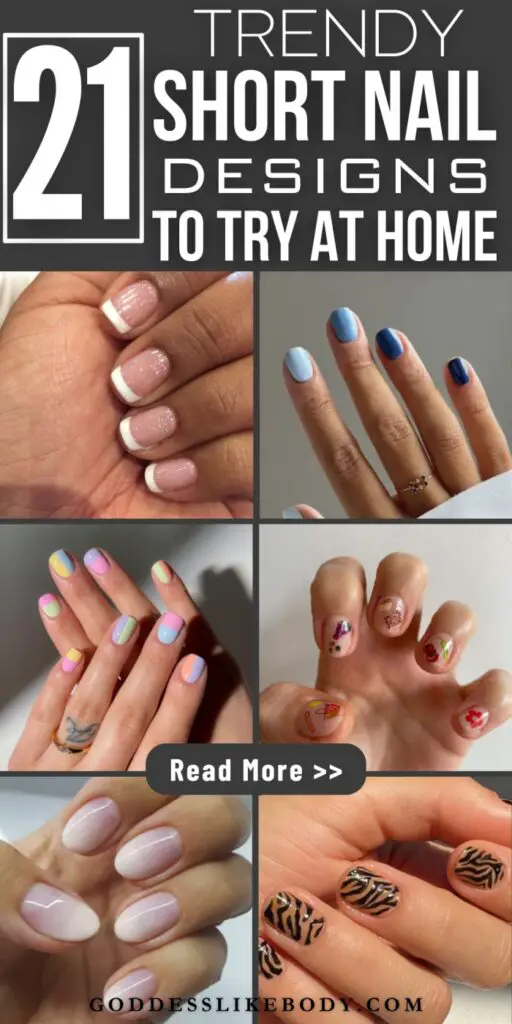
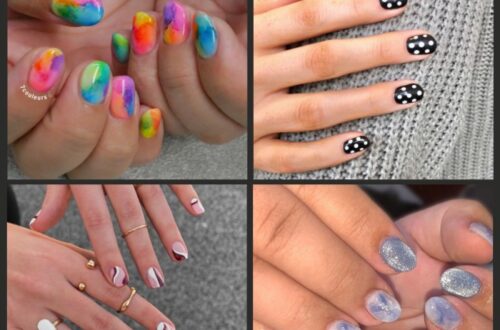
Trendy Short Nail Ideas: 21 Chic Designs to Create At Home
Short nails are proving to be a canvas for creativity and elegance, debunking the myth that chicness is reserved only for long nails.
With the surge in trendy short nail ideas, your nails can now embody sophistication and style, extending your personality right to your fingertips.
Dark manicures, monochrome themes with pops of neon, and minimalist designs not only enhance the clean look of short nails but also make them a statement of classy nails and cute trendy nail ideas.
This year, the spotlight is on trendy short nail designs that range from the subtly elegant to the boldly minimalist, catering to every taste and occasion.
Busy? Save this pin for later.
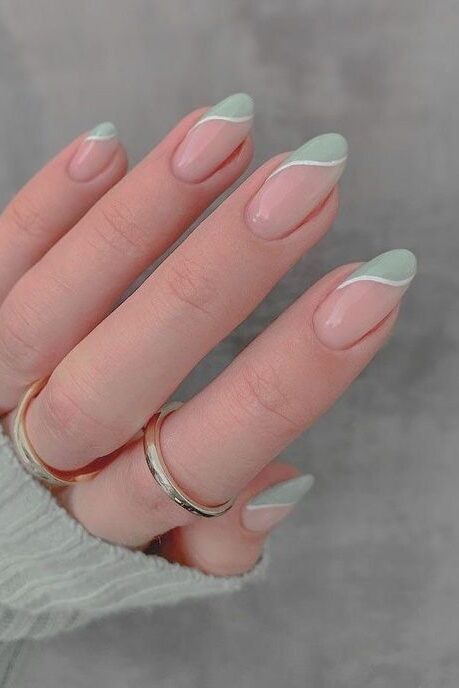
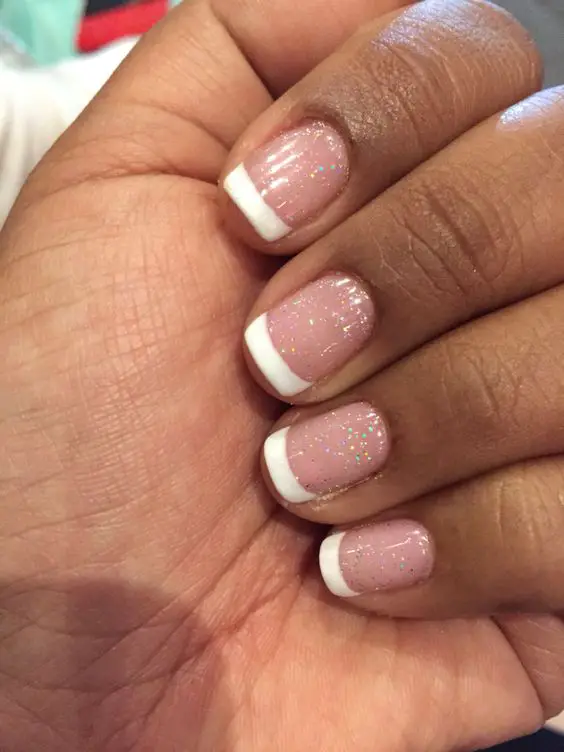
1. Classic French Manicure with a Pop of Color Tip
Revamping the timeless elegance of a classic French manicure can be as simple as adding a splash of color to the tips.
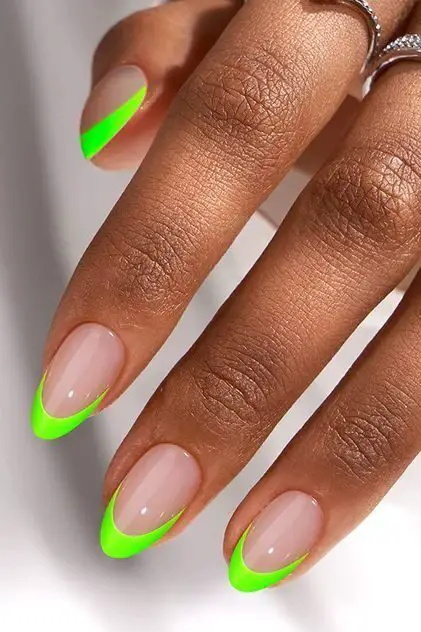
Begin by prepping your nails with a nail file and buffer to ensure a smooth surface. Apply a base coat of nude or light pink polish, which serves as a perfect backdrop for the vibrant tips you’ll add next.
Necessary Tools and Preparation
Nail file and buffer
Base coat
Nude or light pink nail polish
Tape or French tip stencils
Top coat
Cuticle oil
Pointed cotton swabs and nail polish remover for cleanup
Steps to Create a French Manicure at Home
Clean and shape your nails.
Buff and prep the nail plate.
Apply the base color.
Add tape for precision or use French tip stencils.
Paint the tip of the nail with your chosen vibrant color.
Round out the line to ensure a smooth curve at the tip.
Apply a sheer neutral shade to top off the manicure.
Finish with a thin layer of top coat for shine and protection.
Clean up any stray polish with pointed cotton swabs dipped in nail polish remover.
Variations on the Traditional French Manicure
Consider experimenting with V-shaped French tips or an ombré effect to further personalize your nail art. These variations can add a modern twist to the classic design, making your nails a focal point of your style.
2. Minimalist Negative Space with Geometric Shapes
Embrace the art of simplicity with the minimalist negative space nail design, featuring geometric shapes that transform your short nails into a modern masterpiece.
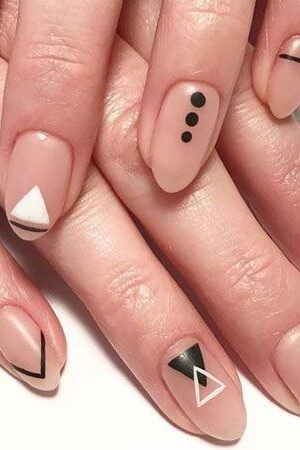
This trend celebrates the untouched beauty of your natural nails by strategically leaving areas unpainted, creating a striking contrast with vibrant and neon shades.
Key Elements of Minimalist Negative Space Design
Base Preparation: Start with a light cream-based color as your foundation, setting the stage for your design.
Geometric Precision: Utilize a 10 mil liner brush to draw precise geometric shapes such as triangles, straight lines, or diagonal strokes.
Color Choices: Experiment with a palette of pink, yellow, green, purple, and blue to fill in selected areas, keeping parts of the natural nail visible.
Contrasting Outlines: Enhance your favorite colors by outlining each nail in a dark, contrasting shade, making the design pop even more.
Layering and Curing: Carefully cure each layer under a UV lamp for 60 seconds to maintain sharp, clean lines, ensuring that each added color does not bleed into the other.
Finishing Touches: Complete the look with a glossy top coat, adding a durable shine that accentuates the negative space and geometric aesthetics.
3. Bold and Glossy Solid Color
Embrace the striking simplicity of a bold and glossy solid color manicure, perfect for those who love a vibrant, eye-catching look without the complexity of intricate designs.
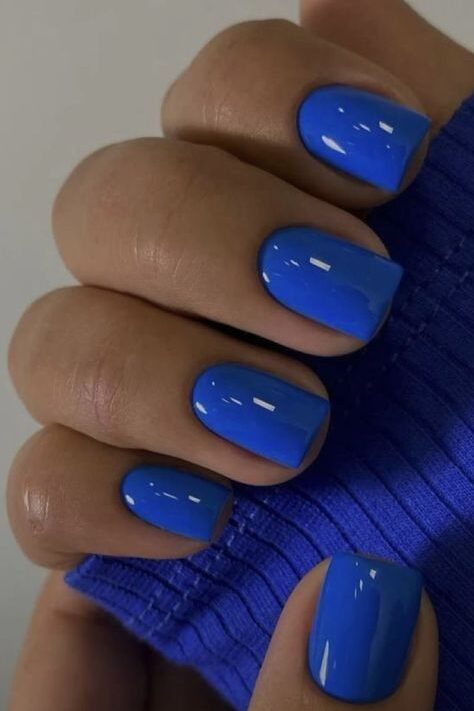
This style not only highlights the beauty of short nails but also offers a versatile canvas for any outfit or occasion.
Essential Steps for a Bold and Glossy Finish
Preparation: Begin by gently pushing back your cuticles with a cuticle pusher, taking care not to damage the nail matrix. Round out the corners of your nails with a 180 grit nail file to prevent breakage.
Nail Buffing: Use a buffer to create a slightly textured surface on the nail plate, which helps the gel polish adhere better.
Cleansing: Apply a nail cleanser (a mix of isopropyl alcohol and acetone) to remove any debris and oil, ensuring the nail plate is completely dry.
Base Coat Application: Apply a thin layer of base coat, making sure to cap the free edge of the nail to prevent lifting.
Color Application: Choose a vibrant, glossy color and apply the first coat evenly across the nail, capping the free edge. After curing under a UV lamp if required, apply a second coat to achieve full opacity.
Top Coat for Shine: Finish with a high-quality top coat to ensure a glossy sheen and additional protection. This step also helps the manicure to self-level and smooth out any minor imperfections.
Final Touches: After the top coat, use a scrubby brush and cleanser to remove any tacky residue, and if necessary, refine the shape of your nail with a file.
4. Glittery Tips for a Night Out
For a dazzling night out, glittery tips on your short nails can elevate your look with a touch of sparkle that catches the light with every gesture.
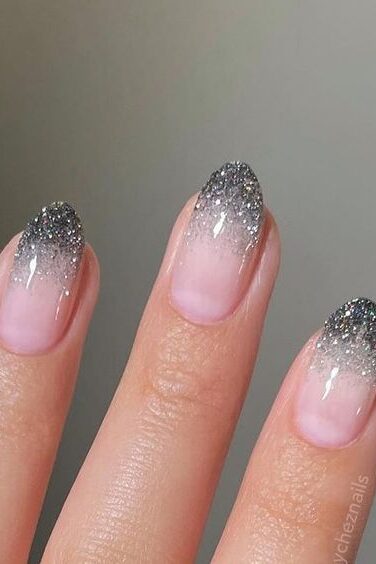
Here’s how you can achieve this glamorous look at home with some basic tools and techniques.
Gather Your Materials
Nail polish: Choose a base coat and a high-quality top coat to start and finish your manicure.
Glitter: Opt for glitter nail polish or loose glitter depending on your preference.
Tools: You’ll need a dotting tool or a small brush for precise glitter application, and nail clippers and a file to shape your nails.
Prepare Your Nails
Trim and file: Use nail clippers to cut your nails to the desired length and shape them with a nail file.
Base coat: Apply a thin layer of base coat and allow it to dry completely to protect your nails and enhance the adherence of the glitter.
Apply the Glitter
Mix your glitter: If using loose glitter, mix it with the top coat on a resin plate. For glitter nail polish, shake well before use.
Application technique: Use a flat nail art brush to apply the glitter mixture to the tips of your nails. If you prefer a gradient effect, lightly drag the brush from the tip towards the nail bed.
Let it dry: Allow the glitter to set and dry completely before moving to the final steps.
Seal the Design
Top coat: Apply a clear top coat to seal in the glitter. This not only protects your design but also gives it a smooth, glossy finish.
Cleanup: Use a cotton swab dipped in nail polish remover to clean any glitter off your skin.
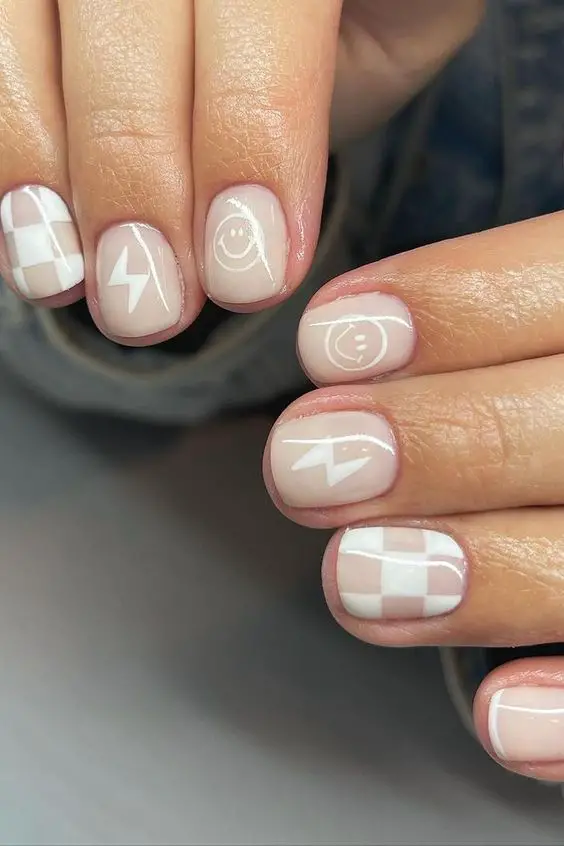
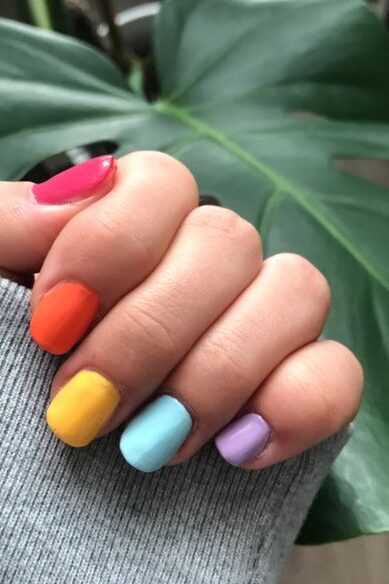
5. Mismatched Pastel Palette for a Playful Look
Embrace a playful and vibrant aesthetic with the mismatched pastel palette design.

This style allows you to experiment with a spectrum of soothing pastels, each nail showcasing a different hue for a fun and eclectic appearance. Here’s a quick guide to achieving this charming look:
Pastel Checkers
Revitalize the classic checkerboard pattern by incorporating pastel shades. Alternate between two pastel colors across the nails to create a modern twist on this timeless design.
Pastel Mismatch (05/39)
Why settle for one when you can enjoy multiple? Apply a unique pastel shade to each nail, or even mix different shades on the same nail. This technique not only highlights individuality but also harmonizes beautifully across your hands.
Pastel Tips
Modify the traditional French manicure by adorning your nail tips with various pastel colors. This subtle yet striking variation adds a contemporary edge to a classic style, perfect for those looking to subtly introduce color into their look.
6. Marbleized Nails with a Hint of Shimmer
Marbleized nails with a hint of shimmer offer a luxurious and artistic touch that elevates the style of any ensemble.
This nail art trend combines the natural elegance of marble patterns with the glamorous sparkle of shimmer, creating a captivating visual effect. Here’s how you can achieve this sophisticated look:
Essential Materials
Milky white gel polish
Three gel colors of choice
Gold glitter
Orange wood stick
Nail lamp
Step-by-Step Guide
Base Preparation: Start by applying a milky white gel polish as your base and cure it under a nail lamp to set the foundation for your design.
Creating the Marble Effect: On a tile, place three gel colors and use an orange wood stick to swirl them slightly. Scoop up the colors and zigzag them down the nail for that classic marble look.
Adding Shimmer: After curing the base marble design, sprinkle some gold glitter for an enhanced shimmer effect that catches the light beautifully.
Layering Colors: For a more intense marble effect, apply two colors in stripes on a palette, swirl them together, and then gently guide the mixture onto the nail, allowing it to naturally fall and settle into a marble pattern.
Final Touches: Cure the final design under a nail lamp and finish with a top coat to seal in the intricate details and ensure a glossy, durable finish.
7. Delicate Floral Watercolors for a Dreamy Touch
Embrace the ethereal charm of delicate floral watercolors, transforming your short nails into a canvas of dreamy, romantic motifs.
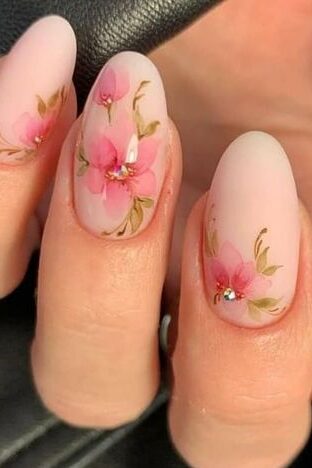
This style captures the essence of spring and femininity, making it a perfect choice for those who appreciate subtle beauty with a touch of artistic flair.
Floral Watercolor Techniques
Base Coat Application: Start by applying two thin layers of a pale blue polish, like Lily of the Nile, and cure under a lamp to set a serene backdrop.
Flower Outlining: Use a Sharpie to sketch gentle flower shapes on each nail, creating a base for your watercolor art.
Coloring the Flowers: Dip a 3D brush in alcohol and gently dab on the Sharpie outlines, letting the alcohol blend the ink into soft, watercolor-like strokes.
Adding Details: Enhance the floral designs by using a thin brush with black polish to add delicate lines, giving depth and detail to each petal.
Green Accents: Apply green Sharpie marks to mimic leaves and disperse the ink with alcohol for a seamless integration into the floral theme.
Top Coat for Shine: Finish with a Cosmic top coat gel to add a glittery, glamorous effect that also protects your artwork.
8. Textured Matte Finish for a Modern Look
Embrace the understated elegance of a textured matte finish, a style that stands out through its simplicity and tactile feel.
This design is perfect for adding a contemporary edge to your nail art repertoire, combining the sophistication of matte textures with the innovative use of materials to create a visually stunning effect.
Preparation and Application
Base Coat: Begin with a protein bond base coat to ensure the gel polish adheres well and minimizes chipping.
Gel Polish Application: Apply a thin layer of black gel polish. Cure under light for 30 seconds, then apply a second coat for a rich, even coverage.
Top Coat: Use a tack-free top coat to create a smooth canvas, curing it for a full 60 seconds to seal the gel polish.
Creating the Matte Effect
Matte Options: You can either use a pre-made matte nail polish or apply a matte topcoat over your existing gel polish. Both methods provide that sought-after flat finish.
DIY Matte Topcoat: For a homemade solution, mix clear topcoat with a pinch of eyeshadow powder to achieve a custom matte look.
Alternative Matte Methods: Incorporate household items like cornstarch or baby powder into your nail polish before application to create a matte effect.
Achieving Texture
Textured Finish: To add texture, apply a speed clear acrylic over the striping gels. Make sure to cover the striping paint completely, giving your nails an appealing matte and textured finish.
Buffing Technique: For an alternative approach, gently buff the top layer of dried nail polish with an extra-fine nail buffer to remove the shine, enhancing the matte texture.
9. Two-Toned Short Nails with Contrasting Colors
Embrace the striking contrast and simplicity of two-toned short nails, a trend that captures both elegance and playful creativity.
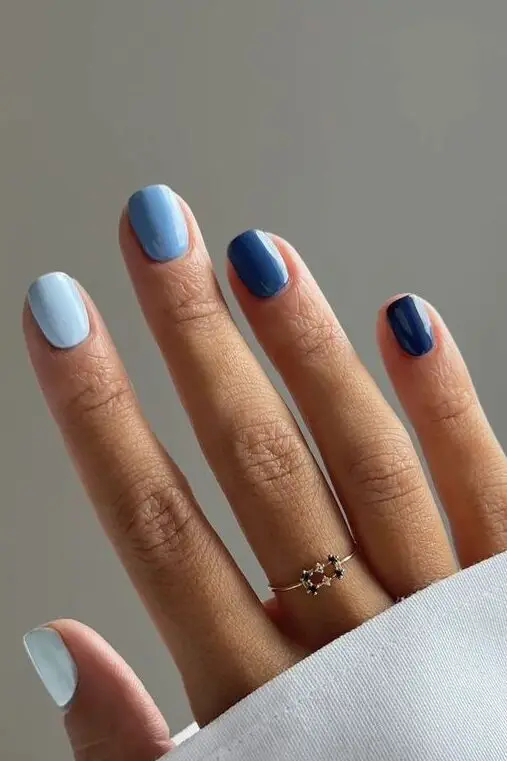
This style is perfect for those who love to express their personality through their manicure but prefer to keep their nails short and manageable.
With a variety of color combinations available, you can customize your nails to fit any occasion or mood.
Bright Duality with Contrasting Colors
Choose Your Colors: Opt for bold or subtle contrasts depending on your personal style. Popular combinations include classic black and white, deep blue and metallic gold, or soft pastel hues for a more understated look.
Application Technique: Paint one half of each nail in one color and the other half in a contrasting shade. You can choose a vertical split or a diagonal one to add an interesting twist to your nails.
Finish and Style: Consider a glossy top coat to enhance the vibrancy of the colors or a matte finish for a modern, sophisticated look.
Seasonal and Thematic Variations
Winter Elegance: Try combinations like silver and navy blue to reflect the icy tones of winter.
Summer Vibes: Bright yellow paired with crisp white can capture the essence of summer.
Autumn Richness: Combine maroon and gold for a warm, luxurious feel suitable for fall.
DIY Options and Trends
Brands like Revel Nail provide dip powder kits that allow you to achieve professional-looking two-toned nails at home.
10. Minimalist Dots for a Simple Yet Chic Design
Embrace the elegance of simplicity with the minimalist dots nail design, a trend that combines understated beauty with a touch of personal flair.
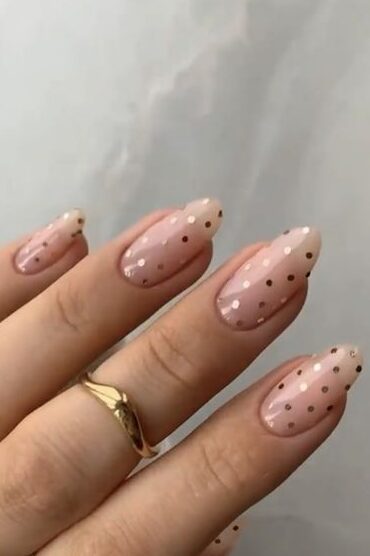
This design is incredibly versatile, easily customizable, and perfect for those who prefer a subtle yet stylish look. Here’s a glimpse into some of the most popular minimalist dot designs that you can try at home.
Popular Minimalist Dot Designs
Classic Dots: Start with a glossy nude base and add a single black dot at the center of each nail for a striking contrast.
Electric Dots: Enhance a French tip by adding small, vibrant red and yellow dots for a playful yet refined look.
Ombré Dots: Create a gradient effect by using dots that transition in color from the cuticle to the tip of the nail.
Burgundy and Black Dots: Pair burgundy French tips with simple black dots for an elegant and cohesive design.
Mismatched Dots: Experiment with black dots on one hand and multi-color stripes on the other for a bold, asymmetrical appeal.
Baby Blues: Apply a nude polish base and dot it with serene baby blue at the base of each nail, perfect for a soft, dreamy vibe.
Double Dots: Place two blue dots against a milky pink base for a simple yet impactful visual effect.
Why Choose Minimalist Dots?
Versatility: Suitable for various nail types, including matte, gel, and shellac nails.
Customizability: Mix and match colors and patterns to suit your style or mood.
Ease of Application: Achievable at home with basic tools like a dotting tool or even a bobby pin.
11. Chrome Nails for a Touch of Edgy Glamour
Chrome nails bring a sleek, mirror-like finish that transforms your short nails into a dazzling accessory.
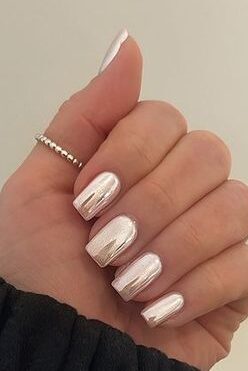
This trend captures the essence of modern elegance with its reflective surface and the illusion of a smooth, metallic coating. Here’s how you can achieve this glamorous look with precision and flair:
Essential Materials and Preparation
Gel polish (preferably black): Provides a dark, uniform base that enhances the chrome effect.
No-wipe gel top coat: Ensures better adhesion of the chrome powder.
Chrome powder: Key to achieving that coveted mirror finish.
Makeup sponge or eyeshadow applicator: For applying the chrome powder evenly.
UV or LED lamp: To cure the gel polish and top coat.
Step-by-Step Application
Base Prep: Apply a smooth layer of black gel polish and cure it under the lamp. This step is crucial as the dark base will make the chrome pop.
Top Coat Application: Use a no-wipe gel top coat for a seamless surface that the chrome powder can adhere to. Cure it as well without leaving any tacky residue.
Chrome Powder Application: Gently rub the chrome powder onto the nail using a makeup sponge or an eyeshadow applicator. Ensure even coverage to prevent patchy areas.
Excess Powder Removal: Brush off any excess powder with a fluffy brush to reveal a smooth, shiny finish.
Final Cure and Seal: Cure the chrome layer under the lamp to set everything in place. Apply another layer of the no-wipe top coat and cure again to seal the chrome powder, enhancing durability and shine.
12. Ombré with a Subtle Gradient for Short Nails
Embrace the subtle elegance of ombré nails, a design that seamlessly blends two colors to create a stunning gradient effect.
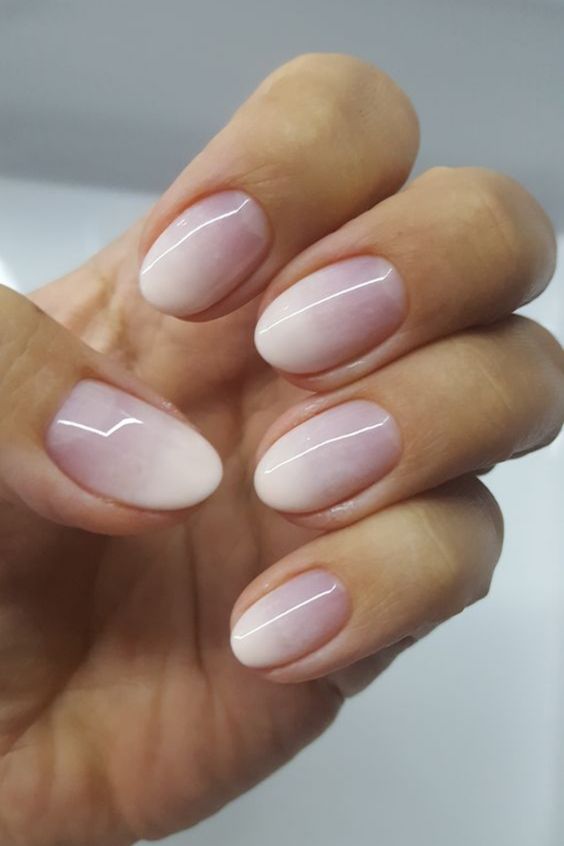
This technique is perfect for those who love a sophisticated yet understated look. Here’s how you can achieve this captivating aesthetic on your short nails:
Choosing Your Colors
Selecting the right colors is crucial for a smooth transition. Opt for shades that are close to each other on the color wheel to ensure a harmonious blend. For a classic look, you might choose a soft pink fading into a warm peach.
Preparation
Base Coat: Start with a clear base coat to protect your nails and enhance the adherence of the colors.
Cuticle Care: Gently push back your cuticles for a clean nail surface, ensuring the polish applies smoothly.
Creating the Gradient
Apply the Base Color: Paint your entire nail with the lighter color as the base. Let it dry completely.
Sponge Technique: Use a makeup sponge to apply the second, darker color. Dab it lightly starting from the tip, working your way down to the middle of the nail.
Blend: While the polish is still wet, softly dab the area where the two colors meet to create a seamless gradient effect.
Finishing Touches
Top Coat: Apply a clear top coat to enhance the shine and prolong the wear of your ombré nails.
Clean Up: Use a small brush dipped in nail polish remover to clean up any polish out of place around the nail edges.
13. French Manicure with Metallic Accents
Embrace the elegance of a French manicure with metallic accents, a modern twist on the classic style that infuses a touch of glamour into your look.
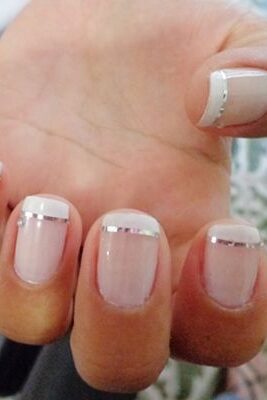
This design elevates the traditional French tip with the addition of silver or gold, creating a chic and sophisticated appearance. Here’s how to achieve this trendy nail art:
Preparation and Base Color
Softening the Cuticle: Begin by softening the cuticle area with a cuticle cream or oil.
Pushing Back Cuticles: Gently push back the cuticles to create a clean nail surface.
Trimming and Cleaning: Trim any excess skin and clean the area thoroughly.
Filing: Shape your nails with a file to your desired shape and smoothness.
Applying Base Color: Paint your nails with a cool-toned pink polish as a base to set a subtle yet striking canvas.
Adding Metallic Accents
Silver or Gold Tips: Opt for a silver or gold polish for the tips. Use a striping brush for precision or a stamping tool for consistency.
Adding Textures and Decals: Enhance the metallic tips with textures like glitter or small decals such as stars and pearls.
Abstract Designs: For a more artistic flair, create abstract designs using a small detailer brush or foil for a mixed-metal effect.
Sealing the Design
Matte Topcoat: Apply a matte topcoat over the design to contrast the shiny metallics, adding an intriguing visual element.
Cuticle Oil: Finish by moisturizing the cuticles with oil to keep your nails healthy and shiny.
14. French Tip with a Twist (wavy line, glitter, etc.)
Embrace a fresh take on the classic French manicure with these inventive twists that infuse your nails with personality and style.
From the subtle artistry of watercolor tips to the boldness of neon geometrics, each design offers a unique way to enhance the traditional French tip.
Velvet Tips
Combine the luxurious feel of velvet nails with traditional French tips for a sophisticated look. The velvet texture adds a touch of glamour and depth, making it a perfect choice for evening events.
Pop Culture Inspiration
Incorporate elements from your favorite shows or characters with Sailor Moon or Disney-inspired French tips. These designs use iconic colors and motifs to celebrate fandom in a chic, understated way.
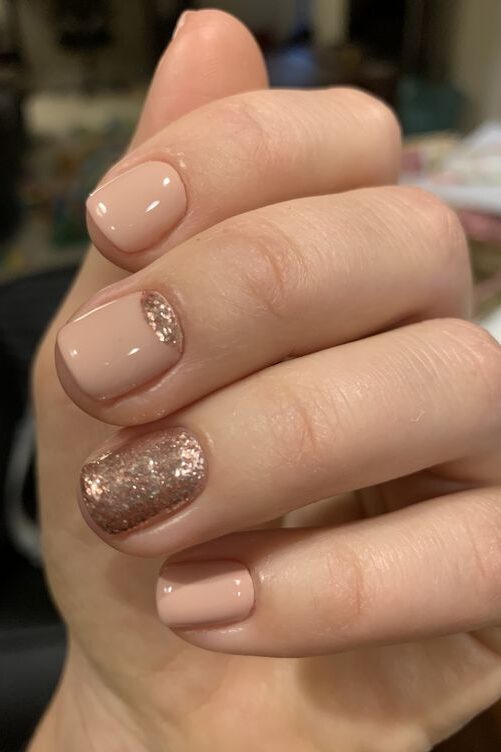
Accent Nails
Highlight one or more nails with a contrasting design, such as a single glitter nail or a different pattern on the ring finger, to add an element of surprise to your manicure.
Color Block
Adopt a color block technique by using bold, solid colors on the tips. This modern approach stands out for its simplicity and vibrant contrast.
Sophisticated Ceramics
Draw inspiration from ceramic art with designs that mimic intricate pottery and sculpture, adding an artistic flair to your nails.
Neon and Geometric
For those who love a splash of color, neon tips combined with sharp geometric patterns can make your nails pop with an edgy, contemporary look.
Floral and Watercolor
Soften your style with delicate floral patterns or blend multiple polish shades for a dreamy watercolor effect that mimics the gentle flow of colors.
Unexpected Textures
Experiment with different materials like sequins or 3D elements to add texture and dimension to your French tips, creating a tactile and visually engaging design.
15. Graphic Nail Art with Lines or Shapes
Graphic nail art with lines or shapes offers a bold and creative way to express your unique style through your manicure.
This trend focuses on the aesthetics of each design, using vivid colors and intricate patterns to make a statement.
Light and Feathery Strokes
Bold Colors: Incorporate vibrant hues to add a dynamic pop to your nails.
Feathery Touch: Use a thin brush to create delicate, light strokes that give a sense of movement and elegance.
Combination of Pink and Burgundy
Base Colors: Start with a light pink base, adding deep burgundy at the tips or in selected areas.
Star Accents: Sprinkle small, eye-catching star decals for a stunning night-sky effect.
Doodle Nails
Personal Canvas: Treat each nail as a mini notebook where you can sketch tiny doodles like yin and yang symbols, swirls, or checkerboards.
Creative Freedom: Let your imagination guide the design, making each nail a unique piece of art.
Abstract Swiggles
Color Smattering: Combine various colors in an abstract fashion across the nails.
Negative Space: Maintain areas of untouched nail to prevent the design from feeling too overwhelming.
Geometry Nails
Sharp Lines: Use tape or stencils to create clean, geometric shapes such as triangles or rectangles.
Contrasting Colors: Pair light and dark shades to enhance the geometric effect.
16. Animal Print for a Fun and Trendy Look
Animal print designs on nails are not just a style statement; they are a celebration of wild beauty and individual expression.
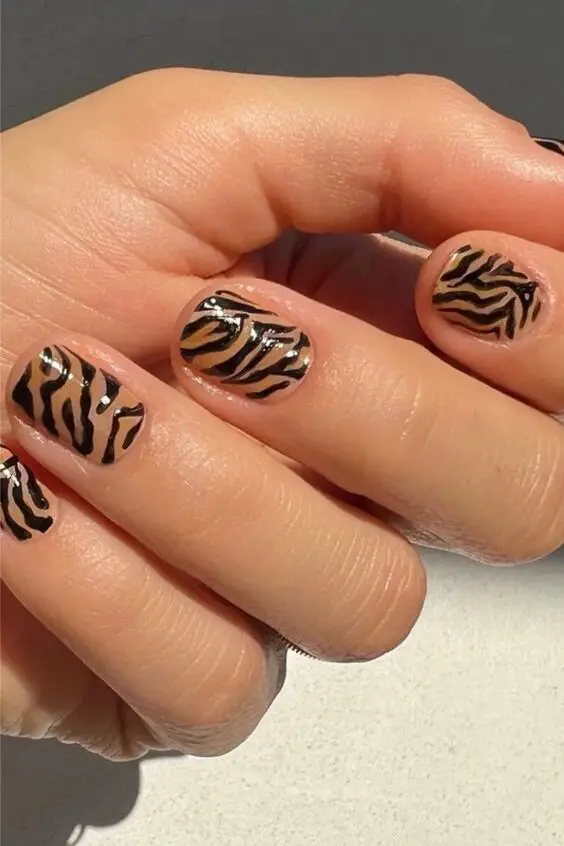
This design trend captures the essence of the animal kingdom with patterns that range from the bold stripes of a tiger to the intricate spots of a leopard.
Embracing the Wild with Style
Leopard Print Elegance: Begin with a base of beige or light brown, mimicking the natural background of a leopard. Using a detail brush, add dark brown or black spots in random, overlapping patterns that resemble the unique markings of a leopard.
Zebra Stripes Chic: Start with a pristine white base and use a striping brush to draw bold, black vertical stripes. This design is all about precision and contrast, perfect for those who love a graphic and minimalist look.
Tiger Stripes Adventure: Apply a warm orange base and add black, perpendicular stripes with a detailing brush. The vibrant base color with striking black accents creates a dynamic and fierce appearance.
Playful Cheetah Spots: After a nude base, use a thin brush to paint small, irregular black stripes that cluster into the iconic cheetah pattern. This look is whimsical and perfect for adding a playful touch to your style.
Creative Twists on Classic Patterns
Colorful Leopard Print: For a fun twist, use two different vibrant colors for the spots before outlining them in black. This variation adds a modern and youthful vibe to the traditional leopard print.
Metallic Accents: Incorporate metallic polishes like gold or silver to outline traditional animal prints, adding a luxurious finish that catches the light beautifully.
17. French Manicure with a Jewel Accent
Elevate the classic French manicure by incorporating a jewel accent, blending timeless elegance with a touch of modern glamour.
This design, popularized by Patty Valdez on Pinterest, where it garners significant attention, showcases how a simple addition can transform a traditional look into something spectacular.
Jewel Accent Inspiration
Ombré Effect with Jewels: Start with an ombré base fading from soft pink to white, topped with a sparkling jewel on the ring finger for a standout look.
Rhinestone French Nails: Adorn the classic white tips with small rhinestones along the smile line for a refined sparkle.
Bold and Bedazzled: For those who love a dramatic flair, opt for larger rhinestones or crystals placed strategically across the nails.
Subtle Elegance: A single tiny gem placed at the base of the nail adds a subtle yet chic touch, perfect for everyday glamour.
Popular Rhinestone Designs
Colorful Rhinestones on Nude: A shimmery nude base with multicolored stones creates a playful yet sophisticated look.
Royal Rhinestone Nails: Combine deep blues and purples with silver gems for a regal effect.
Glam French Rhinestone Nails: Mix classic French tips with a full nail of glitter and rhinestones for a glamorous night out.
18. Mismatched Neon Colors for a Summer Vibe
Neon nails are more than just a trend; they’re a vibrant expression of personality, particularly popular during the summer months.
Here are some exciting ways to incorporate neon into your nail art:
Diverse Neon Designs
Doodle Nails: Each nail becomes a mini canvas. Tiny doodles, whether abstract shapes or miniature symbols, add a whimsical touch.
Mixed Stickers: Combining different prints like stripes, polka dots, and abstract shapes can create an eye-catching and easy-to-achieve look.
Purple Party Nails: Stick to a purple color palette but vary the patterns—think stripes on one nail, polka dots on another.
Metallic Gradient: Introduce a luxurious feel by breaking up a neon gradient with gold and holographic polishes.
Poppy Flowers: Simple yet charming, this design uses a dotting tool or a bobby pin to dot vibrant colors into floral shapes.
Neutral Patterns: For a sophisticated twist, pair bold neon hues with neutral patterns for a chic contrast.
Mismatched Tips: Combine various trends like ombré and geometric shapes for a dynamic and modern look.
Ombré Dots: Create a fun gradient effect with polka dots that decrease in size or change color across each nail.
Outline Nails: Highlight your favorite neon shades by outlining each nail in a dark, contrasting color for added drama.
Tonal Gradient: This simple technique involves using varying shades of the same color for a harmonious yet vibrant effect.
19. Glitter French Tip with a Delicate Touch
For a touch of elegance that sparkles subtly, the Glitter French Tip with a Delicate Touch is a perfect choice.
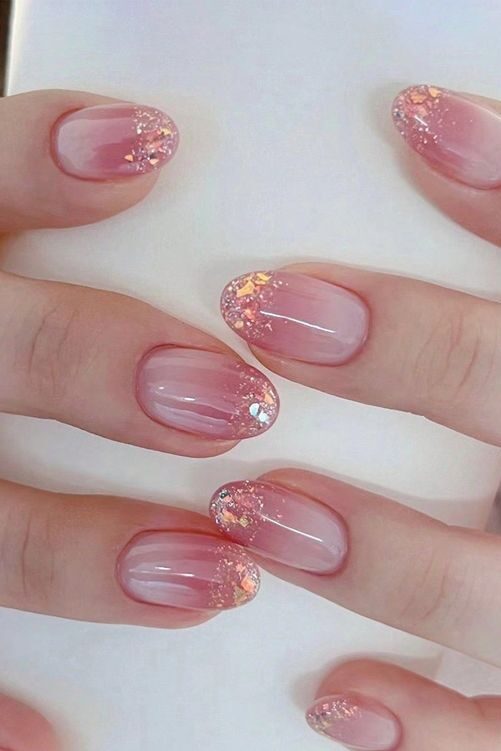
This design enhances the classic French manicure by adding a shimmering twist that catches the light beautifully. Here’s how you can achieve this look:
Step-by-Step Application
Base Preparation: Start by applying a layer of base liquid on your nails. This helps in securing the glitter that you will apply next.
Dipping into Glitter: Dip your nail into the glitter powder, ensuring that the coverage extends up to the sidewalls for a uniform look.
Removing Excess: Gently tap off any excess glitter. Use a toothpick to carefully remove stray glitter flecks, maintaining the neatness of your design.
Second Layer for Definition: Repeat the process for a second layer. Use the first layer as a guide to perfect the smile line, enhancing the classic French tip shape.
Sealing the Design: After the base liquid dries, apply a layer of clear dip powder. This step is crucial as it seals the glitter, preventing it from flaking off.
Smoothing the Surface: Use a file and a buffing block to remove any bulk and smooth the surface of your nails, preparing them for the final touches.
Top Coat for Shine: Apply a generous layer of no-wipe top coat. This not only adds a brilliant shine but also creates the sugar effect where the glitter sparkles intensely.
Curing and Cleaning: Cure the design under a lamp for 60 seconds. Afterwards, use a dust brush to remove any remaining loose glitter.
Tips for Perfect Glitter Tips
Maintain Crisp Lines: Throughout the application, ensure that the smile lines are crisp and well-defined.
Even Glitter Coverage: Make sure the glitter is evenly distributed on the tips, avoiding any patchy areas.
Matte Finish Indication: The crystal glass acrylic should be fully capped, which is indicated by a matte finish before the final glossy top coat is applied.
Suitability for Special Occasions: This technique is particularly suitable for a bridal set of nails, offering a luxurious yet understated look.
20. Textured French Manicure for Added Depth
To create a textured French manicure that adds depth and a unique aesthetic to your short nails, follow these detailed steps.
This design not only enhances the classic French manicure but also injects a touch of modern sophistication with its layered textures.
Step-by-Step Guide to a Textured French Manicure
Nail Preparation: Start by shaping your nails to your desired style. Ensure they are clean and free from any old polish.
Base Coat Application: Apply a protective base coat to help the polish adhere better and to prevent staining.
White Tip Creation: Using a skinny brush, paint a crisp white tip on each nail. For a more natural look on shorter nails, opt for a soft white shade.
Application Technique: Apply the white tip with short strokes, starting from one corner of the nail to the center, then repeating from the other side.
Pink Polish Application: Fill in the rest of the nail with a sheer or natural pink polish, which complements the white tip beautifully.
Adding Texture: For the textured look, you can use gel polish, gel paint, or even 3D decals. These add a dimensional element to the manicure.
Deep French Design: For added depth, consider using a darker color like brown for the tips. Draw two lines down the sides of each nail, connecting them with a horizontal line across the tip.
Custom Touches: Personalize your manicure by adding designs like a Louis Vuitton logo or other creative nail art within the textured areas.
Top Coat Application: Seal everything in with a glossy top coat to enhance the shine and ensure the longevity of your manicure.
Cleanup: Use a small brush dipped in nail polish remover to clean up any imperfections around the edges of your nails.
21. Decal Art with Tiny Stickers or Nail Art Transfers
Decal art provides an exciting avenue to express your unique style through tiny stickers or nail art transfers, allowing you to transform your short nails into miniature masterpieces.
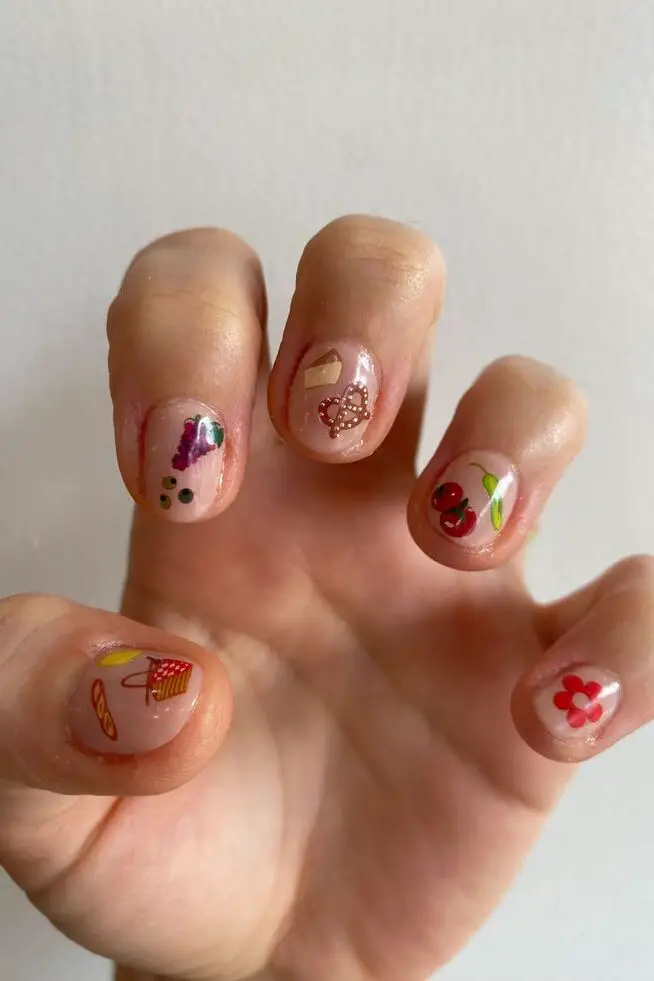
Here’s a straightforward guide to achieving chic and stylish nail designs at home using decals:
Essential Tools and Materials
Nail stickers or water decals
Top coat and base coat
Cuticle oil
Nail polish remover
Scissors and tweezers
Flat saucer or dish
Paper towel
Application Process
Prepare Your Nails: Ensure your nails are clean and dry. Apply a base coat and let it dry completely.
Choose Your Decals: Select decals that complement your style. Popular choices include palm fronds, scenic peaks, and playful designs like hearts and rainbows.
Apply the Decal: Using tweezers, carefully lift the sticker from its sheet and position it on your nail. Smooth it from the center to the edges to remove any air bubbles.
Seal the Design: Trim any excess decal with small scissors. Apply a top coat to seal the decal onto your nail, ensuring the edges are covered.
Dry and Finish: Allow your nails to dry thoroughly. For added nourishment, apply cuticle oil to your nails and hands..
Final Thoughts
As we wrap up our exploration of the 21 chic nail designs for short nails, it becomes clear that the possibilities for creativity and expression are endless.
Each design, with its unique blend of colors, textures, and aesthetics, offers a vibrant palette through which personal style can be articulated.
From the sophisticated glimmer of chrome nails to the playful vibe of mismatched neon colors, these trends are not just about fashion; they invite us on a journey of self-expression.
As these chic designs illuminate, the smallest canvas can host the most impactful statements. Embrace these nail trends as a medium to indulge in the artistry of self-expression, experimenting with the diverse spectrum of designs to find those that resonate most with your unique style.

You May Also Like
20 Prettiest Short Nail Trends This Year
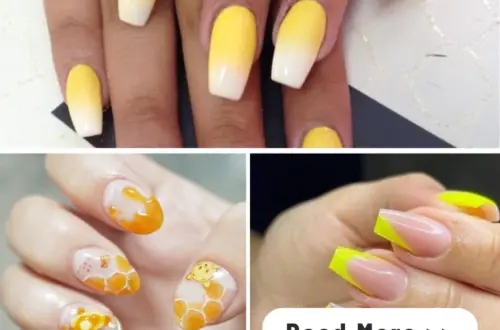
Yellow Nail Designs for Summer: 19 Cute Ideas to Try
