19 Prettiest Summer Hairstyle Ideas for Shoulder Length Hair
As the seasons change, so does the desire to refresh our look, especially when it comes to hair. Shoulder length hair serves as the perfect canvas for versatility, striking a balance between the ease of short hair and the styling flexibility of long tresses.
Diving into the realm of summer hairstyle ideas for shoulder length hair, this post unfolds a collection of 19 exquisite hairstyles designed to elevate your summer look.
Busy? Save this pin for later.

1. Textured Ponytail with Ribbon Accent
A textured ponytail with a ribbon accent offers a chic and playful twist to a classic hairstyle, perfect for shoulder-length hair during the summer months.
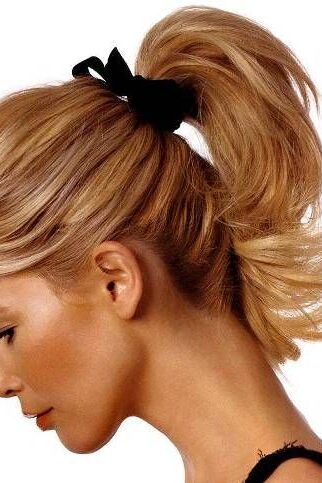
This style starts by creating a base of soft, natural waves to add texture and volume. Using a curling iron or a flat iron, gently twist sections of the hair to achieve loose curls.
Once the waves are set, gather the hair into a mid-height ponytail, ensuring some strands are left slightly loose to enhance the textured look.
The distinctive element of this hairstyle is the ribbon accent. Choose a ribbon that complements your outfit or adds a pop of color for a fun summer vibe.
Secure the ribbon around the base of the ponytail, tying it into a bow at the back or side.
2. Headband Braid
The allure of the headband braid for shoulder-length hair lies in its simplicity and elegance, making it a favorite for those seeking a chic summer style.
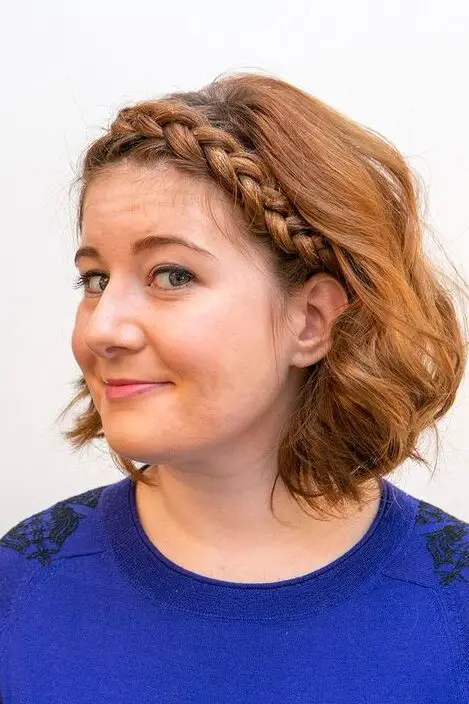
This hairstyle starts by parting the hair down the center, then sectioning off about three inches from the front, running the part down to the ear. This front section is then twisted and clipped away to keep it neat while you work on the braid.
For the headband braid, you can choose from several styles, such as the Dutch braid, known for its pronounced, dimensional appearance as it pops outward from the head, adding texture to the look.
Alternatively, the rope twist offers a straightforward approach where hair is divided into two sections, twisted around each other, ensuring it’s tight and secure.
The fishtail braid provides a more intricate and unique pattern, ideal for those who enjoy a detailed aesthetic.
To execute these braids, begin by taking small sections from the front, gradually incorporating more hair into the braid as you move along the hairline towards the back of the ear.
This technique helps in keeping the braid tight and neat. Once all the hair is braided, secure the ends with a bobby pin, tucking them under the rest of the hair to conceal any loose ends.
3. Textured Lob with Face-Framing Layers
Summer brings with it the perfect opportunity to refresh your look with a fun and stylish hairstyle.

The textured lob, characterized by its shoulder-grazing length, emerges as an ideal choice for those warm, sunny days.
This versatile haircut strikes the perfect balance between short and medium length, making it a fantastic option for anyone looking to add a touch of sophistication and ease to their summer ensemble.
What sets this particular style apart are the face-framing layers that add dimension and movement to the hair, drawing attention to the facial features in a flattering manner.
Whether your hair is thick or fine, curly or straight, incorporating layers around the face can significantly enhance your overall appearance.
These layers are not only aesthetically pleasing but also offer a multitude of styling options, from sleek and straight to bouncy and voluminous curls.
For those with a penchant for color, the textured lob provides an excellent canvas for experimentation. Highlights or lowlights can be added to the layers, creating depth and contrast that illuminate the face beautifully.
Moreover, this hairstyle is incredibly low maintenance, making it a go-to choice for individuals with a busy lifestyle or those simply seeking a cute, effortless look for the summer.
To achieve the textured lob with face-framing layers, it’s essential to start with a solid foundation. This involves a precise cut that removes bulk where necessary while preserving the hair’s natural volume and shape.
Styling products like heat protectants and root boosters play a crucial role in maintaining the health of the hair and achieving the desired volume and texture.
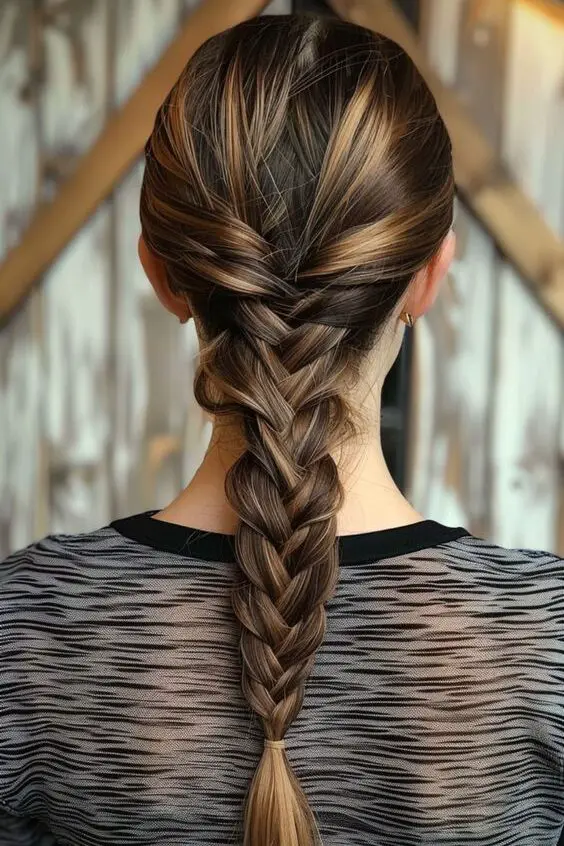
4. Waterfall Braid
The Waterfall Braid is a stunning choice for those with shoulder-length hair, offering a blend of elegance and whimsy that’s perfect for summer outings.
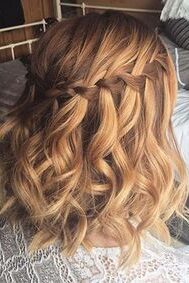
This braid starts like a classic French braid but adds a twist by allowing strands to flow through the braid, mimicking the cascading fall of water, which gives this hairstyle its name.
To create a Waterfall Braid, begin by brushing your hair to ensure it’s smooth and free of tangles. Select a small section at the front and divide it into three strands.
As you start braiding, cross the outer strands over the middle one, adding new sections of hair each time you cross from the top.
The key to the waterfall effect is to drop the bottom strand each time you add a new top section, letting it hang freely, and then picking up a new section from next to the dropped strand to continue the braid.
This technique continues around the head, which can be a bit tricky to master on your own hair. It helps to practice or have a friend assist you the first few times.
Once you reach the desired point around your head, you can choose to tie off the braid with a clear elastic or continue into a regular braid if you prefer a more secured style.
To enhance the look, you can tug gently at the loops of the braid to create more volume and a fuller appearance, which adds to the breezy, effortless vibe of this style.
This hairstyle works beautifully with highlights as they accentuate the woven texture and the dimensional look of the waterfall effect.
5. Messy Bun with Braid Detail
The Messy Bun with Braid Detail is a charming and casual summer hairstyle perfect for shoulder-length hair.
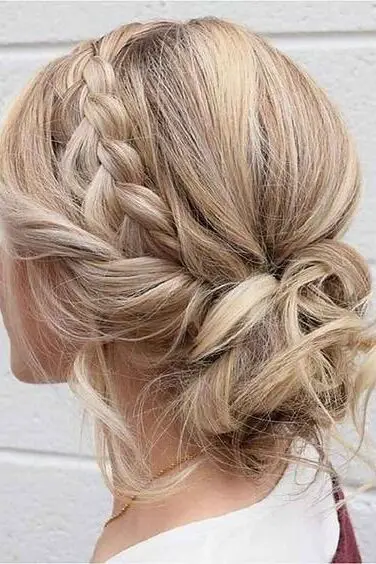
This look combines the relaxed vibe of a messy bun with the intricate appeal of braids, making it both practical and stylish for warm weather.
Starting this hairstyle involves sectioning off the front parts of your hair using duckbill clips, ensuring these sections are clear before focusing on the back.
Gather the remaining hair into a low, messy bun at the nape of your neck, using techniques from popular messy bun tutorials or opting for a neater ballerina bun if preferred.
Once the bun is secured, remove the clips from the front sections and start braiding on the left side. It’s important to pull the hair backwards as you braid to ensure the braid lays flat against your head.
This traditional braid, not a French braid, should then be draped over the top of the bun and pinned in place.
Repeat the same steps on the right side, making sure to lay the second braid over the first for a layered effect.
Secure the ends of the braids with pins, tucking them under to hide any loose ends and to maintain the hairstyle’s overall tidy appearance.
This hairstyle is not only easy to create but also versatile, suitable for various hair textures whether straight, wavy, or curly.
For those with ringlet curls, this style particularly enhances the texture, adding a playful twist to the look.
When braiding, keep the tension moderate to avoid a too-tight appearance, which could give a severe look rather than a soft, summery vibe.
The final touch involves ensuring all braids are securely pinned without leaving any stray hairs, achieving a cohesive and casually elegant messy bun with braid detail.
6. Double Dutch Braids
Double Dutch braids, also known as criss-cross braids, present a captivating blend of style and practicality, making them a superb choice for shoulder-length hair during the summer.
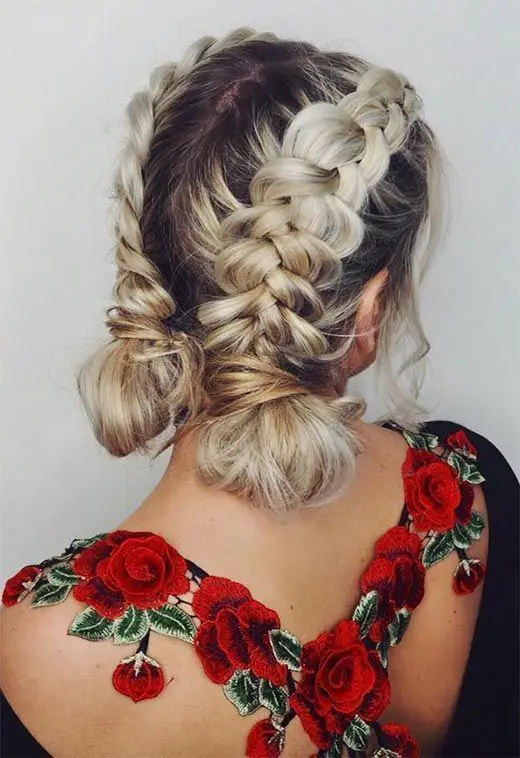
This hairstyle involves creating two braids that elegantly cross over each other, offering a dynamic twist to the conventional braid look.
The process begins by dividing the hair into two equal sections, one on each side of the head. It’s essential to ensure that these sections are as symmetrical as possible to achieve a balanced appearance.
Starting on one side, a small section of hair from the outer edge is taken and crossed under the hair on the other side, laying the foundation for the first braid.
This technique is repeated, with small sections of hair being continuously crossed under from the outer edge to the opposite side, working towards the back of the head.
Once the braid reaches the nape of the neck, the remaining hair is braided down to the ends and secured with an elastic band or hair tie. The same process is then mirrored on the other side of the head to create the second braid.
The two braids should cross over each other at some point, creating the distinctive double Dutch braid effect. It’s crucial to adjust the braids as needed to ensure they are even and symmetrical.
This hairstyle can stand alone or be incorporated into other styles, such as a ponytail or bun, offering versatility.
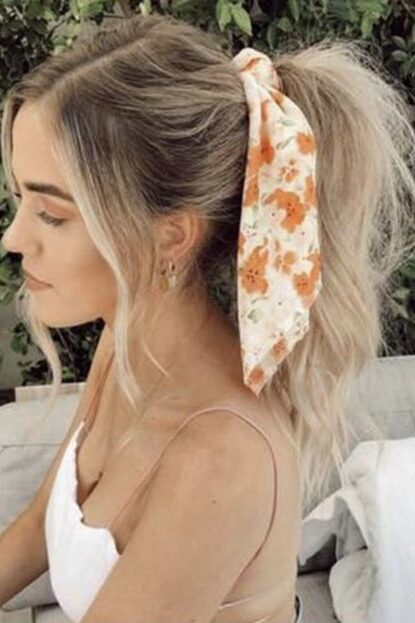
7. High Ponytail with Scarf Tie
The High Ponytail with Scarf Tie is an effortlessly chic hairstyle that combines simplicity with a touch of personal flair, perfect for those sunny summer days.
To achieve this look, start by applying a bit of texture powder at the crown of your head to add volume, or alternatively, you can gently tease this section.
Gather your hair into a high ponytail, ensuring to pull out any face-framing pieces to soften the look. Secure the ponytail with a hair tie, ideally a bungee for maintaining volume.
Next, choose a scarf that complements your outfit—perhaps a vibrant color or a playful pattern. Fold the scarf into a rectangular shape and place the middle on the top of your head so the ends are even on both sides.
Cross the ends underneath your ponytail and then bring them up, tying them into a knot or a bow right at the top.
This positioning allows the scarf to lay visibly on either side of your ponytail, adding a dynamic element as your hair moves throughout the day.
For a polished finish, pinch and pull small sections around your crown to enhance texture and volume. This step is crucial as it adds a casual yet voluminous look to the hairstyle.
Optionally, add a bit more volumizing powder to your ponytail to maximize the fullness.
8. Loose Fishtail Braid
The Loose Fishtail Braid stands out as a summer favorite for those with shoulder-length hair, blending elegance with a carefree spirit.
This hairstyle begins by dividing the hair into two large sections. Unlike traditional braids that rely on three strands, the fishtail braid weaves together two sections for a more intricate appearance.
The technique involves taking small pieces from the outside of one section and crossing them over to the inside of the opposite section. This crossing over creates the unique, herringbone pattern that fishtail braids are known for.
As you work your way down, it’s important to keep the sections tight to ensure the braid’s structure, but once completed, the magic happens in the loosening process.
Gently pulling apart the braid, or ‘pancaking’ it, gives it a fuller, more relaxed look that’s perfect for summer. This step transforms the braid from sleek and polished to effortlessly chic.
To finish the look, secure the end with a clear elastic band or a decorative hair tie that complements your summer wardrobe. For an added touch of whimsy, you can weave in small flowers or ribbon through the braid, perfect for summer festivals or a casual day out.
9. French Twist Updo
The French Twist Updo is a timeless and elegant hairstyle, ideal for summer events where a touch of sophistication is required.
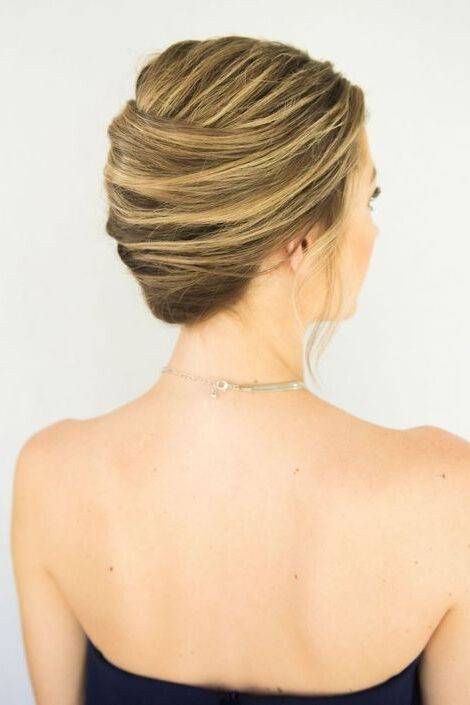
To begin, apply some volumizing powder at the crown of your head to create necessary texture and volume.
This ensures the twist holds better and adds a fuller appearance to your hair. Gather all your hair into a low ponytail, allowing some sections to swoop over your ears for a softer look around the face.
Next, it’s time to create the twist. Hold the ponytail with your right hand, and use your left hand’s index and middle fingers to wrap the base of the ponytail upwards and over to the right.
Then, twist your fingers counterclockwise, securing the twist as you go. This method helps in forming the classic French twist shape, which should sit snugly against your head.
To secure the twist, use French pins starting from the bottom of the twist. Hook each pin through the outside of the twist and push it against your head towards the middle.
Repeat this up the length of the twist, ensuring the top is also well secured, especially if you prefer a higher twist that is visible from the front.
For a final touch, gently pull up at the base of the twist to enhance the volume and ensure a polished finish.
10. Pinned-Back Waves
Pinned-Back Waves offer a classic yet versatile summer hairstyle idea for shoulder length hair, embodying the essence of easy-going elegance.
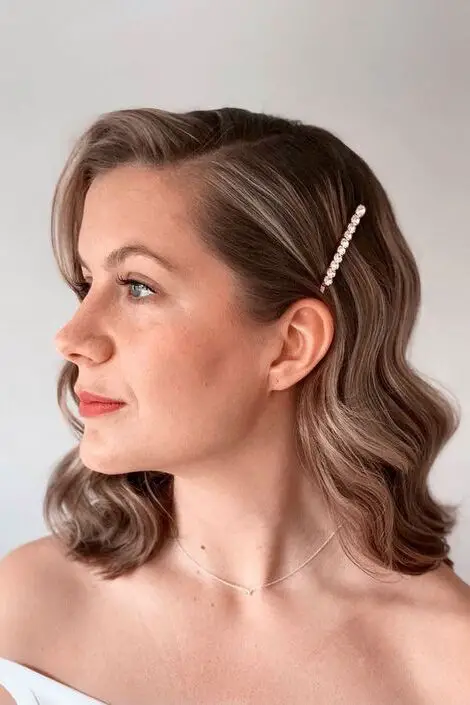
This style is particularly appealing for its simplicity and the graceful way it frames the face.
To achieve this look, one starts by creating soft, natural waves throughout the hair using a curling iron or a flat iron, ensuring the waves are loose and flowy, perfect for a relaxed summer vibe.
Once the waves are set, the key to this hairstyle’s charm lies in the artful pinning back of sections of hair. This can be done on one or both sides, depending on personal preference.
Selecting small sections from the front, gently twist or pull them back to a comfortable point behind the ear or lower, securing them with bobby pins that match the hair color for a seamless look.
The result is a beautifully open face, highlighted by the cascading waves on the sides.
This style is incredibly adaptable, suitable for both casual day outings and more formal evening events. It allows for various accessories to be incorporated, such as delicate flowers or minimalist hair clips, adding a personal touch to the overall look.
For those looking to add a bit more flair, incorporating highlights or subtle balayage can enhance the dimension and depth of the waves, making the hairstyle stand out even more.
11. Side Braid with Curls
The Side Braid with Curls is a delightful and versatile hairstyle that perfectly complements shoulder-length hair, offering a blend of elegance and casual charm.
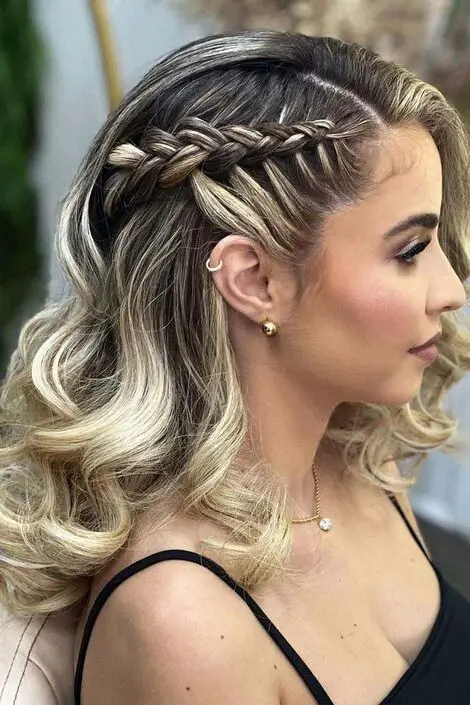
This style begins by creating a deep side part, which sets the stage for the braid and curls to beautifully frame the face.
The process involves sectioning off the front part of the hair, twisting it slightly, and then securing it with pins to keep it out of the way while focusing on the braid.
For the braid, you can opt for a French fishtail technique, which involves dividing the hair into two sections and alternately crossing small pieces from each side to the other.
This method not only adds a touch of sophistication but also provides a secure base for incorporating the curls later. As you reach the ends of the braid, secure it temporarily and shift your focus to curling.
Using a curling iron, preferably with a medium barrel, curl the remaining hair to create soft, bouncing curls that add volume and texture.
Once the curls are set, gently combine them with the braid, either by wrapping them around the braid or pinning them discreetly underneath to blend seamlessly.
This hairstyle is finished by releasing any pinned-up sections and allowing them to merge with the rest of the hair, enhancing the overall softness and romantic flair of the look.
12. Bubble Braid
The Bubble Braid is a playful and easy-to-create hairstyle that has gained popularity for its versatility and stylish appeal, perfect for shoulder-length hair during the summer.
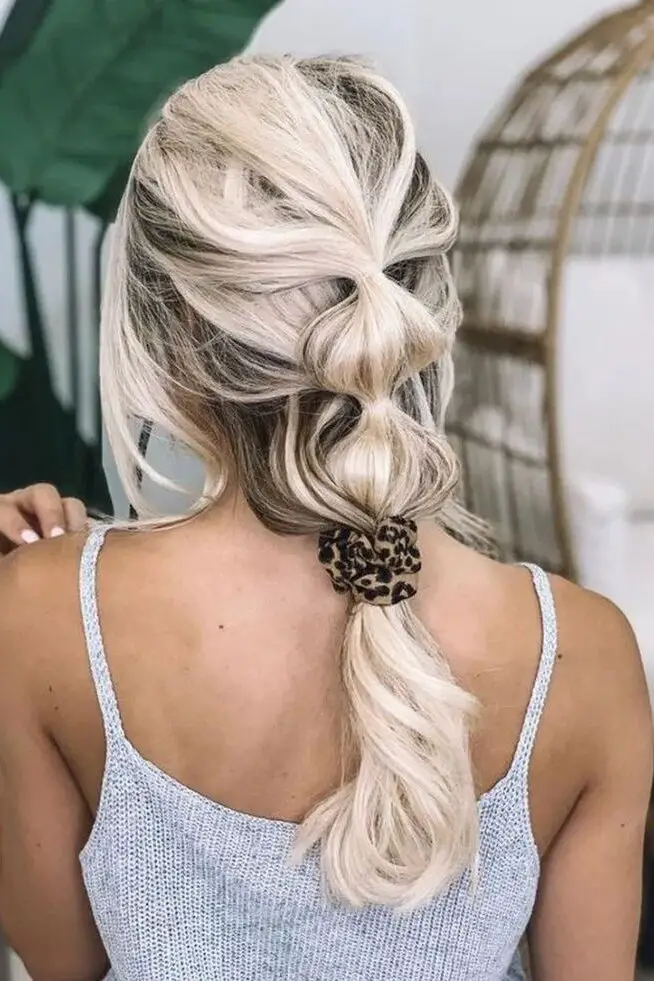
This hairstyle can be dressed up for formal events or kept casual for everyday wear, making it a go-to choice for those looking to add a fun twist to their hair routine.
The beauty of the Bubble Braid lies in its simplicity and the minimal effort required to achieve a look that appears intricate and polished.
Creating a Bubble Braid starts with tying the hair into a ponytail and securing it with an elastic. This forms the base of the hairstyle.
Then, moving a few inches down from the base, another clear elastic is added to the ponytail. The key step involves gently pulling or teasing the hair between the two bands to create the signature “bubble” effect.
This process is repeated down the length of the ponytail, adding elastics and creating bubbles at intervals, until you reach near the end of the hair.
To maintain a modern and relaxed look, it’s recommended to leave a few inches of the tail at the end of the ponytail.
For those looking for a more comprehensive style, the Bubble Braid can also be adapted into two braids using all of the hair, rather than just the ponytail.
This involves sectioning the hair and applying the same technique of adding elastics and creating bubbles throughout.
The use of clear hair elastics is essential for achieving a neat appearance, but larger elastics may be necessary for thicker hair sections.
Adding gel can help to tame flyaways and achieve a sleeker look, although it’s not a requirement for the style.
13. Half-Up Dutch Braid with Ponytail
The Half-Up Dutch Braid with Ponytail is a stylish and functional choice for those with shoulder-length hair, especially during the warmer months.

This hairstyle starts by sectioning the top half of the hair and creating a Dutch braid. Unlike the more common French braid, the Dutch braid is crafted by crossing the strands under each other, which makes the braid appear more pronounced and sits on top of the hair.
Begin by taking three small sections near the crown of your head. Cross the right strand under the middle one, then the left strand under the new middle, gradually adding more hair from each side as you work your way back.
Continue this process until you reach the back of the crown. At this point, secure the braid with a small elastic, ensuring it’s tight enough to hold but loose enough to maintain comfort.
Once the braid is secured, gather the rest of the hair along with the tail end of the braid into a high ponytail.
This can be positioned at the back of the head or slightly to the side, depending on preference. Secure the ponytail with a sturdy elastic, and for added flair, wrap a small section of hair around the base to conceal the elastic, pinning it discreetly underneath.
14. Textured Chignon
Creating a textured chignon starts with prepping the hair to ensure it holds the style effectively. Initially, apply a heat protectant spray such as Kenra Platinum Heat Cast Spray 12 to safeguard the hair during styling.
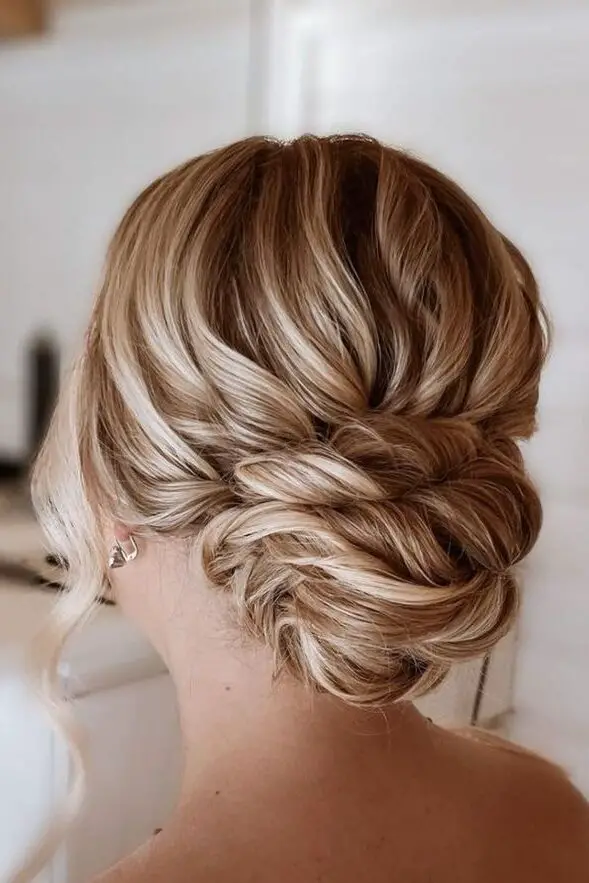
This step is crucial, especially when using thermal tools like a texturizing iron, which is employed here to add subtle texture without creating curls.
The iron should be lightly tapped from roots to ends, enhancing the hair’s grip and making it easier to manage.
Once texturizing is complete, focus on building volume at the roots. This can be achieved by applying a volume powder at the crown and gently backcombing the hair.
These actions not only add lift but also create a sturdy base for the pins that will secure the chignon. To maintain the texture and control flyaways, a light application of Kenra Smoothing Spray is recommended. This product adds a fine shine and helps in managing the hair without weighing it down.
To form the chignon, gather the textured and volumized hair into a low ponytail at the nape. This ponytail serves as the foundation of the updo.
Proceed by twisting the ponytail into a bun, securing it loosely with pins to preserve the texture. For additional hold and to manage any stray hairs, apply a firm-hold spray such as Kenra Volume Spray 25.
The final step involves detailing the chignon to personalize the look.
15. Beachy Waves
Beachy waves are the epitome of summer hair, evoking images of long days at the beach and relaxed, carefree moments.
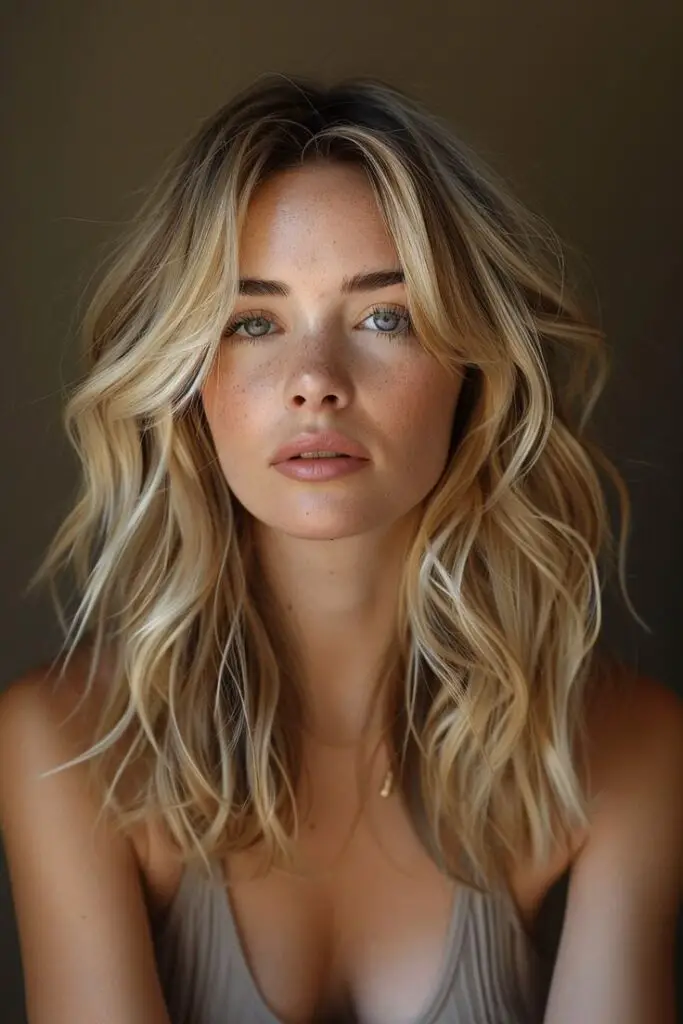
Achieving this look, especially for those with shoulder-length hair, involves a mix of technique, the right tools, and some insider tips to ensure that your waves look effortlessly chic rather than overly styled.
The process begins with ensuring your hair is completely dry. Moisture can sabotage your styling efforts, leading to potential damage or a frizzy finish.
For those aiming for that perfect beachy texture, starting with straight hair can also help manage the ends better, preventing them from flipping out too much. Using a paddle brush to achieve a straight blowout lays a smooth foundation for the curls to come.
Selecting the right curling tool is crucial. A 1-inch curling iron or wand is highly recommended for its versatility across different hair lengths.
It’s important to wrap sections of hair around the barrel, leaving about 1-2 inches out at the ends. This technique is the secret to that coveted beachy look, as it ensures the ends stay straight, giving off an ‘undone’ vibe.
Alternating the direction of the curls around your head – away from the face for the pieces around it, then varying the direction – adds to the natural, tousled effect.
Once you’ve curled your entire head, the magic happens in the finishing touches. Running your fingers through the curls breaks them up, avoiding a tight, overdone appearance.
For added texture and volume, incorporating a working texture spray at the roots and a beach wave spray on the dry hair can enhance the separation of the waves and add a hint of shine.
These products work together to create the perfect balance between hold and movement, ensuring your beachy waves look fresh and vibrant throughout the day.
Refreshing day-old waves is simple with a bit of texture spray, reviving the volume and ensuring your beachy look lasts.
16. Messy Braid Crown
The Messy Braid Crown is an enchanting and effortlessly chic hairstyle that marries the laid-back vibe of summer with a touch of royal elegance, making it an ideal choice for shoulder-length hair.
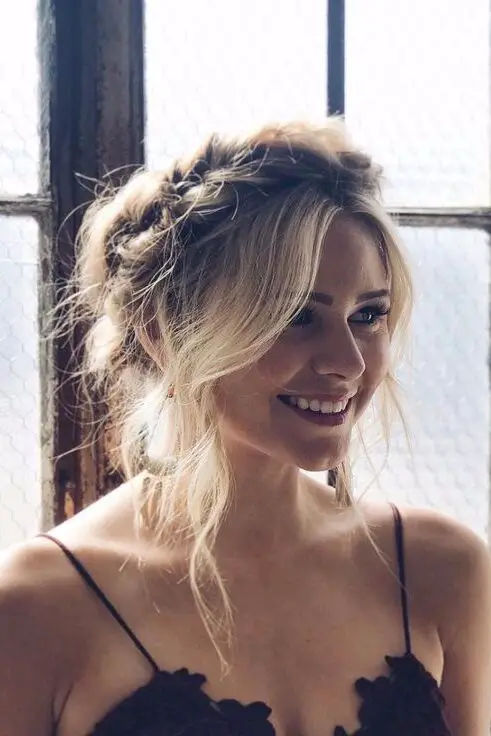
This style captures the essence of a carefree summer day while adding a sophisticated twist to your look.
Creating a Messy Braid Crown involves braiding sections of hair and wrapping them around the head to simulate a crown.
The beauty of this hairstyle lies in its imperfection; the messier, the better. It starts by dividing the hair into two equal sections.
Each section is then braided in a simple three-strand braid, keeping the braiding loose to add volume and texture. Once both sides are braided, the ends are secured with small elastics.
The next step is to lift one braid and drape it across the top of the head, securing it discreetly with bobby pins on the opposite side.
The same is done with the other braid, ensuring it slightly overlaps the first for a cohesive crown look. To achieve the desired messiness, gently pull at the braids to loosen them further and allow some strands to escape, framing the face beautifully.
This hairstyle is not just about achieving a look but also about embracing a carefree summer spirit. It’s perfect for both casual beach days and more formal summer evenings, offering versatility and ease.
For those looking to add a bit more flair, incorporating small flowers or decorative pins can elevate the style, making it suitable for weddings or summer festivals.
17. Dutch Braids with Loose Ends
Dutch Braids with Loose Ends are a refreshing and stylish choice for those with shoulder-length hair, seeking a hairstyle that combines the classic charm of braids with a modern twist.
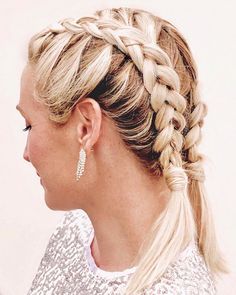
This hairstyle is perfect for summer days, whether you’re hitting the beach or just looking to keep your hair neatly out of your face while adding a touch of elegance.
The process of creating Dutch Braids with Loose Ends starts by parting your hair down the middle, ensuring an even distribution on both sides. This initial step is crucial as it sets the foundation for a symmetrical look.
The Dutch braid technique involves dividing a small section of hair at the front into three equal strands.
The key difference from traditional braiding is that each strand is crossed under the middle one, rather than over, which creates the braid’s signature “popped out” effect.
As you continue braiding, gradually incorporate more hair from the sides into the middle strand, maintaining a tight grip to keep the braid neat and secure.
Once you reach the nape of your neck, you have the option to stop adding new hair and continue with a regular three-strand braid.
This transition marks the beginning of the “loose ends” aspect of the hairstyle. Secure the braid with a clear elastic, leaving a generous amount of hair unbraided at the ends.
For those with layered hair, it’s common to have shorter strands poking out of the braid. This can be easily remedied with the strategic placement of bobby pins, tucking any flyaways neatly back into the braid.
The final look should be a blend of polished braiding at the top, transitioning into relaxed, loose ends that add a modern flair to the classic Dutch braid.
18. Half-Up, Half-Down with Headband
The Half-Up, Half-Down with Headband hairstyle is a classic and timeless choice that beautifully complements shoulder-length hair, making it a perfect option for summer.

This style effortlessly marries elegance with casual charm, offering a versatile look that can transition from daytime outings to evening gatherings with ease.
The addition of a headband not only adds a touch of personality but also helps to keep any stray hairs neatly in place, ensuring your hairstyle remains flawless throughout the day.
To achieve this look, start by selecting a headband that matches your outfit or adds an interesting contrast.
Next, take the top section of your hair and gently pull it back, securing it at the crown of your head.
This creates the half-up portion of the hairstyle, which can be adjusted to your liking—either pulled tightly for a sleek appearance or left slightly loose for a more relaxed vibe.
Once the top section is secured, place the headband just in front of the secured hair, ensuring it sits comfortably around the head.
For the half-down portion, you can leave your hair as is, embracing its natural texture, or add soft curls for a more refined look.
19. Textured Top Knot
The Textured Top Knot is a versatile and stylish hairstyle that perfectly suits shoulder-length hair, especially during the summer months when you’re looking for ways to keep cool while still looking effortlessly chic.
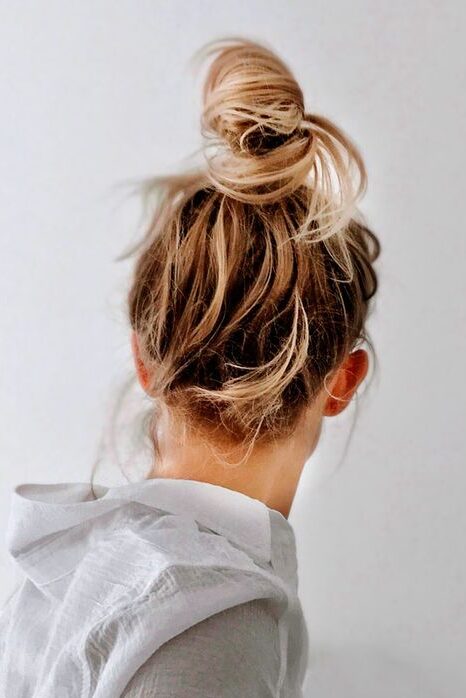
This hairstyle begins with the preparation of the hair to ensure it has enough texture and volume to hold the top knot in place.
Using a bit of dry shampoo can work wonders in adding that much-needed texture, especially if you’re not in the habit of washing your hair every day. It gives life to the hair and makes the bun easier to manage and style.
After applying the dry shampoo, the next step involves flipping your head over and gently brushing through the hair with your fingers to remove any knots, ensuring a smooth base for the ponytail.
The hair is then gathered into a high ponytail, with the position depending on where you prefer your bun to be.
While holding the hair with one hand, the other hand is used to twist the hair slightly before wrapping the rest around the twist to form the bun.
For those with layered hair, tucking the loose hairs underneath the bun is crucial to achieving a neat look. The bun is secured by tying the hair two or three times with a hair tie.
For a fuller bun, gently pulling at different ends of the hair can help achieve the desired shape and size.
The use of bobby pins, especially those that blend with your hair color like golden bobby pins, can help secure the bun in place and adjust any tight spots by gently pulling the hair towards the front.
Final Thoughts
Exploring a myriad of summer hairstyle ideas for shoulder-length hair unveils the versatility and charm this length provides.
These hairstyles are designed not only to accentuate the beauty of medium-length hair but also to cater to various tastes and occasions, ensuring there’s a perfect look for every moment of the season.


You May Also Like
18 Fun and Flirty Hairstyles for Date Night

20 Best Summer Hairstyle Ideas for Long Hair (2024)