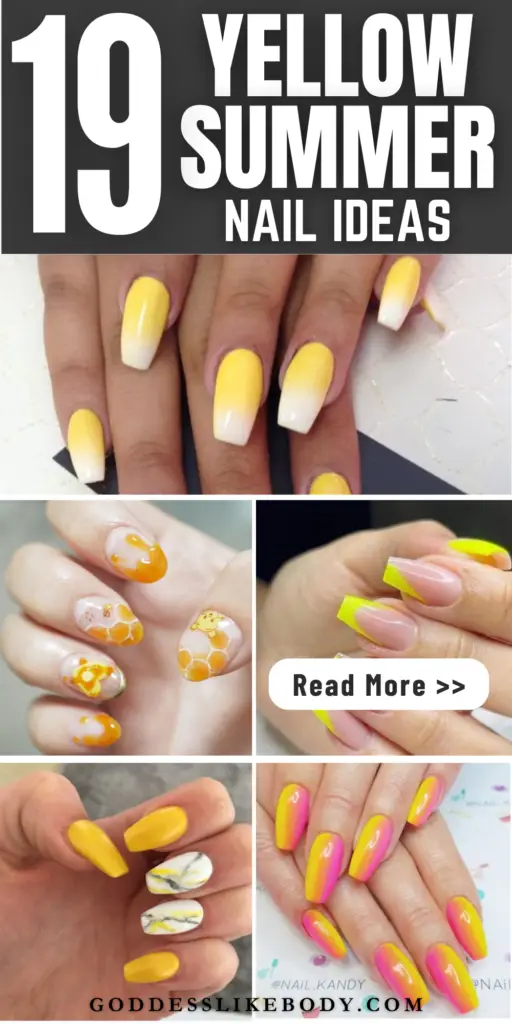
Yellow Nail Designs for Summer: 19 Cute Ideas to Try
Yellow nail designs have become a sunny staple in summer beauty trends, garnering attention with their bright and bold palette.
This summer, embrace the warmth with your nail art by exploring the vibrant shades of sunny yellow, banana yellow, pastel yellow, mustard, and neon yellow.
As you dive into the season, let your nails mirror the sunshine and joy that summer brings, making each gesture a statement of style and color.
From the playful zest of lemon to the elegance of acrylic nails and the chic allure of French nails, yellow nails promise to be your go-to for a fresh, summer-ready look.
This article lays out 19 cute yellow nail designs, perfect for adding a pop of color to your summer vibes. So, prepare to dazzle with your mellow yellow nails that are sure to turn heads and uplift spirits.
Busy? Save this pin for later.
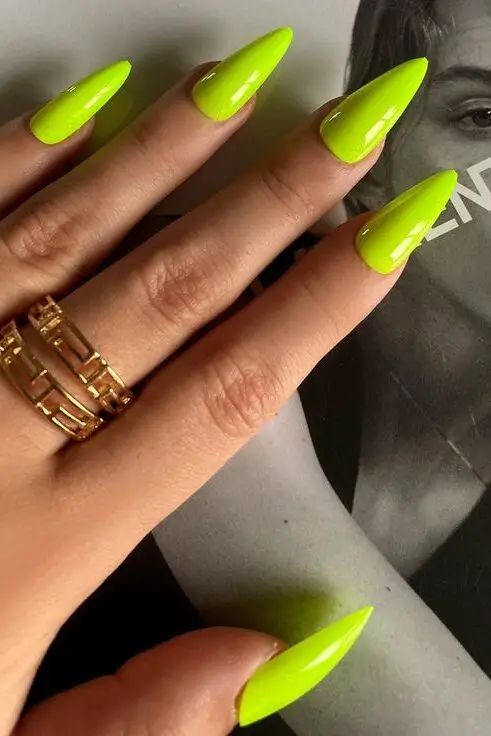
1. Sunshine Yellow
Sunshine-dipped nails are quickly becoming a favorite for their cheerful yellow tips, providing a bright yet subtle alternative to full-coverage yellow nails.
This style not only brightens your look but also offers ample room for personalization with various designs enhancing the yellow tips. Here’s a breakdown of some creative ways to wear the Sunshine Yellow style this summer:
Mod French
Description: Update the classic French manicure by opting for thicker, more rounded tips on long, almond-shaped nails.
Detail: Embellish with some jeweled accents to add a touch of glamour and shine.
Flaming Hot
Description: Choose neon-flame designs on a bare nail base for a striking summer statement.
Detail: A glossy finish on these bold patterns enhances their visibility and appeal.
Mini French
Description: Ideal for those with shorter nails, this style features mini, rounded French tips.
Detail: Adds a delightful pop of color and creates an illusion of elongated nails.
Half Moon
Description: Dynamic half-moon design using a warm mustard yellow, covering most of the nail while leaving a semi-circle bare at the base.
Detail: This design is both eye-catching and modern, perfect for stylish summer outings.
Faint Pastel
Description: Soft pastel yellow shade combined with a French tip and playful daisy decals.
Detail: This subtle yet impactful look is great for a more understated summer vibe.
Lemon Jellies
Description: Embrace a lemon-lime theme with a fun mix of neon green and yellow-jelly polish, detailed with white lemon outlines.
Detail: This adorable design is perfect for casual summer days and beach outings.
Minimal Square
Description: A single thin line of rich, warm yellow across the tip of a square nail.
Detail: Offers a significant visual impact without overwhelming, suitable for both casual and formal settings.
Mix Match
Description: Combine multiple designs like a French manicure, hourglass shape, and full-coverage on one hand.
Detail: Creates a unique, eclectic look that stands out as creative and individualistic.
Go For the Gold
Description: Metallic gold chrome tips with jeweled details make a luxurious and chic statement.
Detail: Ideal for special occasions like weddings, this design adds a sophisticated touch.
Getting Groovy
Description: Bright-yellow French tips paired with orange floral decals.
Detail: Evokes a ’60s flower-power vibe, perfect for a retro-inspired summer look.
2. Lemon Drop
Embrace the subtle elegance of Lemon Drop Pastel Yellow, a minimalist nail design that’s perfect for those who appreciate understated beauty.

This new spring color by Nail Thoughts is a creamy pastel yellow gel nail color, which unlike traditional pastel shades that can be chalky, offers a creamy consistency that’s easier to apply.
Key Features of Lemon Drop Pastel Yellow:
Creamy Consistency: Unlike other pastels, its creamy texture ensures a smoother application, reducing streaks and unevenness.
Versatility in Design: Whether you opt for a full cover or creative designs like the Minimal Square or Faint Pastel, this color provides a perfect base.
Popular Designs Using Lemon Drop:
Faint Pastel: Mix this soft pastel yellow with a French tip and delicate daisy decals for a playful yet subtle look.
Minimal Square: A single thin line of this warm, rich yellow across the tip of a square nail creates a significant visual impact with minimal effort.
3. Sunflower Tips
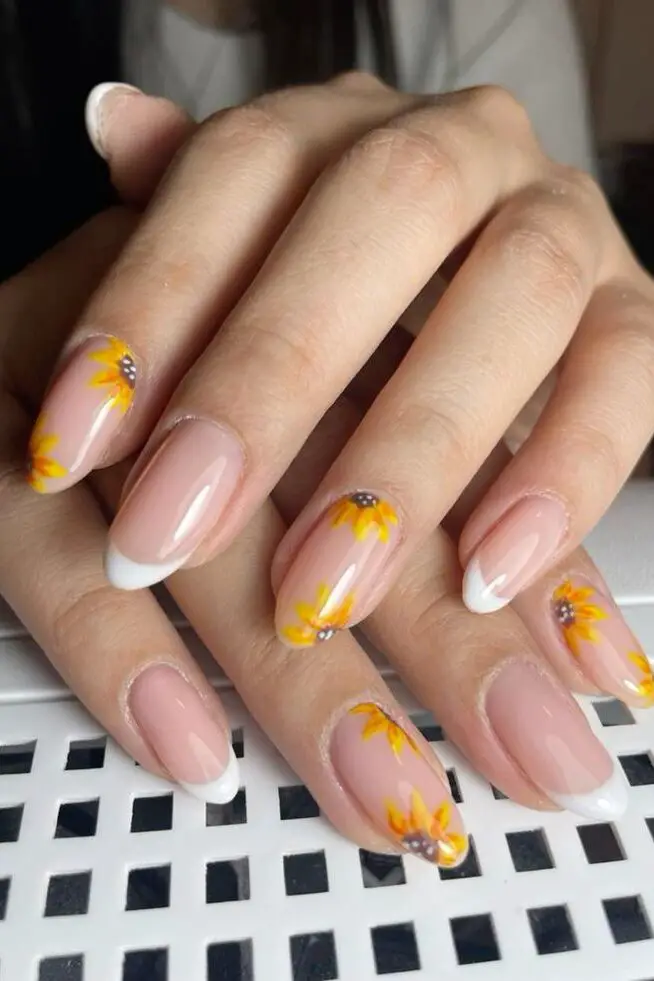
To achieve the vibrant and cheerful Sunflower Tips nail design, follow these detailed steps:
Step-by-Step Application:
Preparation:
Start by dehydrating your nails to ensure a clean surface.
Apply a primer to help the acrylic adhere better and prevent lifting.
Base Application:
Choose a random yellow acrylic that includes glitter to create the base of the sunflower.
Apply this yellow acrylic between the nail bed and the free edge, blending it gently towards the nail bed for a seamless transition.
Adding the Nude Acrylic:
After setting the yellow base, cover the remaining part of the nail bed with a nude acrylic. This contrast helps the yellow pop and adds depth to the design.
Shaping and Buffing:
Once the acrylics have set, shape the nails as desired. Common choices for this design are almond or coffin shapes.
Use a nail drill to refine the shape and a buffer to smooth the surface, preparing it for painting.
Painting the Sunflower:
Use black acrylic paint to draw the center of the sunflower on the yellow base.
Add tiny black dots around the center to mimic the seeds, enhancing the floral effect.
Sealing the Design:
Finish by applying a gel top coat to seal in your artwork, providing a glossy finish and prolonging the durability of your nail design.
4. Honeycomb Nails
The Honeycomb Nails design is a stunning choice that combines the natural beauty of a honeycomb pattern with the artistic flair of dripping honey accents.

This design is not only eye-catching but also versatile, making it suitable for any season and adding a unique touch to your nail art collection.
Step-by-Step Guide to Creating Honeycomb Nails:
Preparation:
Begin by applying a base coat to protect your nails and ensure a smooth application of colors.
Base Color:
Apply a pastel yellow nail polish as the base color. Allow it to dry completely.
Honeycomb Pattern:
Using gold polish, carefully paint hexagons to mimic the honeycomb. For added precision, use a thin brush or a dotting tool.
Dripping Honey Effect:
For the honey dip design on accent nails, blob a slightly darker yellow gel polish onto the nail. Using a fine brush, drag the polish upwards, curving the edges to resemble the natural flow of honey.
Adding Details:
Optionally, paint a small bee on one of the nails to enhance the theme.
Finishing Touches:
Once all elements are dry, apply a top coat to seal in the design and add a glossy finish.
Variations and Tips:
Mixing Colors: Instead of using a stamping plate for the honeycomb pattern, try freehand mixing of colors directly on the nail to create a more organic look.
Glitter Accents: Incorporate fine glitter into the base color for a shimmering effect that mimics the light reflecting off honey.
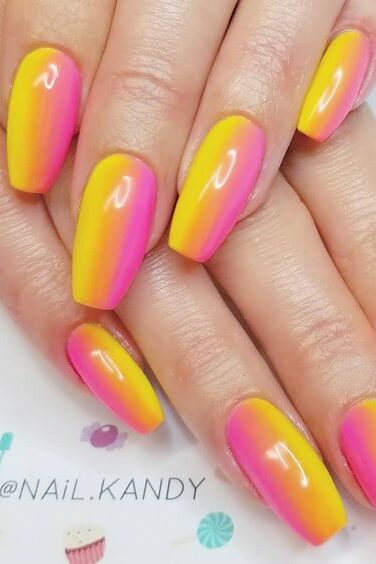
5. Neon Yellow Ombre
Neon Yellow Ombre nails are a dazzling choice for those looking to make a bold statement with their summer nail art.
This style combines vibrant neon yellow with softer yellow tones to create a stunning gradient effect that’s perfect for both day and night events. Here’s how you can achieve this eye-catching look:
Step-by-Step Guide to Neon Yellow Ombre Nails:
Base Preparation:
Start by applying a white base coat on your nails. This step is crucial as it helps the neon colors stand out more vividly.
Applying the Colors:
Take neon yellow and a lighter yellow polish and apply them to a makeup sponge, overlapping them slightly to create a gradient.
Press the sponge onto your nails, repeating the dabbing motion to intensify the color until you’re satisfied with the ombre effect.
Enhancing the Design:
For an added touch, use a thin brush to paint small citrus-like shapes or abstract designs on each nail, enhancing the summery vibe.
Glow Enhancement:
Utilize a phone flashlight converted into a blacklight to make your nails glow in the dark, perfect for evening summer parties.
Sealing the Artwork:
Apply a topcoat to seal in your design, ensuring it lasts longer and maintains a high-gloss finish.
Tips for Perfecting Neon Yellow Ombre:
Multiple Coats: Depending on the opacity of your neon polish, you might need three to four coats to achieve the desired intensity and flawless gradient.
Sponge Technique: Regularly replace your sponge during the application to avoid muddying the colors, which can keep the ombre effect crisp and clear.
6. Smiley Face Accents
Smiley Face Accents on your nails can infuse a playful and joyful vibe into your summer nail art.
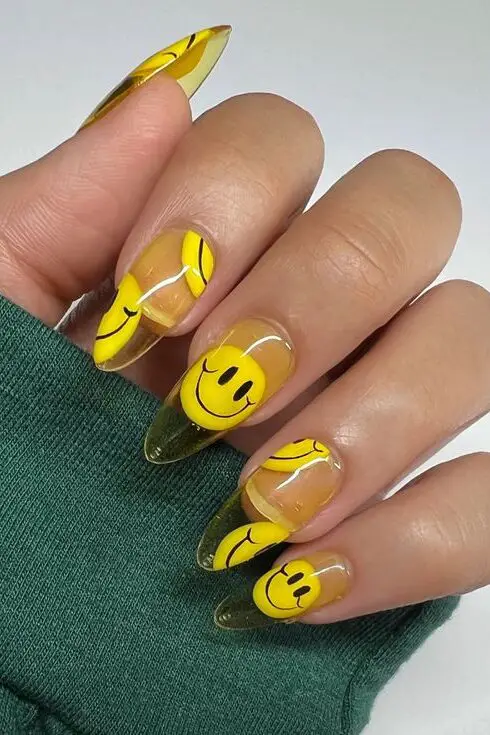
This design is perfect for expressing a lighthearted mood and adding a touch of whimsy to your look. Here’s how you can incorporate Smiley Face Accents into your yellow nail designs:
Step-by-Step Guide to Creating Smiley Face Accents:
Base Color Application:
Begin by applying a base coat to protect your nails.
Choose a bright yellow polish as the base color for a vibrant backdrop that makes the smiley faces pop.
Drawing the Smiley Faces:
Once the base color is dry, use a fine-tip brush and black nail polish to draw smiley faces. You can position them centrally or at the tip of the nail, depending on your preference.
For a uniform look, keep the smiley faces similar in size.
Adding Expressive Features:
Customize each smiley face by adding different expressions. Consider using tiny strokes to create smiles, winks, or even surprised looks.
Top Coat for Protection:
Seal your design with a clear top coat to ensure longevity and to give your nails a glossy finish.
Tools and Materials Needed:
Bright Yellow Nail Polish: Serves as the perfect sunny background.
Black Nail Polish: For drawing the details of the faces.
Fine-tip Brush: Essential for intricate detail work.
Top Coat: To protect and enhance the nail design.
Design Tips:
Vary the Expressions: Mix and match different smiley expressions to reflect various moods.
Accent Nails: Instead of painting smiley faces on all nails, consider doing them on just one or two accent nails to keep the design subtle yet playful.
Popular Variations:
Glittery Backgrounds: Add a layer of glitter polish under the smiley faces for a sparkling effect.
Colorful Faces: Use different colors for the features of the smiley faces to add a colorful twist to the classic black and yellow.
7. Daisy Nail Art
Daisy Nail Art captures the essence of summer with its bright colors and charming floral patterns.
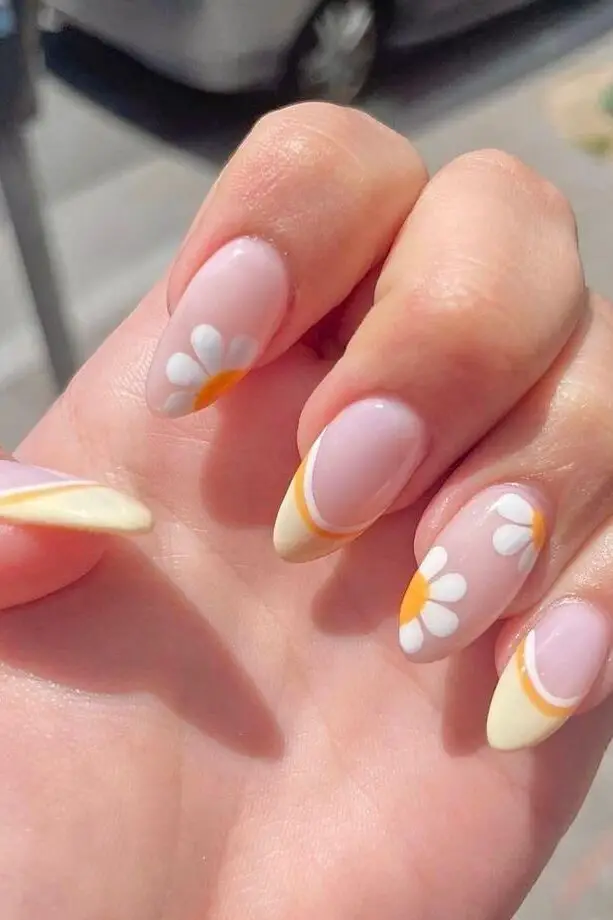
Here are some delightful daisy nail art ideas that you can try this season:
Bright and Cheerful Designs
Daisies & Frogs: Inspired by childhood memories, this adorable design features playful frogs and daisies, perfect for a nostalgic summer look.
Blue Satin French Tips: Reflecting the clear summer sky, these baby blue tips are ideal for those who enjoy daydreaming under the sun.
Funky Daisy Row: A fun twist on traditional designs, where each nail sports a single, prominent daisy.
Just The Tips: Subtle daisy patterns on the tips for a minimalist yet elegant appearance.
Stained Glass: This ethereal design mimics the look of light filtering through colored glass, adorned with floral accents.
Elegant and Subtle Options
Floral Elegance: Tiny, delicate daisies that suit a subdued, classy style, perfect for formal gatherings.
Makin’ A Buzz: Bright yellow hues paired with tiny bee accents, embracing the vibrant energy of summer.
Summer Black: Dark bases make the white daisies stand out, offering a bold contrast that’s sure to catch the eye.
Daisy Chain: A creative array that might just be your gateway to a new style adventure.
The Yellow & Brick Red Road: A retro-inspired look that brings a pop of ’70s flair to your nails.
Unique and Artistic Expressions
3D Skittle Design: For those who love variety, combining multiple colors with daisy accents in a skittles-style manicure.
Mellow Yellow: Ideal for days spent in flower fields or at picnics, this design is whimsically charming.
Sheer Daisies: Transparent nails with striking daisy designs that stand out against the bare background.
So Lady-Like: Reminiscent of carefree days spent outdoors, catching ladybugs and enjoying nature.
Think Pink: Perfect for attending glamorous events, featuring a chic pink and white daisy pattern.
Artistic and Bold Creations
Van Gogh Daisy: Each nail is a canvas with artfully painted daisies, celebrating the beauty of impressionist art.
Mismatched Art: A loud, bold statement that mixes various designs for an eye-catching look.
Retro Daisies: Simple yet colorful, this design adds a playful vibe to your summer wardrobe.
One & Done: For minimalists who prefer a single, subtle daisy as a nod to nail art.
Pearlescent Daisies: Combines the allure of daisies with the shimmer of mermaidcore trends for a captivating finish.
8. Bumblebee Stripes
To create the playful and eye-catching Bumblebee Stripes nail design, follow this detailed guide that combines classic yellow and black stripes with whimsical details to capture the essence of a bumblebee.
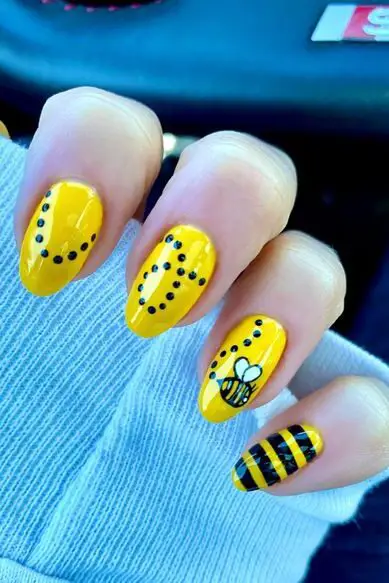
This design is perfect for adding a fun and vibrant touch to your summer nail art collection.
Step-by-Step Guide to Bumblebee Stripes:
Base Coat Application:
Apply a base coat to protect your nails and ensure a smoother polish application.
Yellow Base Color:
Apply two or three coats, depending on the opacity needed.
Creating the Bumblebee Head:
Paint the tip of each nail with black nail polish to represent the bumblebee’s head.
Striping the Body:
With a striping brush dipped in black polish, add horizontal stripes along the nail to create the bumblebee’s body.
Adding the Eyes:
Use a dotting tool with white nail polish to create two large dots for the eyes. Add smaller black dots in the center for the pupils.
Wing Details:
Outline wings with a thin brush using black polish, then fill them in with white or silver polish for a shimmering effect.
Extra Touches:
Enhance the design by adding small white eyelashes using a fine brush.
Accent Nails:
For a varied look, apply “Sloane Square” black-based glitter by Nails Inc on the left hand and “Many Celebrations to Go” glitter by OPI on the right hand. Add “Chill Zone from a nebula afar” gold glitter polish on top for extra sparkle.
Top Coat Application:
Apply a thin layer of nail polish over the areas where colors meet before applying the topcoat to prevent any smearing.
Additional Design Variations:
Alternative Patterns: Consider using dots and black stripes to create a flight pattern for a dynamic look.
Geometric Shapes: Incorporate black and yellow oval geometric shapes for a modern twist.
Floral and Bee Art: Mix yellow with floral and bee designs for a nature-inspired theme.
Checker Print: Explore designs like the yellow checkerboard print and bee nail art by @nailsbylindseylu for a bold and graphic style.
9. Pineapple Slices
Pineapple Slices nail art is a vibrant and playful design that captures the essence of summer.This style is part of a broader category that includes ‘Nails’, ‘Nail Art’, and ‘Cute Nail Designs’, making it a popular choice for those seeking a fun and fruity look.
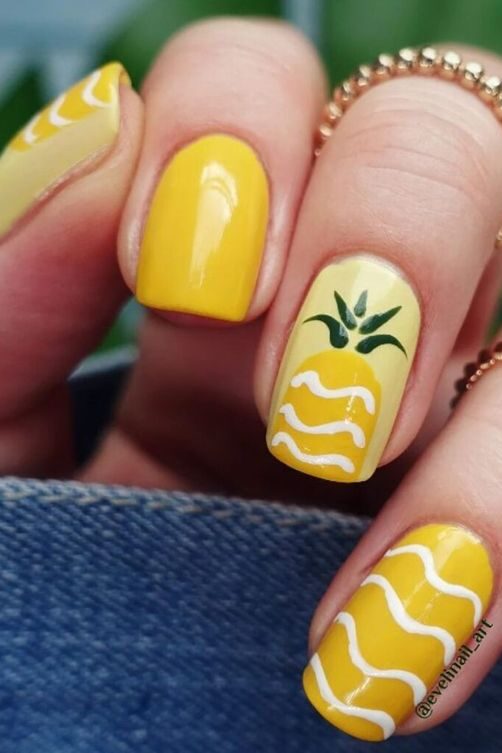
Here’s how you can create your own Pineapple Slices nail art, drawing inspiration from various resources and tutorials available online.
Step-by-Step Guide to Painting Pineapple Nail Art
Base Coat Application:
Start with a clear base coat to protect your nails and enhance the polish adherence.
Yellow Base:
Apply a vibrant yellow polish as the base color. This serves as the background, mimicking the bright color of a ripe pineapple.
Orange X’s for Texture:
Once the yellow base is dry, use a fine brush to paint small orange X’s across each nail. This detail represents the textured surface of a pineapple.
Green Leaves:
At the tip of each nail, paint green leaves to emulate the crown of the pineapple. Use a darker green to add depth and realism.
Dark Green Outline:
Outline the green leaves with a dark green polish for a more defined and dramatic look.
Top Coat for Shine:
Finish off with a glossy top coat to seal in your design and give it a shiny, professional appearance.
Pineapple Slices nail art is not just a style; it’s a statement of fun, vibrancy, and summer joy.
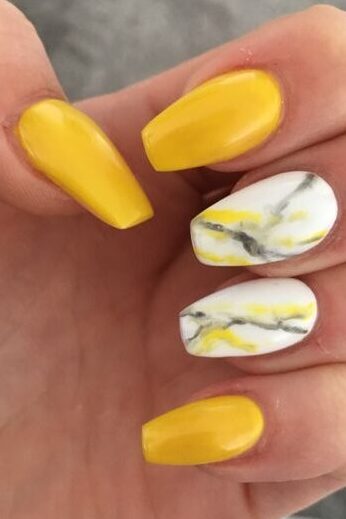
10. Yellow Marble
Yellow Marble nail art design is a standout choice for those looking to bring a touch of elegance and creativity to their summer nail repertoire.
Here’s a straightforward guide to achieving this sophisticated look.
Creating Yellow Marble Nail Art
Base Colors:
Begin by applying a coat of Cupcake Polish’s “Don’t Worry, Bee Happy” followed by Zoya’s “Purity”. These colors serve as a vibrant and clean canvas for the marble effect.
Marble Technique:
Utilize the drag marble technique to swirl these colors together directly on the nail. This method involves dragging a pointed tool through dots of wet polish spread on the nail, creating a natural marble effect.
Adding Details:
For a touch of sparkle, add silver dots using Zoya’s “Trixie” at strategic points across the nail to mimic the reflections often seen in real marble.
Sealing the Design:
Finish with a top coat to protect your artwork. Choose from glossy or matte finishes to customize the final look.
11. Neon French Chevron
The Neon French Chevron nail design is a vibrant and modern twist on the classic French manicure, perfect for those who love to add a pop of color to their style.
This design features a chevron, or V-shaped line at the tip of the nail, filled with eye-catching neon-colored polish.
The neon colors typically used include shades like pink, orange, yellow, green, blue, and purple, making it a versatile choice for various occasions.
Creating the Neon French Chevron Design:
Preparation:
Start by applying a clear or nude base coat. This helps the neon colors stand out more prominently.
Chevron Creation:
Use tape, a nail guide, or freehand techniques to create the V-shaped chevron at the tip of the nail. If using tape, ensure it is cut precisely to achieve clean lines.
Applying Neon Polish:
Fill in the chevron with your chosen neon polish. For a more striking effect, consider using multiple neon colors within the same design.
Finishing Touches:
Once the neon polish has dried, carefully remove any tape or guides used. Clean up any polish outside the lines for a neat finish.
Apply a top coat to seal in the design and add a glossy finish, enhancing the vibrancy of the neon colors.
Tips for Perfecting Your Neon French Chevron:
Tape for Crisp Lines: Use Scotch tape cut with scissors to create sharp, clean edges for your chevron. Apply the tape along the bottom of the smile line and in the middle of the nail for precise placement.
Protecting the Skin and Cuticles: Place tape around the edges of the nails and the cuticles to protect them from stray polish.
Creating a Bullseye: After the base coat, create a bullseye with the colored paints on a surface like a palette. Draw lines from the center to the edges to prepare for creating the chevron pattern.
Dipping for Details: For intricate designs, prepare the three middle nails with tape and a white base, then dip them into a water marble design. Clean off any excess polish from the top of the design before removing the tape.
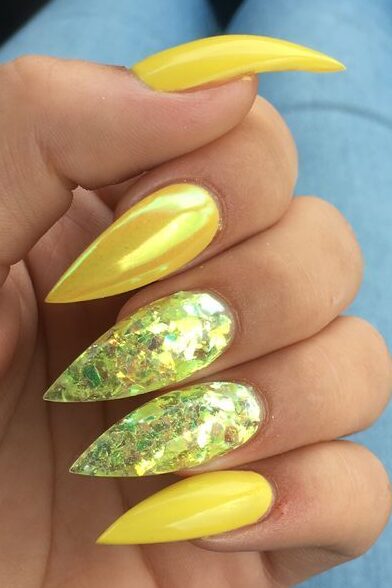
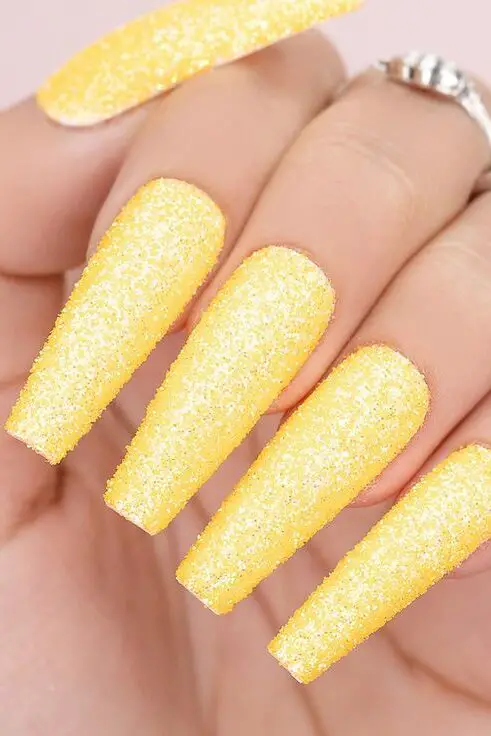
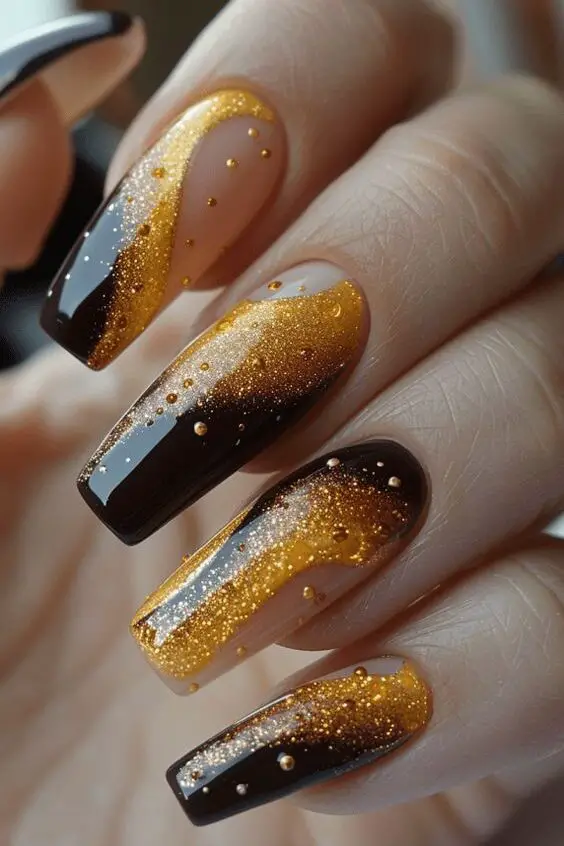
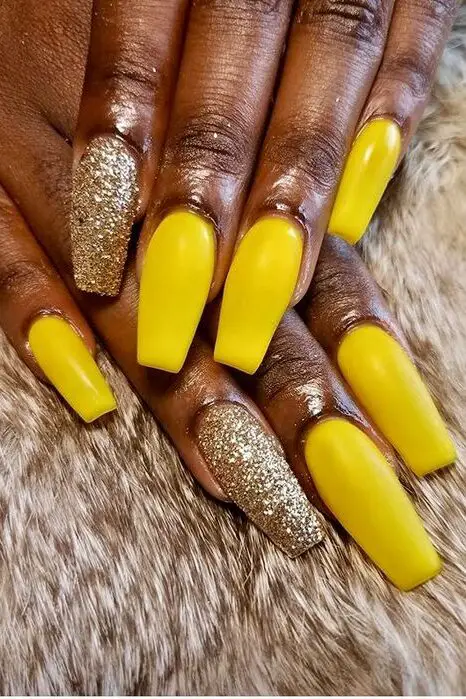
12. Matte Yellow with Glitter Accent
Matte yellow acrylic nails with glitter accents offer a stylish and eye-catching option for those looking to make a statement with their summer nail designs.
Here’s a detailed guide on how to achieve this fashionable look:
Key Products and Application Techniques:
Base Color:
Start with UN/DN Laqr’s Nail Polish in Joyride, a vibrant yellow that provides a perfect matte finish for the base.
Glitter Accents:
For a subtle yet glamorous look, opt for glitter French tips. You can use a warm yellow iridescent glitter that includes hints of orange and green sparkles.
This glitter can be applied over gel, nail polish, or acrylic, making it flexible for different nail art techniques.
Application Methods:
Consider the raw sugar dust effect, where you lightly sprinkle glitter over the wet base coat to create a textured look.
The burnish effect involves rubbing glitter into a still-tacky base coat, achieving a smooth, reflective finish.
Traditional nail polish application with a top coat seals in the glitter, ensuring durability and shine.
Variations of Matte Yellow with Glitter Accent:
Bold Yellow Nails with Gold Glitter: This variation adds a luxurious touch, perfect for evenings or special occasions.
Sassy Yellow Acrylic Nails with Bold Glitter: For those who prefer a more dramatic look, this style uses dense glitter to make the nails truly pop.
13. Textured Crinkle Nails
Textured Crinkle Nails are a captivating trend in nail art, drawing inspiration from the serene beauty of winter landscapes.
This design is achieved through a unique method where crinkled plastic wrap is applied to gel on the underside of the nail.
Afterward, a shiny top coat and a sprinkle of glitter are added to enhance the textured appearance.
Step-by-Step Guide to Creating Textured Crinkle Nails:
Preparation:
Start with a clean, dry nail surface. Apply a base coat to protect your nails and improve the adherence of the gel.
Applying the Gel:
Choose a gel polish in your desired color and apply a thin layer to your nails. Cure under a UV or LED lamp as directed.
Adding Texture:
While the gel is still tacky, press a piece of crinkled plastic wrap onto the nail. Carefully peel it off to leave a crinkled pattern.
Enhancing the Design:
Apply a shiny top coat over the textured pattern. While the top coat is still wet, sprinkle your choice of glitter over the nails for a sparkling effect.
Final Curing:
Cure the nails again under a UV or LED lamp to set the top coat and ensure the longevity of your design.
Popular Variations and Styles:
Full Nail Coverage: Coat the entire nail with the crinkle texture for a bold look.
See-Through Tips: Apply the texture only to the tips of the nails for a subtle yet chic appearance.
Winter-Themed Combinations: Incorporate other elements like snowflakes or icy blue colors to complement the crinkled texture.
Tips for Maintenance:
Top Coat Reapplication: To maintain the shine and protect the texture, reapply a top coat every few days.
Gentle Use: Be mindful of your nail art when performing tasks that could snag or chip the design.
14. Negative Space Palms
Negative Space Palms nail art is a unique and eye-catching design that cleverly uses the absence of color to create striking visual contrasts.
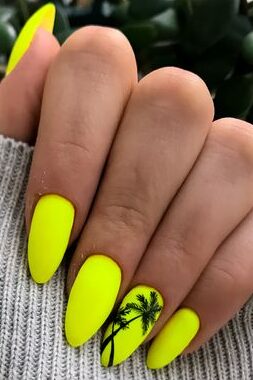
Inspired by the silhouette of palm trees against a tropical sky, this design typically features shades of green and white or leaves certain areas unpainted to enhance the effect.
Key Features of Negative Space Palms Nail Art
Design Inspiration: Palm trees, a symbol of summer relaxation.
Color Scheme: Predominantly green with white or clear negative spaces.
Artistic Approach: Can be free-handed for a personalized touch.
Tutorial Overview: “Endless Summer – Aqua Palm Trees & Negative Space”
This specific design from Buff and Polish utilizes a combination of specialized tools and techniques to achieve a stunning summer-ready look.
Tools and Supplies:
Mundo de Uñas – Mint 72: A vibrant green polish that forms the base of the palm leaves.
Non-descript White Polish: Used to add highlights and details to the palm design.
Coconut Tree 3D Nail Art Stickers: From Born Pretty Store, these stickers can add depth and realism to the design.
MoYou London – Holy Shapes 02: A stamping plate used for creating precise shapes and backgrounds.
Pure Color Brush No. 10: From Whats Up Nails, perfect for detailed brush strokes.
Step-by-Step Application:
Base Preparation: Apply a clear or nude base coat to protect your nails and enhance the design’s negative space.
Stamping the Background: Use the MoYou London plate to stamp geometric or abstract shapes in a light color as the background.
Drawing the Palms: With Mundo de Uñas – Mint 72, draw palm leaves, filling only parts of the leaves to maintain negative spaces.
Adding Details: Use the white polish and Pure Color Brush to add highlights and finer details to the palm leaves.
Applying Stickers: Place Coconut Tree 3D stickers strategically to give a layered effect.
Sealing the Design: Finish with a top coat to protect your artwork and add a glossy finish.
Additional Creative Ideas
Mixing Techniques: Combine free-hand drawing with stickers and stamping for a mixed-media effect.
Color Variations: Experiment with different shades of green or add subtle colors like aqua to enhance the tropical feel.
15. French Manicure with Yellow Tips
French Manicure with Yellow Tips offers a vibrant twist on the classic French manicure, perfect for adding a cheerful pop of color to your summer look.
This nail design trend combines the elegance of a traditional French manicure with the lively, sunny vibes of yellow, making it a popular choice for those who enjoy a splash of color.
Variations of French Manicure with Yellow Tips
Pastel Yellow Tips: Often paired with white French tips, pastel yellow offers a soft, contrasting look that’s both elegant and understated.
Sunshine-Dipped Tips: For a subtle yet bright enhancement, opt for sunshine yellow tips. This style is less about full coverage and more about adding a hint of color.
Mod French: Elevate the classic look by applying a thicker, more rounded yellow tip on long, almond-shaped nails. Adding jeweled accents can further enhance the glamour.
Mix Match: Combine various designs such as the traditional French manicure, an hourglass shape, and full-coverage yellow for a unique and eclectic appearance.
Reverse French: A creative take where only the area closest to the cuticle is painted in a vibrant yellow, offering a modern twist on the reverse French manicure.
Application Techniques for Yellow French Tips
Base Preparation: Start with a clear or nude base coat to enhance the color’s vibrancy.
Tip Painting: Carefully paint the tips with your chosen shade of yellow. Use tape or stencils for precision if necessary.
Finishing Touches: Apply a top coat to seal in the color and add a glossy finish, ensuring longevity and shine.
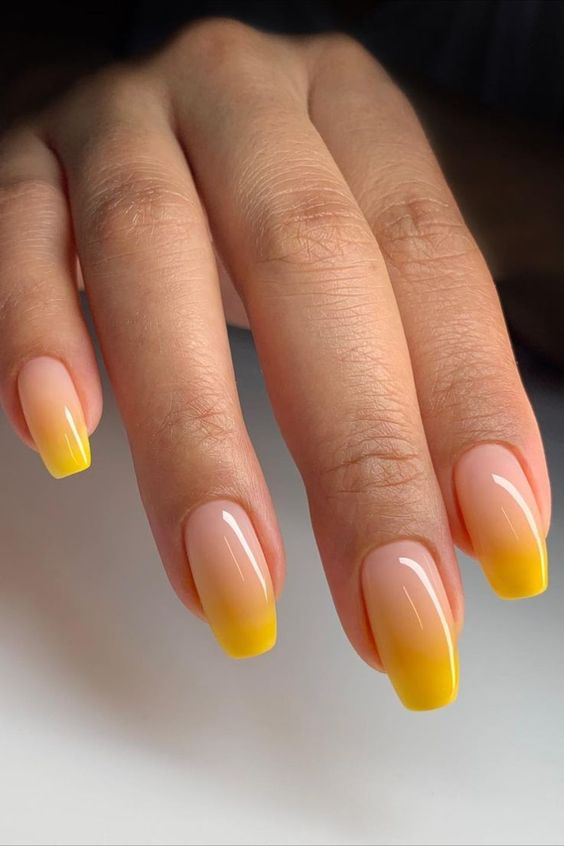
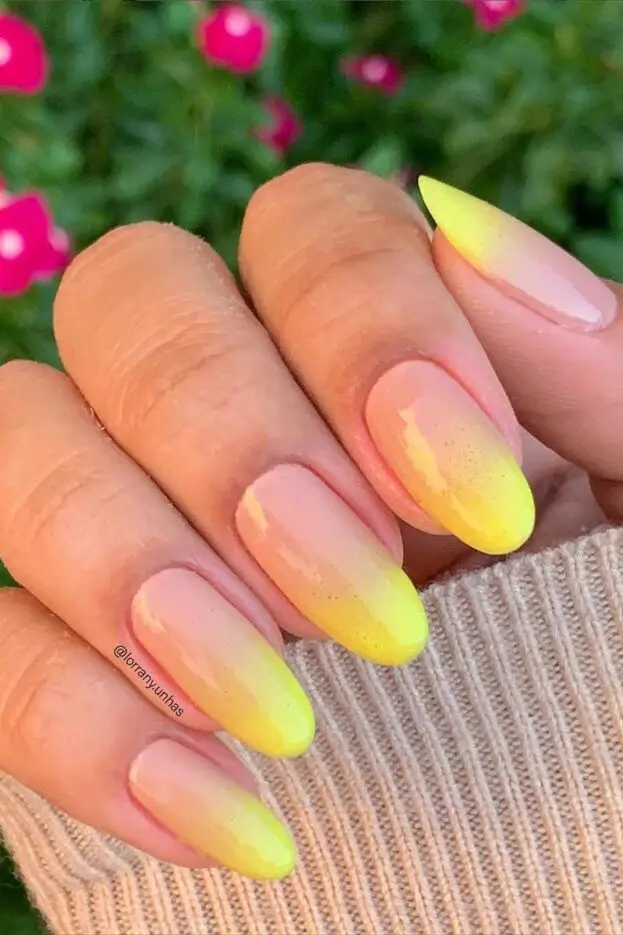
16. Lemonade Gradient
Lemonade Gradient nail art is a refreshing design that captures the essence of summer with its vibrant yellow base and crisp white top, resembling a delicious glass of lemonade.
This design is not only visually appealing but also simple to create, allowing you to bring a touch of summer fun to your nails. Here’s how you can achieve the Lemonade Gradient look:
Step-by-Step Guide to Creating Lemonade Gradient Nails:
Base Color Application:
Start by applying a bright yellow polish as the base color on all nails. This vibrant shade will act as the perfect backdrop for the gradient effect.
Creating the Gradient:
Using a makeup sponge, apply solid white polish to one end of the sponge. Dab the sponge lightly onto the tips of your nails, gradually blending into the yellow to create a smooth gradient effect.
Adding Mint Leaves:
On the two middle fingernails, use two shades of green polish to paint mint leaves. This adds a realistic and creative touch to the design, enhancing the lemonade theme.
Painting Lemon Slices:
For the index and pinky fingernails, use a striping brush along with white and yellow polish to create the look of lemon slices. The natural curve of your nails will help in achieving the perfect oval shape for the slices.
Matte Topcoat Application:
To enhance the cooling effect of the design, apply a matte topcoat over all your nails. This not only seals in the design but also gives it a unique, frosted look.
Optional Glitter Addition:
For a sparkling variation, consider adding a touch of glitter to your nails. This creates a ‘Sparkling Lemonade’ effect, perfect for evening events or whenever you want a bit of extra sparkle.
17. Starry Night Nails
The Starry Night nail design draws its inspiration from Vincent Van Gogh’s iconic painting and the enchanting allure of summer nights.
This nail art style is particularly favored for its dynamic use of colors and its ability to convey the beauty of a starlit sky. Here’s a detailed guide on how you can achieve this mesmerizing look:
Step-by-Step Guide to Creating Starry Night Nails:
Base Coat Application:
Begin by applying a clear base coat to protect your nails and enhance the adherence of the polish.
Color Base:
Paint your nails with a deep blue polish to set the night sky backdrop. Allow it to dry completely.
Adding Starry Details:
Dip a fine brush in white polish and flick it across your nails to create small stars. For larger stars, dot the brush gently on the nail.
Incorporating Yellow Accents:
Use a thin brush to add small strokes of yellow to mimic the swirling wind patterns seen in Van Gogh’s painting.
Final Touches:
Once all the colors have dried, seal your artwork with a top coat to ensure longevity and a glossy finish.
Tools and Materials Needed:
Deep Blue Nail Polish: Acts as the perfect canvas for the starry night.
White and Yellow Nail Polish: For creating stars and adding vibrant swirls.
Fine-tip Brush: Essential for detailed painting.
Top Coat: To protect and enhance the nail design.
Design Variations and Inspiration:
Constellation Stickers: Enhance the celestial theme by using constellation nail art stickers with glitter.
Gel Options: For a more durable design, consider using gel nails which can be cured under a lamp for a long-lasting finish.
18. Mismatched French Tips: Yellow & White
Mismatched French tips breathe new life into the classic French manicure by introducing a playful and modern twist.

This trend, which has taken social media by storm, involves using different colors for each tip, such as a vibrant yellow and crisp white.
The flexibility of this design allows for a variety of creative interpretations, making it a favorite among those looking to add a unique touch to their nail art.
Key Features of Mismatched French Tips:
Trendsetter: Inspired by popular nail artists like luccinails, this style features a mix of yellow and white nail polish, providing a fresh take on the traditional French manicure.
Design Variations:
The beauty of mismatched French tips lies in their versatility. Here are some popular design ideas that incorporate the yellow and white theme:
Colorblock: Simple yet striking, this design uses blocks of yellow and white on different nails for a geometric appeal.
Emoji Fun: Adding playful emoji designs in black on top of yellow and white tips can infuse a fun, youthful vibe.
Rainbow Gradient: A soft gradient transitioning from yellow to white, often combined with other pastel shades for a rainbow effect.
Layered Mountains: Abstract mountain shapes layered over each other in shades of yellow and white.
Squiggle-Edge: Wavy lines separating the yellow and white colors add a whimsical touch.
Half-and-Half: Each nail split into half yellow and half white, sometimes diagonally for a dynamic look.
Mismatched Swirl: Swirling patterns that play with the contrast between yellow and white.
Two-Toned Rainbow: Each nail featuring a different color pairing, with yellow and white as constants.
Pastel Neon: Soft neon hues paired with bold yellow and white for a striking effect.
Bold Rainbow Gradient: A more vivid version of the rainbow gradient, perfect for those who love bright colors.
Abstract Art: Freeform abstract patterns that make each nail a piece of art.
Aperol Spritz: Inspired by the popular drink, featuring sunny yellow with hints of white.
3D Effects: Adding textures or small 3D elements to enhance the tactile feel.
Earth Tones: Incorporating earthy shades with yellow and white for a natural look.
Clear Tips: A minimalist approach with clear polish, accented with yellow and white tips.
Tips for Creating Mismatched French Tips:
Precision is Key: Use tape or nail guides to achieve clean, sharp lines for your French tips.
Experiment with Textures: Combine matte and glossy finishes or add glitter to enhance the visual interest of your design.
Balance the Colors: While experimenting, maintain a balance between the colors to ensure one does not overpower the other.
19. Textured Yellow Nails with Neon Drip
Textured Yellow Nails with Neon Drip is a dynamic and eye-catching nail art trend that combines the allure of bright yellow hues with the edgy appeal of neon drips.
This design stands out for its striking contrast and textured appearance, making it a favorite among those who enjoy bold and creative nail art. Here’s how you can achieve this trendy look:
Step-by-Step Guide to Creating Textured Yellow Nails with Neon Drip:
Prepare Your Nails:
Begin with clean, shaped nails. Apply a base coat to protect your nails and improve the adherence of the polish.
Apply the Base Color:
Choose a matte yellow nail polish for the base. For a textured look, you can apply the polish with a sponge or use a textured nail polish. Allow it to dry completely.
Creating the Neon Drip:
Using a detailing brush, apply neon nail polish at the tip of the nail. Gently drag the polish down towards the cuticle to create a drip effect. You can use multiple neon colors for a more vibrant look.
Seal the Design:
Once your design has dried, apply a clear top coat to seal in the artwork and add a glossy finish.
Tools and Materials Needed:
Matte Yellow Nail Polish: Serves as the base for the textured effect.
Neon Nail Polish: For creating the drip effect. Popular choices include neon green, pink, or orange.
Detailing Brush: Essential for precise application of the drip design.
Sponge (optional): For creating a textured base if not using textured polish.
Top Coat: To protect and enhance the nail design.
Design Variations and Tips:
Color Combinations: Experiment with different neon colors against the yellow base to see which combination stands out the most.
Texture Varieties: Try different methods like dabbing or stippling with a sponge to create unique textures on the yellow base.
Maintenance Tips:
Regular Top Coat Application: Reapply a top coat every few days to maintain the gloss and protect the design.
Gentle Use: Avoid activities that can chip or damage the nail polish to extend the life of your nail art.
Final Thoughts
As we journey through the vibrant world of summer nail art, it’s clear that yellow dominates the season with its myriad of shades and intricate designs.
From the glossy elegance of honeycomb patterns to the playful vibrancy of lemonade gradients, each style embodies the joy and brightness of summer, offering a delightful canvas to express one’s individuality and mood.
The diversity in designs, whether it be the subtle elegance of daisy nail art or the dramatic flair of neon yellow ombre, ensures that there’s a yellow nail design to match every summer occasion and personal style preference.


You May Also Like
French Tip Nail Designs for Summer: 16 Stunning Looks to Stand Out
Juicy Trends: Top 20 Cutest Fruit Nail Design Ideas to Make You Stand Out