White summer nails are a timeless classic, embodying the essence of simplicity and elegance that can elevate any summer outfit.
This season’s white summer nail ideas go beyond the basics, introducing playful and whimsical touches from delicate floral patterns to iridescent shimmer.
As you dive into the variety of manicures, from the minimalist charm of white and blue accents to the lively contrasts of white nails paired with neon or pastel colors, you’ll discover 18 unique nail designs.
Each design captures the sparkling spirit of summer, ensuring your nails stand out with an eye-catching blend of textures, colors, and intricate artistry, making them the perfect addition to your summer style repertoire.
Busy? Save this pin for later.

1. Confetti Nails with a White Base
Confetti nails with a white base offer a vibrant and playful look, perfect for adding a splash of color to your summer style.
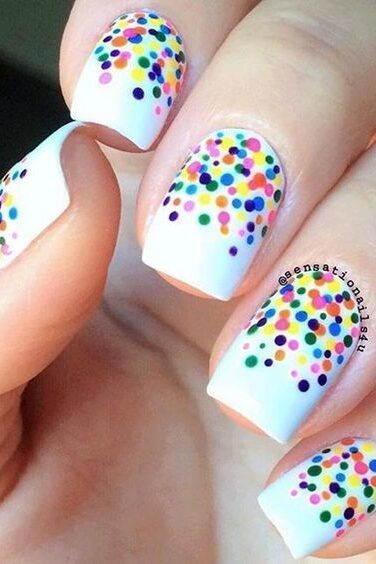
Here’s how you can achieve this eye-catching manicure:
Step-by-Step Guide to Creating Confetti Nails with a White Base
Prepare Your Nails:
Start with clean, shaped nails. Apply a base coat to protect your nails and ensure a smooth application.
Apply the White Base Coat:
Choose a high-quality white nail polish and apply one or two coats, depending on the opacity you desire. Allow it to dry completely.
Add the Confetti:
While the base coat is still tacky, sprinkle your chosen confetti over the nails. You can use a variety of colors and shapes to match your personal style.
For a more precise application, use a toothpick or a small dotting tool to place the confetti on your nails.
Seal the Design:
Once you are satisfied with your confetti placement, apply a clear top coat to seal in the design. This not only adds a glossy finish but also ensures the longevity of your manicure.
Customization Options:
Feel free to add extra embellishments such as tiny rhinestones or a touch of glitter to enhance the festive look.
Tips for Perfect Confetti Nails
Choosing the Right Confetti: Opt for thin, nail-specific confetti. These are usually lighter and adhere better to nail polish, reducing the risk of peeling off.
Working with Gel Polish: If you prefer a longer-lasting manicure, consider using gel polish for your base and top coats. Remember that curing under a UV or LED lamp is required for gel polish.
Creative Variations: Experiment with different confetti placements, such as only on the tips or a gradient effect, to make your nails uniquely yours.
2. Negative Space White Nail Art
Negative space white nail art introduces a unique and modern twist to traditional manicures by strategically leaving parts of the nail unpainted.
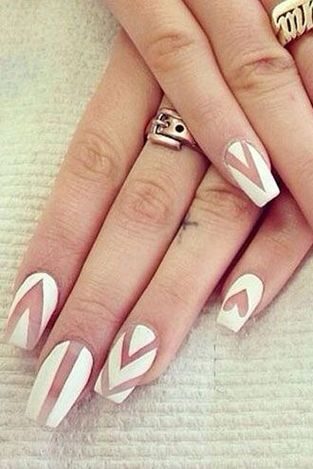
Here’s a guide to achieving this look, with a focus on simplicity and elegance.
Essential Products Needed
To start, you’ll need a few basic items:
Base coat
White nail polish
Black nail polish
Thin brush for detailed designs
Nail polish remover or acetone
Top coat
Step-by-Step Guide to Creating Negative Space White Nail Art
Prepare Your Nails:
Begin with clean, dry nails. Apply a base coat to protect your nails and improve the longevity of your nail art.
Design Planning:
Decide on your design beforehand. Popular choices include geometric shapes, abstract lines, or simple motifs like hearts.
Application of Base Color:
Apply a thin layer of nude or clear polish as your base color if you prefer not to leave your nails completely bare.
Creating the Design:
Use striping tape or stencils to mark out the areas you want to leave unpainted.
Apply white polish around the tape or stencil. For intricate designs, use a thin brush to carefully paint around the negative spaces.
Detailing:
Once the white polish is semi-dry, gently remove the tape or stencil to reveal your design.
Clean up any smudges or excess polish with a thin brush dipped in nail polish remover.
Seal the Design:
Apply a top coat to protect your artwork and add a glossy finish.
Creative Design Ideas
Here are some popular designs to inspire your negative space creations:
Chequer Board: Use tape to create square shapes, alternating between painted and unpainted squares.
Half Moons: Paint half-moons at the base or tip of your nails, leaving the rest of the nail bare.
Heart Tips: Draw heart shapes on the tips of your nails, filling in the space around the hearts with white polish.
Additional Tips for Perfect Results
Ensure your base coat is completely dry before applying tape or beginning your design to prevent lifting.
Apply the top coat with a generous amount of polish on the brush to avoid dragging the underlying design.
Experiment with different color combinations and textures, like matte top coats or metallic polishes, for a personalized touch.
3. White Daisy Nail Art
White Daisy Nail Art offers a delightful and fresh approach to summer manicures that can brighten up your look with its simplicity and charm.
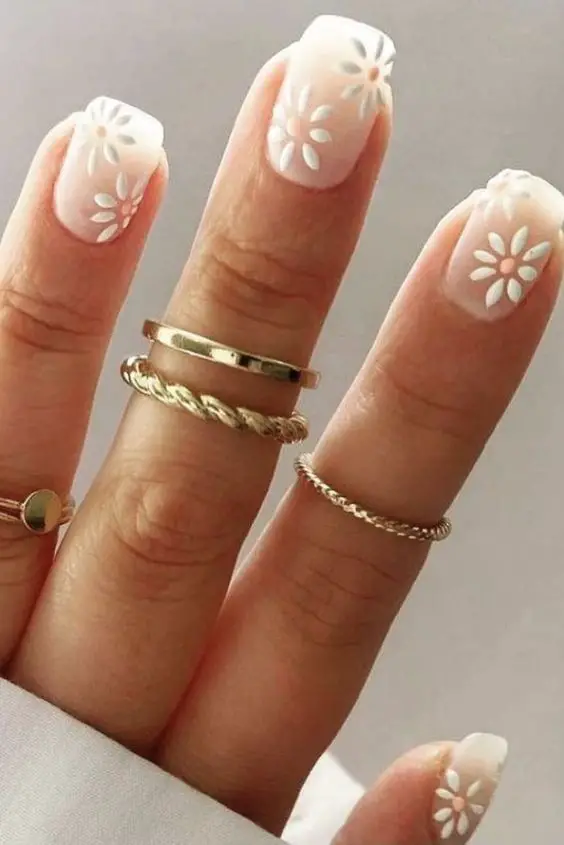
Here’s how you can create this popular design at home:
Essential Products Needed
To start, gather the following items:
Base coat (e.g., Dazzle Dry’s Peacefully Me)
White acrylic paint
Yellow nail polish
A small dotting tool
Green and orange acrylic paint
Clear top coat
Step-by-Step Guide to Creating White Daisy Nail Art
Prepare Your Nails:
Ensure your nails are clean and shaped to your liking. Apply a base coat to protect your nails and help the nail art last longer.
Apply the Base Color:
Use a light gray or white nail polish as your base color. Allow it to dry completely.
Painting the Daisies:
Dip your dotting tool into white acrylic paint and create small white dots around a central point on your nail to form the petals of the daisy.
For the center of the daisy, use yellow nail polish to create a small circle.
Adding Details to the Petals:
To give the petals a more realistic look, make the dots gradually smaller as they move away from the center.
Creating Leaves:
Mix green and a bit of orange acrylic paint to get an olive color suitable for the leaves.
Use a thin brush to add small leaf shapes near the daisies.
Finish the Design:
Once all elements are dry, apply a clear top coat to seal in your design and add a glossy finish.
Additional Tips for Perfect Results
Use a fine brush or a toothpick for intricate details like the leaves and smaller dots.
Ensure each layer is completely dry before applying the next to avoid smudging.
You can add a touch of sparkle by using a silver glitter base before painting your daisies.
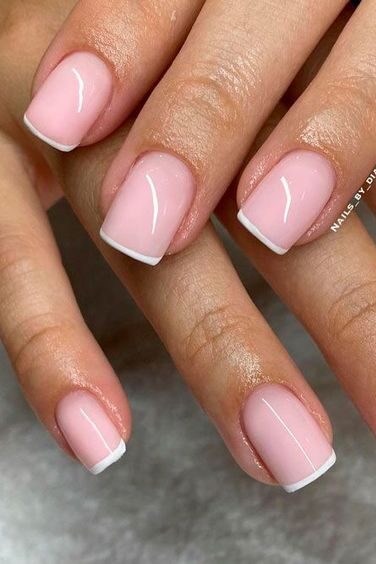
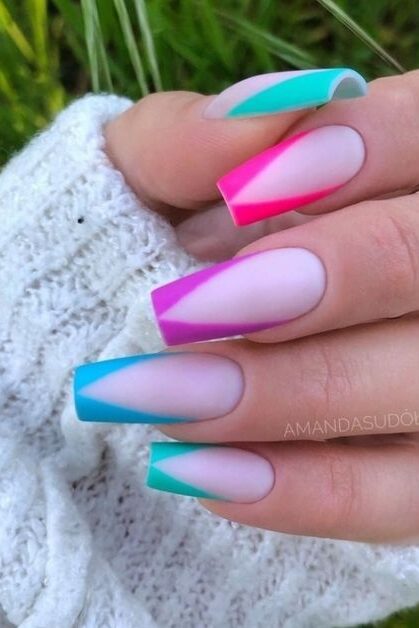
4. French Manicure with a Pop of Color Tip
Essential Products Needed
To achieve a French Manicure with a pop of color, you will need:
Base coat
White nail polish for the tips
Colored nail polish for the pop of color (e.g., baby blue, pastel pink, lilac)
Top coat
Optional: glitter or crystal accents
Step-by-Step Guide to Creating French Manicure with a Pop of Color Tip
Prepare Your Nails:
Start with clean, shaped nails. Apply a base coat to protect your nails and ensure a smooth application.
Apply the Base Color:
Choose a clear, nude, or white polish as your base color and apply it to your entire nail. Allow it to dry completely.
Paint the Tips:
Using white nail polish, carefully paint the tips of your nails. You can use striping tape to achieve a clean, straight line.
Add the Pop of Color:
Select a pastel or light shade like baby blue, pastel pink, or lilac. Apply this color just above the white tip, following the same curve. This adds a modern twist to the classic French manicure.
Enhance with Accents (Optional):
For an extra touch of elegance, add glitter or small crystal accents to the colored tip. This can be especially striking for special occasions.
Seal the Design:
Finish with a clear top coat to protect your nail art and add a glossy finish.
Tips for Perfect French Manicure with a Pop of Color
Precision is Key: Use a fine brush or striping tape to ensure the lines between the white and colored tips are sharp and clean.
Choose Complementary Colors: Select a pop of color that complements your skin tone and the occasion. Light pastels are great for daytime events, while bolder shades can be perfect for an evening out.
Experiment with Textures: Mixing matte and glossy finishes can create a unique look. Consider a matte base with a glossy colored tip, or vice versa.
Maintain Nail Health: Regularly moisturize your cuticles and keep your nails trimmed to ensure your manicure looks its best.
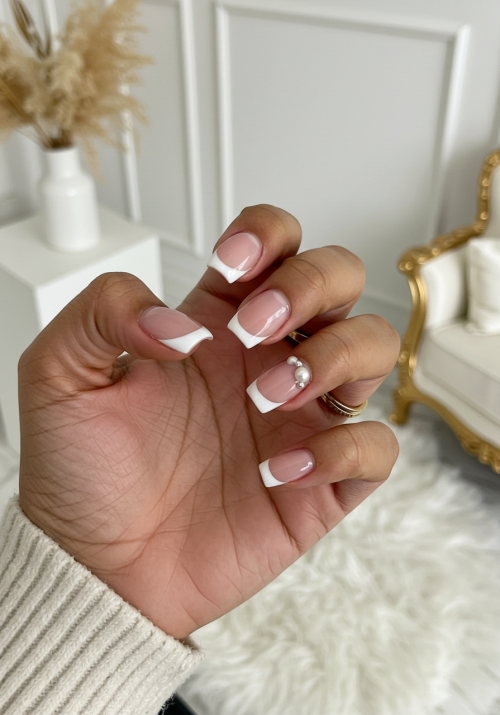
5. White and Bling Accent Nail
White and Bling Accent Nail designs blend the timeless elegance of white manicures with the eye-catching sparkle of rhinestones and pearls, offering a sophisticated yet striking look.
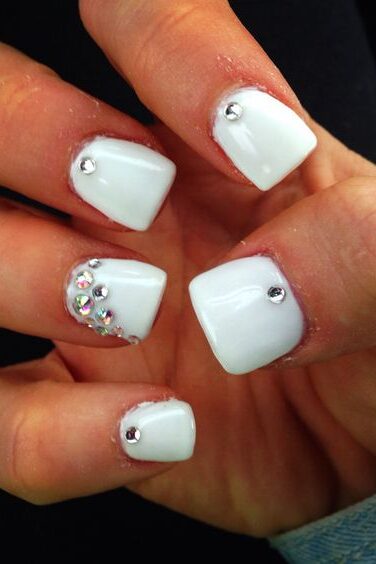
Here’s how you can achieve this glamorous style:
Essential Products Needed
Base coat
White nail polish
Rhinestones and/or pearls
Adhesive or nail glue
Tweezers or a dotting tool
Top coat
Step-by-Step Guide to Creating White and Bling Accent Nails
Prepare Your Nails:
Start with clean, shaped nails. Apply a base coat to protect your nails and ensure a smooth surface for your polish.
Apply the White Base:
Paint your nails with a white nail polish. Allow it to dry completely to avoid smudging.
Select Your Bling:
Choose from rhinestones or pearls. These can vary in size and color, allowing for a range of creative possibilities.
Apply the Accents:
Using tweezers or a dotting tool, apply a small dab of adhesive to your nail where you want to place the rhinestone or pearl.
Carefully place the accent onto the adhesive. Press gently but firmly to ensure it adheres well.
Seal the Design:
Once all accents are in place and the adhesive has dried, apply a top coat to seal in your design and add a glossy finish.
Creative Variations
Single Accent Nail: Instead of decorating all ten nails, consider applying accents to only one or two nails per hand for a subtler look.
Pearlcore Designs: Incorporate trends like pearl-adorned French tips or pearlescent vanilla chrome for a chic, modern twist.
Abstract Designs: Use small rhinestones to create abstract patterns on one or more nails, adding artistic flair to your manicure.
Tips for Long-Lasting Wear
Nail Care: Be sure to use a base and top coat to protect your nails and the longevity of your manicure.
Gentle Removal: To remove, soak your nails in warm, soapy water to soften the adhesive, then gently peel off the accents to avoid damage to the nail surface.
6. Scalloped White French Tip
The scalloped French tip offers a chic and playful twist to the classic French manicure, perfect for those looking to add a unique touch to their nail art.
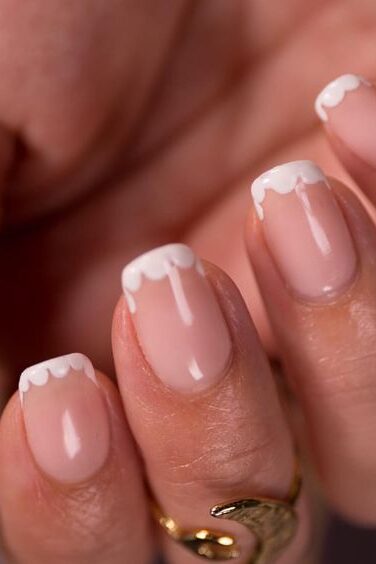
This design is versatile, making it suitable for various settings like a casual day at the office or a stylish back-to-school look.
Here’s how you can achieve this sophisticated design with a few simple steps:
Essential Products Needed
Base coat (preferably in nude or pale pink)
White nail polish
Clear top coat
A pearl or bead-tipped sewing pin
Step-by-Step Guide to Creating Scalloped White French Tips
Prepare Your Nails:
Start by applying a base coat in a nude or pale pink shade to clean, shaped nails. Allow it to dry completely.
Creating Scallops:
Dip the pearl or bead-tipped sewing pin into white nail polish. Carefully create small dots along the tip of each nail, spacing them evenly.
Connect the Dots:
Using the brush from your white polish bottle, gently connect these dots in a scalloped pattern along the tip of your nails.
Final Touches:
Allow your scalloped design to dry thoroughly before applying a clear top coat. This will seal in your design and give it a glossy finish.
Tips for Perfect Scalloped French Tips
Steady Hand: Ensure your hand is steady while connecting the dots to achieve a smooth, curved line.
Dot Size Variation: Experiment with different sizes of dots for a more dynamic look.
Color Variations: While traditional scalloped tips are white, feel free to experiment with other colors like soft pastels or bold shades depending on the occasion.
7. White Marble Nails
White Marble Nails are a sophisticated and artistic choice for those who appreciate a touch of luxury in their manicure.
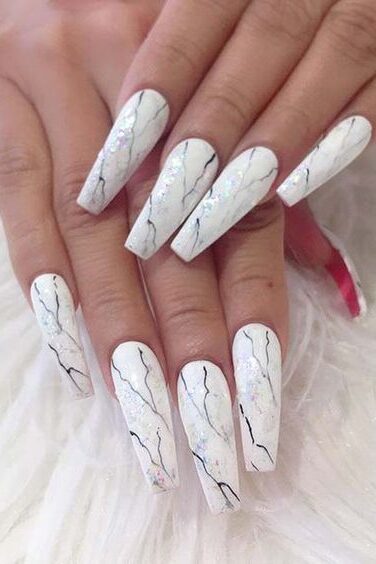
This design mimics the elegant swirls found in natural marble, creating a captivating look that’s perfect for both day and evening wear.
Here’s a detailed guide on how to achieve the White Marble Nail effect:
Essential Products Needed
To start, you’ll need the following items:
Milky white gel polish
Mop brush with short, stiff, and dense bristles
Three different gel colors (for blending)
Orange wood stick
Gel brush
Special blooming gel
Black, teal, and gold tints
99% rubbing alcohol
Top coat
Step-by-Step Guide to Creating White Marble Nails
Base Preparation:
Apply a milky white gel polish as your base coat and cure it under a UV or LED lamp as per the polish instructions.
Creating the Marble Effect:
Load a mop brush with white gel polish and tap it vertically on the nail to start creating the marble lines.
Blend the lines by continuously tapping until you achieve the desired marble effect.
Color Application:
Place three gel colors on a tile and swirl them slightly with an orange wood stick.
Use a gel brush to scoop up the mixed colors and apply them on the nail in a zigzag motion.
Soften the edges using the corner of the brush to integrate the colors beautifully.
Adding Depth with Blooming Gel:
Apply a layer of special blooming gel over the white base.
Draw fine black lines and wait for them to diffuse into the blooming gel, creating a natural marble look.
Incorporating Additional Colors:
Introduce drops of black, teal, and gold tints to enhance the complexity of the marble pattern.
Use a brush dipped in rubbing alcohol to spread the tints, further developing the marble effect.
Finalizing the Design:
Allow the nail to air dry for about 30 seconds.
Seal everything with a top coat to ensure durability and a glossy finish.
Tips for Perfect Marble Nails
Practice Makes Perfect: The marble effect can vary greatly, so practice on a paper or a practice nail before applying it to your nails.
Work Quickly: Gel polish tends to set fast under a lamp, so work swiftly to blend the colors and effects before curing.
Customization: Feel free to experiment with different color combinations and tint placements to create a unique design that expresses your style.
8. White Ombre Nails
White Ombre Nails are gaining popularity in 2024, offering a stylish and versatile option that complements any season.
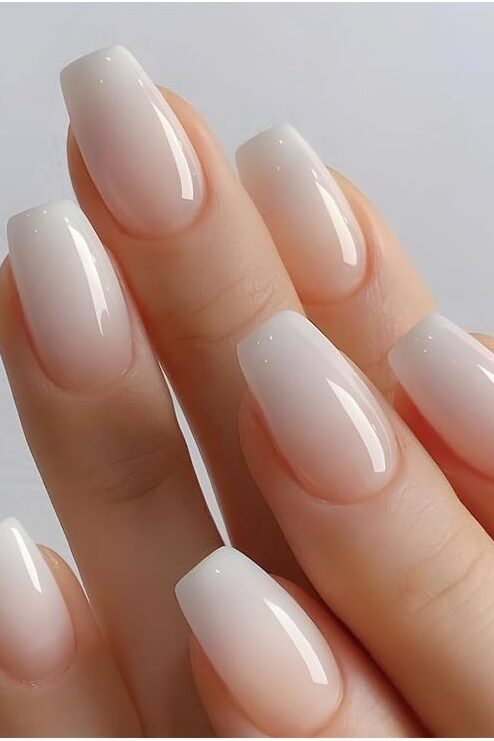
These nails feature a beautiful gradient that fades from opaque white to transparent, creating a subtle yet striking effect.
Here’s how you can achieve this sought-after look:
Essential Products Needed
To create white ombre nails, you will need:
A base coat
White nail polish
A sponge (for the ombre effect)
A top coat
Step-by-Step Guide to Creating White Ombre Nails
Prepare Your Nails:
Begin with clean, shaped nails. Apply a base coat to protect your nails and ensure a smooth application.
Apply the White Base:
Paint your nails with one or two coats of white nail polish, depending on the desired opacity. Allow it to dry completely.
Creating the Ombre Effect:
Lightly dab a sponge into white nail polish, then gently press it onto the tip of your nails, moving upwards to create a faded effect.
Clean Up:
Use a small brush dipped in nail polish remover to clean up any excess polish around your nails.
Seal the Design:
Finish with a top coat to protect your nail art and add a glossy finish.
Additional Tips for Perfect Ombre Nails
Sponge Selection: Use a dense makeup sponge as it gives a smoother gradient effect.
Practice the Technique: Try practicing on a piece of paper first to perfect the fading effect before applying it to your nails.
Layering: You might need to repeat the dabbing process 2-3 times to achieve the perfect gradient. Ensure each layer is dry before applying the next.
9. White and Neon accents Nails (pick your favorite summery neon color!)
White and Neon Accent Nails offer a vibrant and eye-catching look that’s perfect for summer.
This style combines the crispness of white with the vivid punch of neon colors, making your nails stand out beautifully.
Here’s how you can create this trendy nail art:
Essential Products Needed
Base coat
White nail polish
Neon nail polish (choose your favorite color like neon purple, pink, or green)
Small detailing brush
Top coat
Step-by-Step Guide to Creating White and Neon Accent Nails
Prepare Your Nails:
Start with clean, shaped nails. Apply a base coat to protect your nails and provide a smooth surface for painting.
Apply the White Base:
Paint all your nails with a white nail polish as the base color. This will make the neon colors pop even more. Allow it to dry completely.
Design with Neon:
Choose your favorite neon color and use a small brush to create designs. Popular designs include flames, ombre effects, minimalist dots, or geometric shapes like triangles and stripes.
Detailing:
For a precise and clean design, use a detailing brush to touch up and define the edges of your neon accents.
Seal the Design:
Apply a top coat to protect your nail art and add a glossy finish, ensuring your manicure lasts longer and keeps its vibrant look.
Additional Tips for Perfect Neon Accent Nails
Neon Color Selection: Bright neon colors like electric blue, hot pink, or lime green are perfect for summer and enhance the white base dramatically.
Design Simplicity: Even simple neon dots or lines can dramatically enhance the overall look of your nails without requiring complex artistry.
Experiment with Patterns: Try different neon patterns on each nail for a fun and eclectic look, or keep it uniform for a more cohesive appearance.
10. Seashell Nail Art on a White Base
Seashell Nail Art on a White Base captures the essence of the ocean and transforms your nails into a miniature seascape.

This intricate design combines the simplicity of white nails with the opulence of seashells, making it an ideal choice for beach events or summer parties.
Here’s how to bring this aquatic fantasy to life on your nails:
Essential Products Needed
Gelx fill
Dehydrator
Primer
Rubber base
Structure gel
Rubbing alcohol
White gel polish (e.g., Madame Glam’s Perfect White)
Iridescent blue color polish
Rhinestone glue (e.g., Model Ones)
Small pearls or similar embellishments
Mermaid chrome powder
Top coat (glossy and matte options)
Acrylic powder or builder gel
Thin nail art brush
Step-by-Step Guide to Creating Seashell Nail Art on White Base
Prep Your Nails:
Begin with a Gelx fill on nails that have grown out for about a week. Push back cuticles, lightly buff the nail plate, and cleanse any debris and oil.
Base Application:
Apply a dehydrator at the base of the nail where there’s growth, followed by a primer in the same area.
Add a rubber base at the base of the nail and work upwards, then cure in the lamp for a full 60 seconds.
White Base Layer:
Apply ‘Perfect White’ gel polish in two even layers over all nails, curing each layer in the lamp for a full 60 seconds.
Seashell Design:
Use hard gel from IBD and a thin nail art brush to create the seashell design, starting thickly at the top and thinning out as it moves down the nail.
Apply a mermaid chrome powder using a makeup applicator to add a shimmering underwater effect.
Adding Details and Texture:
Use rhinestone glue to create 3D lines and apply small dots.
Place pearls or small stones to enhance the seashell effect.
Consider using acrylic powder or builder gel for a more textured look.
Final Touches:
Seal your artwork with a glossy top coat for a shiny finish or opt for a matte top coat for a more sophisticated, realistic look.
Additional Tips for Perfect Seashell Nails
Experiment with Colors: While white and blue are classic, adding hints of teal, gold, or even purple can mimic the natural variations in seashells.
Customize Your Design: Each nail can feature different aspects of seashell art – from complete shells to mere hints of iridescence and pearl.
Maintain Nail Health: Regularly moisturize your cuticles and keep your nails trimmed to ensure your manicure looks its best.
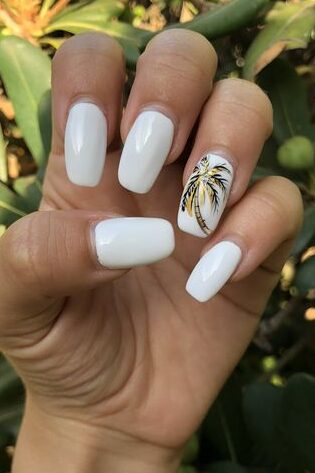
11. Palm Tree Nail Art on White Base
Palm Tree Nail Art on a white base brings a tropical vibe right to your fingertips, ideal for both day-to-day wear and special summer occasions.
Here’s a straightforward guide to achieving this stylish look:
Essential Products Needed
White nail polish
Black nail polish for the palm tree details
Additional colors (optional): pink, green, or gold
Small detailing brush
Top coat
Step-by-Step Guide to Creating Palm Tree Nail Art
Prepare Your Nails:
Ensure your nails are clean and shaped. Apply a base coat to protect your nails and improve the adherence of the polish.
Apply the White Base:
Use a white nail polish as the base color. Allow it to dry completely to provide a good canvas for your artwork.
Creating the Gradient Background (Optional):
If you desire a sunset background, apply orange and yellow nail polish to a disposable makeup sponge and dab it gently on the nail to create a gradient effect.
Painting the Palm Tree:
Start with the trunk of the palm tree using black nail polish and a tiny detail brush. Draw a slightly curved line from the tip of your nail upwards.
Add leaves by painting small lines coming off the top of the trunk, fanning them out to mimic the look of a palm tree.
Adding Details:
For a more detailed look, you can add coconuts using small dots of black polish near the base of the leaves.
Optionally, create a black base at the bottom of your nail to resemble an island.
Additional Elements:
On other nails, consider painting simple elements like distant birds or small waves to complement the theme.
Seal the Design:
Apply a top coat to protect your design and add a glossy finish, ensuring your beautiful palm tree art lasts longer.
Tips for Perfect Palm Tree Nail Art
Use Light Pressure: When drawing the palm tree details, use light pressure to create thin, delicate lines for a more realistic look.
Detailing Brush: Invest in a good quality tiny detailing brush to achieve precise and clean lines.
Experiment with Colors: While black is classic for the palm tree, feel free to add colors like green for leaves or gold for a touch of shimmer.
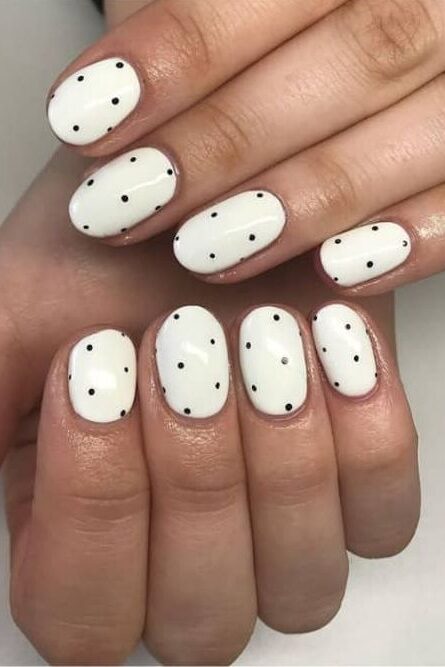
12. Minimalist White Nail Art with Dots
Essential Supplies
To begin crafting your minimalist white nail art with dots, gather the following:
Clear base coat
White nail polish
Clear top coat
A dotting tool or a bobby pin
Step-by-Step Tutorial
Base Preparation:
Apply a clear base coat to your nails. This step protects your nails and creates a smooth canvas for your nail art.
Let the Base Dry:
Allow the base coat to dry completely before proceeding to the next step. This ensures that the white dots will sit neatly on the surface.
Creating Dots:
Dip your dotting tool or the end of a bobby pin into white nail polish. Start by placing small dots on your nails, gradually increasing the size as you move towards the center of the nail.
Drying Time:
Wait for the white dots to dry completely. This prevents any smudging when applying the top coat.
Apply Top Coat:
Seal your design with a clear top coat. This not only adds a beautiful shine but also extends the wear of your nail art.
Complete Drying:
Allow the top coat to dry completely. This final drying phase is crucial for a flawless finish.
Additional Tips for Perfection
Gradient Effect: For an enhanced look, use different shades of white polish to create a gradient effect with the dots.
Tool Cleaning: Clean the dotting tool between each dot to keep the dots uniform and prevent color mixing.
Mistake Correction: If you make a mistake, use a nail polish remover pen to clean up any unwanted dots or smudges.
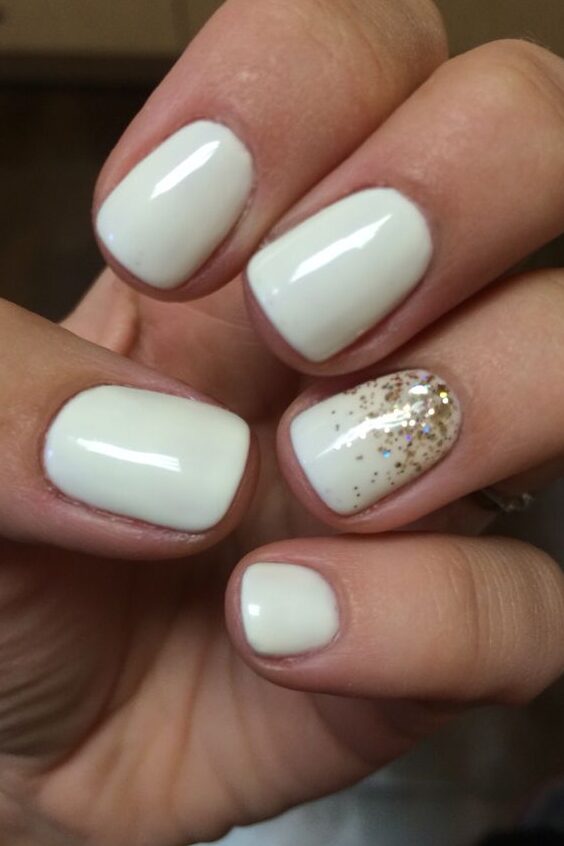
13. White and Gold Glitter Nails
White and Gold Glitter Nails combine elegance and flair, making them a perfect choice for those looking to add a touch of glamour to their manicure.
This design is versatile, easily transitioning from day to night wear, and suitable for both casual outings and more formal events.
Here’s how you can achieve this luxurious look:
Essential Products Needed
Base coat
White nail polish
Gold glitter polish
Thin striping brush or gold foil
Top coat
Step-by-Step Guide to Creating White and Gold Glitter Nails
Prepare Your Nails:
Start with clean, shaped nails. Apply a base coat to protect your nails and ensure a smooth application.
Apply the White Base:
Use a white nail polish to apply a solid base color. Allow it to dry completely.
Add Gold Glitter or Gold Accents:
For a subtle look, apply a top layer of gold glitter polish. For something more dramatic, use a thin striping brush or gold foil to create designs such as stripes, dots, or abstract shapes on the white base.
Seal the Design:
Apply a top coat to protect your nail art and add a glossy finish, making your manicure last longer and keeping the glitter in place.
Creative Variations to Explore
Gold Glitter Tips: Instead of covering the entire nail, apply gold glitter just at the tips or create a gradient effect.
Gold Foil Accents: Use small pieces of gold foil to add a luxurious touch to your white base, placing them randomly or in a specific pattern.
Mixed Textures: Combine different types of gold accents, such as fine glitter with chunkier pieces, to add depth and interest to your nails.
Tips for Perfect Application
Thin Layers: When applying glitter, use thin layers to avoid clumping and to allow each layer to dry completely.
Foil Placement: If using gold foil, apply it gently and press it into place with a clean, dry brush to ensure it adheres well without tearing.
Top Coat Application: Apply the top coat with minimal strokes to prevent dragging the glitter or foil out of place.
14. White Swirl Nails
White Swirl Nails are a captivating choice for those who love an elegant twist on the classic manicure.
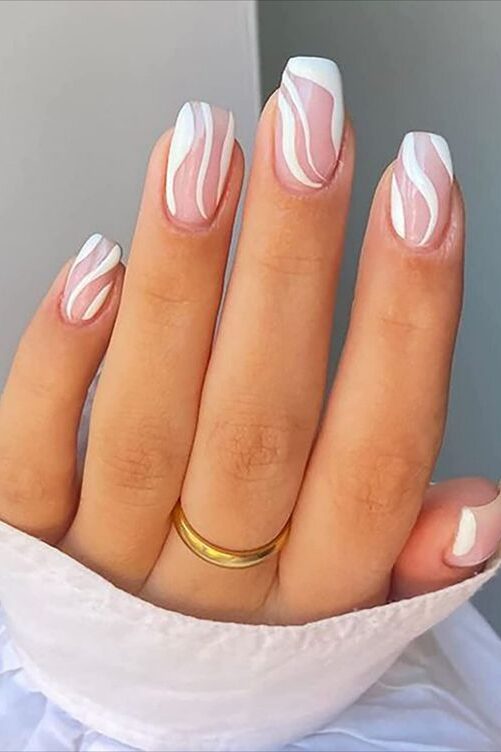
This design features bright white swirls that create an abstract and artistic look on your nails.
Here’s how you can achieve this stylish effect:
Essential Products Needed
To start, you’ll need:
Base coat
White nail polish
A toothpick or a bobby pin
Top coat
Step-by-Step Guide to Creating White Swirl Nails
Prepare Your Nails:
Begin with clean, shaped nails. Apply a base coat to protect your nails and ensure a smooth application.
Apply the Base Color:
Choose your base color and apply it to your nails. Allow it to dry completely.
Creating Swirls:
Dip a toothpick or bobby pin into white nail polish.
Gently drip thin lines of the white polish onto the still-wet base coat.
Quickly swirl these lines together using the toothpick or bobby pin before the polish starts to dry.
Finalizing the Design:
Work quickly to ensure the polish doesn’t dry before you create your designs.
If you make a mistake, use a nail polish remover to correct it before the polish dries completely.
Seal the Design:
Apply a top coat to protect your artwork and add a glossy finish.
Tips for Perfect White Swirl Nails
Work in Small Sections: Avoid putting all the blobs before swirling, as some may dry and require scraping the base layer. Apply one blob and swirl at a time.
Nail Length: This design is easier to achieve on longer nails, as there’s more space to create the swirl.
Quick Work: Make sure to work quickly, as the polish starts to dry almost immediately.
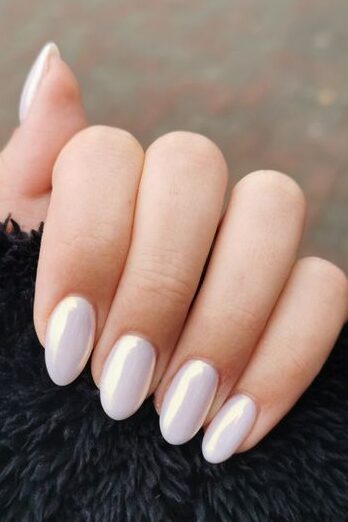
15. Pearlescent White Nails
Pearlescent white nails are simple yet universally flattering, offering a subtle shimmer that enhances the elegance of your manicure.
Here’s how to achieve this sophisticated look:
Essential Products Needed
Base coat
Milky white base coat
Born Pretty White Chrome Powder
Clear top coat
Emery board for shaping
Cuticle remover
Gel base coat
LED lamp for curing
Eyeshadow applicator
Step-by-Step Guide to Creating Pearlescent White Nails
Nail Preparation:
Gently file your nails to the desired shape using an emery board.
Apply a cuticle remover to soften and push back the cuticles for a clean nail surface.
Base Coat Application:
Apply a gel base coat and cure it under an LED lamp for 30 seconds to ensure a solid foundation for the polish.
Applying the Base Color:
Use a milky white or neutral-toned gel color mixed with a clear top coat to create a translucent shade. Apply this mixture evenly across your nails.
Curing the Base:
Cure the base color under the LED lamp for another 30 seconds.
Chrome Powder Application:
Using an eyeshadow applicator, gently apply a light layer of Born Pretty White Chrome Powder over the entire nail to give it that pearlescent finish.
Excess Powder Removal:
Carefully dust off any excess powder while cleaning the edges of the nails to maintain a neat look.
Top Coat for Sealing:
Apply a clear top coat to seal in the pearlescent powder. Cure it under the LED lamp for 60 to 90 seconds to finalize the manicure.
Tips for Perfect Pearlescent White Nails
Even Application: Ensure the base coat and chrome powder are applied evenly to avoid patchy areas which can diminish the pearlescent effect.
Curing Times: Adhere strictly to the recommended curing times to prevent smudging or premature chipping.
Top Coat Quality: Use a high-quality no-wipe top coat to enhance the durability and glossiness of your pearlescent nails.
16. Milky White French Tip
Milky white French tips are a modern twist on the classic French manicure, offering a subtle yet sophisticated look.
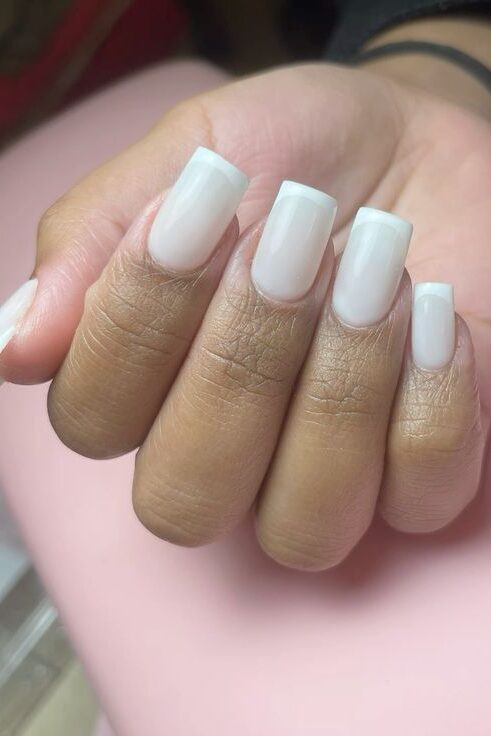
This style is characterized by its soft, translucent white tips that blend seamlessly into a milky base, creating an elegant and seamless transition.
Here’s a step-by-step guide to achieving this trendy nail design:
Step-by-Step Guide to Creating Milky White French Tips
Prepare Your Nails:
Start by pushing back the cuticles and trimming any excess. Shape your nails to your desired style, ideally a soft square or a gentle oval, to complement the milky French aesthetic.
Use a nail file to smooth out any ridges and apply a nail dehydrator to ensure a clean surface.
Apply the Base Coat:
Choose a sheer pink or a very light beige as the base color to enhance the natural look of your nails. Apply a thin layer and let it dry completely.
Painting the Tips:
Dip a thin striping brush in white nail polish and carefully draw a smile line across the tips of your nails. For a more modern look, keep the white line fine and subtle.
Blend for the Milky Effect:
While the white tip is still tacky, lightly brush over it with a sponge or a fluffy brush dipped in the base color. This technique helps diffuse the white into the base, creating the iconic milky effect.
Apply the Top Coat:
Seal your design with a clear top coat to enhance the shine and ensure the longevity of your manicure.
Tips for Perfect Milky White French Tips
Consistency is Key: Ensure the white tips are consistent in thickness and curvature across all nails for a cohesive look.
Smooth Transitions: Use a clean, dry brush to softly blend the white tips into the base color for that flawless milky transition.
Regular Maintenance: To keep your milky French tips looking fresh, apply a new top coat every few days.
17. Classic White Nails
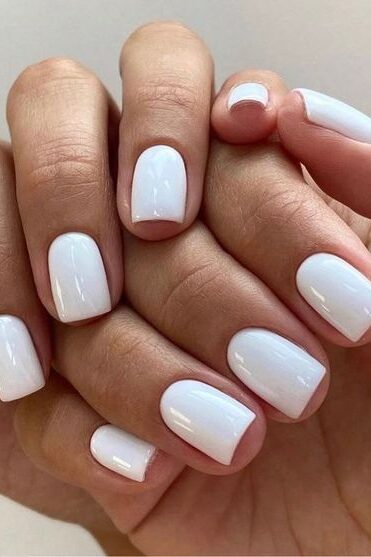
Classic White Nails embody elegance and simplicity, making them a timeless choice for any occasion.
Variations of Classic White Nails
Buttercream White Nails: Universally loved, buttercream white offers a soft, slightly off-white hue that’s less stark than pure white, making it ideal for all skin tones.
Butterfly Nail Art: Adding butterfly decals or paintings on white nails brings a whimsical touch, perfect for wedding guests or spring and summer gatherings.
Micro Hearts: Small, delicate hearts in a contrasting color can be added to a white base for a playful yet elegant design.
White Croc Nails: For a bold, edgy look, white croc nails mimic the texture of crocodile skin, giving a modern twist to the classic white manicure.
Matte Speckled White: Incorporating a matte finish with tiny black speckles offers a contemporary variation that adds texture and interest to your nails.
White Chrome Nails: These feature a metallic finish that shines spectacularly under light, providing an instant upgrade to the traditional white nail design.
White Heart Nails: Simple white nails with a single heart on the ring finger showcase minimalism and are subtly charming.
Achieving the Perfect Classic White Nail
Preparation: Start with a clean, dry nail surface. Apply a base coat to protect your nails and improve the polish’s adherence.
Application: Use a high-quality white nail polish like Orly’s Coconut Milk or Deborah Lippmann’s Gel Lab Pro Nail Color in Amazing Grace for a crisp, opaque finish.
Finishing Touches: Apply a top coat for a glossy finish and added durability. For matte styles, opt for a matte top coat.
Maintenance Tips
Regular Touch-Ups: Keep your white nails looking fresh by touching up any chips as soon as they appear.
Moisturize: Regularly apply cuticle oil and hand cream to keep your hands and nails healthy, enhancing the appearance of your manicure.
18. White and Wavy Metallic Lines
White and Wavy Metallic Lines nail art offers a sophisticated and modern look that’s perfect for adding a touch of glamour to your summer style.
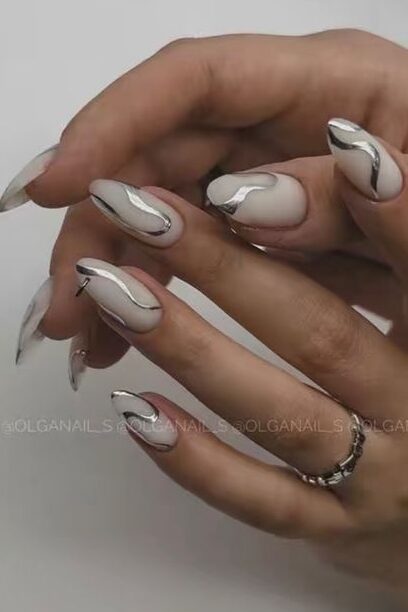
This design features elegant, flowing metallic lines over a crisp white base, creating a striking contrast that’s sure to catch the eye.
Here’s how you can achieve this look:
Essential Products Needed
Base coat
White nail polish
Metallic gold buttercream polish
Fine nail art brush
Top coat
Step-by-Step Guide to Creating White and Wavy Metallic Lines
Prepare Your Nails:
Begin with clean, shaped nails. Apply a base coat to protect your nails and provide a smooth surface for painting.
Apply the White Base:
Paint your nails with a white nail polish. Allow it to dry completely to ensure a crisp and clean canvas for your metallic lines.
Drawing the Metallic Lines:
Dip a fine nail art brush into metallic gold buttercream polish. Start from the base of your nail and draw thin, wavy lines that stretch up to the tip. You can vary the wave patterns to add visual interest.
Seal the Design:
Once the metallic lines have dried, apply a top coat to protect your nail art and add a glossy finish.
Tips for Perfect Wavy Lines
Steady Hand: Ensure your hand is steady while drawing the lines. You can rest your hand on a flat surface to help maintain control.
Line Thickness: Keep the lines thin and delicate for a more elegant look. If a line becomes too thick, you can use a clean brush dipped in nail polish remover to correct it.
Dry Time: Allow the white base to dry thoroughly before drawing the metallic lines to prevent smudging.
Final Thoughts
Throughout this vibrant exploration of white summer nail ideas, we’ve journeyed through an array of designs, from the playfully delightful confetti nails with a white base to the sophisticated elegance of white marble nails, each offering a unique way to brighten your look this season.
The inventive variations provide not just a testament to white’s versatility in nail art but also serve as a canvas for personal expression, enabling you to find a style that resonates with your individual taste.
Reflecting on the numerous styles presented, it’s clear that the charm of white summer nails lies in their ability to marry simplicity with sophistication.


Leave a Reply
You must be logged in to post a comment.