12 Creative Makeup Ideas to Make Your Eyes Pop After 40
Navigating the world of creative makeup ideas after 40 can be a transformative journey, especially when the goal is to make your eyes pop.
Adapting to changes in eyelid texture, which can resemble tissue paper, requires a more nuanced approach.
This post delves into 12 creative makeup ideas tailored for those looking to enhance their gaze with sophistication and flair.
Busy? Save this pin for later.

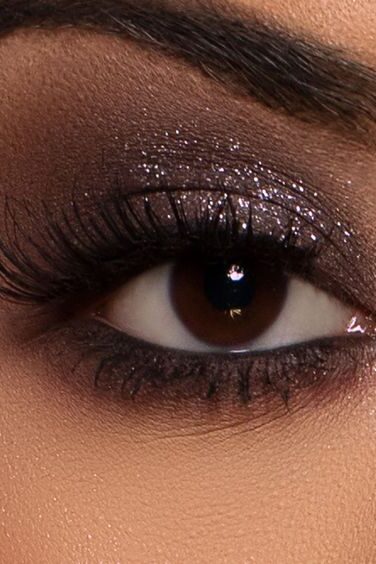
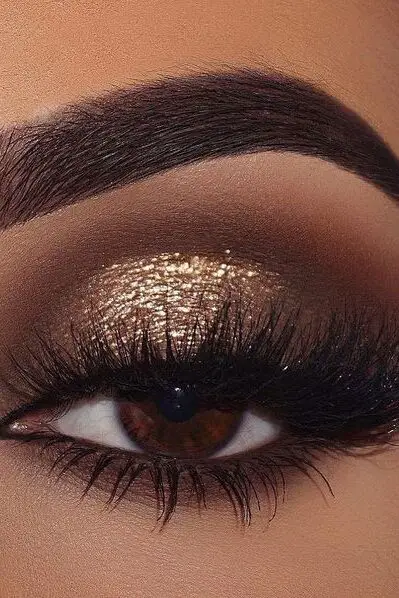
1. Glittering Liner
Glittering liner is a fantastic way to add a touch of glamour and make your eyes truly pop, especially after 40.
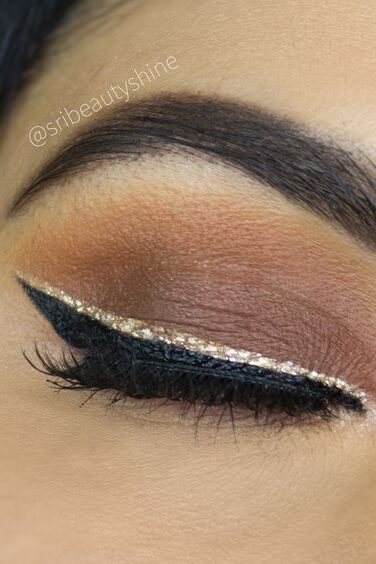
Here’s how you can master this look with ease:
Choose Your Base: Start by applying a cream liner from a dual-ended eyeliner to your upper lash line. This helps create the appearance of thicker lashes and provides a lifting effect to the eye area.
Define with Liquid Liner: Use the liquid end of the eyeliner to define the shape of your eyes, making them appear more awake and vibrant.
Apply Transition Shade: Before adding glitter, use a neutral transition shade on your crease to ensure a smooth blend and to define your eye shape subtly.
Crease Definition: Deepen the crease slightly with a darker shade to add dimension, blending well to avoid harsh lines.
Add the Glitter: Depending on your preference, apply glitter either before or after the eyeliner. For a more integrated look, pat the glitter onto the lid where you want the most impact, typically at the center or inner corner of the eye.
Accentuate with Shimmer: If you’re concerned about highlighting textured skin on the lids, opt for a light shimmer instead of full glitter. Apply it carefully as a thin line just above your eyeliner or dab lightly on the center of the lid.
Lower Lash Line: For a cohesive look, lightly apply the same transition shade along your lower lash line. This balances the glitter and enhances the overall eye makeup.
Highlight Your Look: A subtle hint of shimmer on the cheekbones can complement the sparkle on your eyes, giving you a fresh-faced glow.
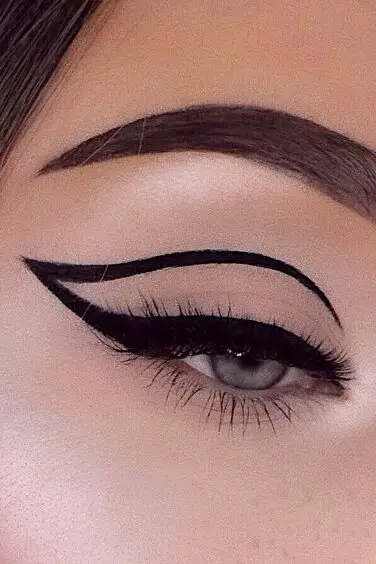
2. Smoked-Out Wing
To achieve a sultry smoked-out wing that enhances your eyes, follow these detailed steps designed specifically for those over 40 seeking a dramatic yet age-appropriate look:
Preparation: Begin by applying a concealer underneath your eyebrow to highlight and define the area. Prep your eyelid with a suitable base to ensure the makeup adheres well and stays throughout the day.
Creating a Guide: Attach a small piece of tape from the bottom edge of your lower lid towards the end of your eyebrow. This will help you achieve a sharp and precise winged effect.
Initial Eyeshadow Application: Using a soft blending brush, apply a neutral shade like ‘Creme Brulee’ on the outer edge of your crease and blend towards the center of your eyelid. This acts as a transition shade and sets the groundwork for deeper colors.
Deepening the Crease: With a denser brush, apply a darker shade such as ‘NARS Galapagos’ starting from where the tape meets your lash line and blend upwards following the edge of the tape. This step adds depth and definition to your eyes.
Defining the Wing: Apply a very dark eyeshadow like ‘Corrupt’ close to the lash line and along the tape. This intensifies the wing and gives a smoky effect.
Highlight and Clean Lines: Once your shadow is in place, carefully remove the tape to reveal a crisp winged line. Use a light shimmery shade on the inner corners of your eyes to brighten and open up your look.
Eyeliner for Definition: Trace along the sharp line with a gel liner to define the wing further. You can also apply the liner to your waterline to enhance the smoky effect.
Final Touches: Blend all the shadows together to ensure there are no harsh lines. Apply your favorite mascara, and consider adding false lashes for extra volume and drama.
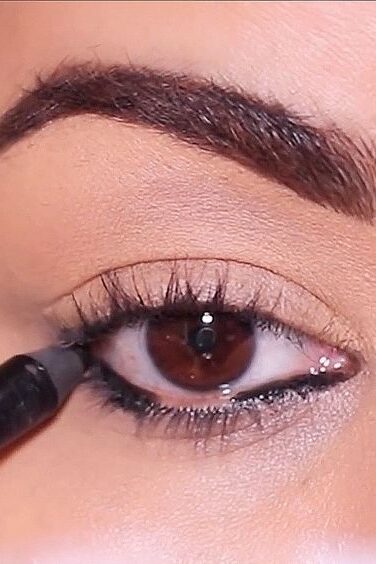
3. Double Liner Play
Double liner looks offer a versatile approach to eye makeup, especially beneficial for those over 40.
Here’s a simple guide to mastering this technique:
Start with the Basics: Use a dark chocolate eyeliner as your base. Apply it messily along the base of your lashes.
Blend Upwards: With the same eyeliner, blend the color upwards towards your eyebrows. This creates a natural shadow effect doubling as an eyeshadow.
Enhance Stability: For those with shaky hands, sit down and rest your elbows on a firm surface. Place your pinky on your cheek for extra stability.
Use the Right Tools: Employ a sharpener designed for eyeliners to maintain a perfect tip. Also, consider using a magnifying mirror to better see your application area.
Choose the Right Formula: Opt for a creamy eyeliner that won’t tug at your skin. This type is easier to smudge and blend.
Tight Lining for Definition: Apply the eyeliner under the lash line to subtly define the eyes without making them look harsh.
Final Touches: If you desire a more intense look, you can smudge the eyeliner with a damp angled brush or apply it more heavily along the lash line.
4. Graphic Cut Crease
Step 1: Define the Crease
Begin by sweeping a deep chocolate brown eyeshadow just above the natural crease of your eye, close to the brow bone.
This darker shade, like ‘tycoon’ from the Visionary palette, serves as a perfect base for the graphic cut crease, providing depth and dimension.
Step 2: Contrast with Concealer
Apply a light concealer across the lid to clean up the edges of the brown eyeshadow. This step is crucial as it sharpens the divide, enhancing the graphic nature of the cut crease.
Use an angled brush to extend the concealer outward, aligning it with the tail of your eyebrow.
Step 3: Create the “Cut”
Over the concealer, layer a cream or white shadow to intensify the contrast. This bright layer is what defines the graphic cut crease, making your eyes appear larger and more open.
The stark contrast between the lid and the crease should be maintained without blending.
Step 4: Add Eyeliner
Finish the look by applying your favorite eyeliner along the upper lash line. For an extra lift, angle the eyeliner upwards to mimic a cat-eye effect.
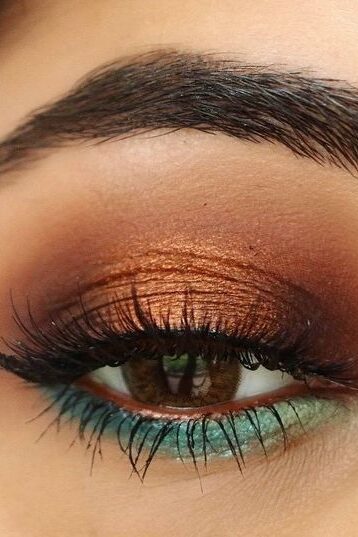
5. Jewel-Toned Smokey Eye
Step-by-Step Guide to a Jewel-Toned Smokey Eye
Step 1: Prep Your Base
Apply primer on your eyelids to create a smooth canvas, ensuring your eyeshadow adheres well and stays vibrant throughout the day.
Step 2: Apply a Cream Base
Start with a cream shade on the outer corner of your eyes. This acts as a foundational color that will help the subsequent shades blend seamlessly.
Step 3: Intensify with a Dark Tone
Use a dark eyeshadow at the base of your lashes. This technique creates a softer liner look and adds depth without being too harsh.
Step 4: Blend in Mid-Tone Colors
Choose a palette with a range of jewel tones. Apply a mid-tone color, like a rich sapphire or emerald, from the outer corner towards the center of the lid using a fluffy brush.
Step 5: Highlight with Lighter Shades
To open up the eye area and add dimension, apply a lighter shade such as gold or light bronze to the center of the eyelid. Blend this well into the darker tones.
Step 6: Define the Crease
Add depth by applying a slightly darker shade in the crease. Ensure to blend well to avoid any harsh lines, creating a smooth transition.
Step 7: Smoke Out the Lower Lash Line
Line the lower lash line with a coordinating dark jewel tone and blend it out for a cohesive smokey effect. This step pulls the whole look together.
Step 8: Final Touches
Curl your lashes and apply a volumizing black mascara to define and enhance your lashes, giving your eyes a dramatic finish.
6. Gradient Eyeshadow
Creating a gradient eyeshadow look is an elegant way to enhance your eyes, blending colors seamlessly from light to dark.
Here’s a straightforward guide to achieving this sophisticated style:
Step 1: Prime Your Eyelids
Begin by applying a mix of concealer and eyeshadow primer over your entire lid. This creates a smooth canvas that helps your eyeshadow adhere better and last longer without creasing.
Step 2: Apply Your Base Color
Sweep a light eyeshadow across the entire eyelid. This base layer not only covers any discoloration but also serves as a foundation for the other colors, enhancing their vibrancy.
Step 3: Define the Crease
Choose a mid-tone shade and apply it in the crease of your eye, blending upward but stopping just beneath the brow bone. This adds depth and definition to your eyes.
Step 4: Darken the Outer Corner
Use a darker shade to mark two key points on your eye: one directly above the pupil and the other at a 45-degree angle from the first. Connect these points in a triangular shape, filling in with the eyeshadow and blending inward and upward.
Step 5: Blend for a Seamless Gradient
Using a clean blending brush, soften any harsh lines between the different shades to create a smooth gradient effect. A lighter color can be used to further blend and soften the look.
Step 6: Highlight and Define
Apply a shimmering highlighter shade to the inner corners of your eyes to brighten them. Then, lightly apply eyeliner underneath your eye, following its natural shape to subtly define your look.
Step 7: Add the Finishing Touches
Finish your gradient eyeshadow look by applying several coats of mascara, allowing each coat to dry in between. Optionally, add false lashes for extra drama and a nude eyeliner in the waterline to open up your eyes.
7. Lower Lash Line Drama
Enhancing the Lower Lash Line
Shortening the Wing: Begin by slightly shortening the wing of your eyeliner. This technique helps avoid drawing attention to any texture or fine lines around the eyes, maintaining a youthful appearance.
Extending the Line: Use an eyeliner to continue the line of your lower lashes upwards, connecting it to your upper lashes until about one-third of the way across your eye. This extension helps create a subtle yet impactful look.
Smudging for Softness: After applying the eyeliner, use an eyeliner brush to smudge the line gently. This softens the overall effect and makes the eyes appear larger and more inviting.
Subtle Lower Lash Smudging: With the residual product on the brush, lightly smudge along one-third of your lower lashes. This step enhances the softness and size of your eyes without overpowering the look.
Practice Makes Perfect: Remember, mastering this technique takes practice. Don’t be discouraged by initial mistakes; instead, use them as a learning curve.
Benefits for Mature Skin: This method is particularly beneficial for mature skin, as it creates a softer and more flattering eyeliner look without being too harsh.
Inner Waterline Enhancement: For an added effect, line your lower inner waterline with a peach or white eyeliner. This brightens the whites of the eyes, making them appear larger and more awake.
Upper Lash Line Definition: To create the illusion of a fuller lash line, apply a black liner to the underside of your upper lashes. This small detail can make a significant difference in how voluminous your lashes appear.
8. Metallic Lid
Step-by-Step Application for a Metallic Lid
Prime Your Eyelids: Start by applying a natural-colored primer around the eyes. This helps smooth out the eyelid skin, hide any discoloration, and ensures the eyeshadow stays vibrant without creasing.
Apply the Base: Use a metallic liquid eyeshadow, which is ideal for not accentuating fine lines or crepiness. Begin with a thin line along the upper lash line, gradually thickening it towards the outer corner to give the appearance of a lifted eye.
Precision Application: Keep the eyeshadow primarily to the lower lash line and into the center of the lid, avoiding the crease. Use your fingers or a stubby brush for more precise application, blending upwards lightly.
Enhance with Eyeliner: Apply a creamy, pigmented eyeliner pencil above the metallic base for a quick, wearable smokey eye. This adds depth and definition without overpowering the metallic sheen.
Brighten the Waterline: For tired eyes, use a flesh-colored pencil on the waterline. This trick brightens the eyes, making them appear larger and more awake.
Add Definition with Mascara: Apply mascara to add definition and volume, enhancing the illusion of larger, brighter eyes.
Highlight the Look: Add a touch of shimmer to the center of the lid to bring it forward, creating the illusion of more lid space.
Also, apply a shimmery shadow just below the brow area and around the tear duct to open and lift the eye further.
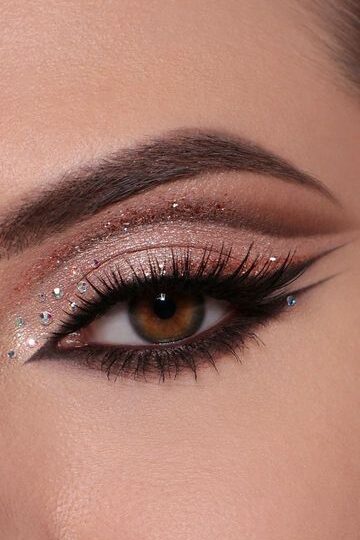
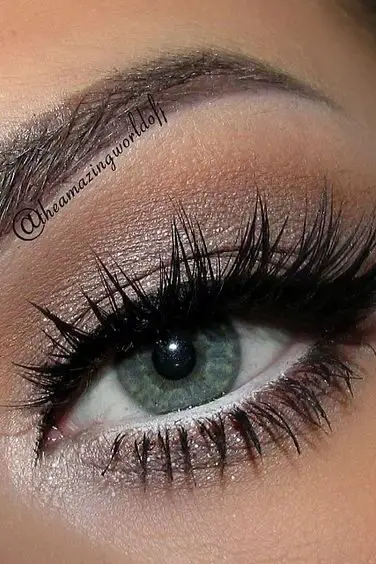
9. Highlighter Halo
Step-by-Step Guide to Creating a Highlighter Halo
Preparation of the Base: Begin by applying a neutral eyeshadow over the entire lid to create a smooth, even canvas. This base helps to enhance the colors you will layer on top.
Applying the Dark Shades: Use a deep brown eyeshadow on both the inner and outer corners of your eyelids. Ensure to leave the center of the lid free from this dark color to set the stage for the halo effect.
Blending for Softness: Apply a warm shade, like a soft bronze or taupe, over the same areas where you applied the deep brown.
Extend this slightly into the crease and blend well to avoid harsh lines, enhancing the eye’s natural shape.
Creating the Halo: Select a highlighter shade and apply it to the center of your eyelid. Gently work the product slightly upwards and outwards in an angle to maximize the halo effect.
Enhancing Eye Size and Brightness: The strategic placement of the highlighter not only adds dimension but also helps to make the eyes appear larger and more radiant, perfect for a festive or special occasion look.
Final Touches: For added sparkle, you can pat a small amount of glitter over the highlighter. This step is optional but adds an extra layer of glamour to your halo eye makeup.
10. Two-Toned Brows
Step-by-Step Guide to Achieving Two-Toned Brows
Step 1: Determine the Shape
Using a brush or pencil, align it with the outer part of your nostril and the pupil to find where your brow arch should peak.
Extend the tool to the outer corner of your eye to find where your brows should end. This ensures your brows have a natural start, arch, and end point.
Step 2: Choose Your Colors
Opt for two shades to create a gradient effect. Typically, a lighter shade at the beginning of the brow and a darker one towards the tail works well.
Ensure the colors harmonize with your hair color and skin tone to avoid a harsh contrast.
Step 3: Fill in the Brows
Start by applying the lighter color at the inner corner of the brows using soft feather strokes, especially if you have sparse areas.
As you move towards the tail, gradually switch to the darker shade. This technique gives your brows a natural, yet defined look.
Step 4: Define and Set
Use an angled brush and a matching powder to refine the shape and fill any gaps. For a polished look, apply a clear or tinted eyebrow gel to set the hairs in place.
This step is crucial for maintaining the shape and ensuring the longevity of your brow look throughout the day.
Step 5: Clean Up
After filling in your brows, use a small amount of concealer around the edges to define and lift the brow area.
11. Faux Lashes for Volume
Enhance Your Look with Faux Lashes
Preparation is Key: Start by using a lash curler to lift your eyelids and make your natural lashes appear longer and fuller. This step is crucial for setting the base for the faux lashes.
Select the Right Adhesive: Choose a high-quality eyelash glue. Apply a thin strip to the back of the faux lash band and wait a few seconds until it becomes tacky. This ensures a stronger hold and easier application.
Apply Faux Lashes: Begin by placing the faux lashes on your natural lash line, starting from the center then adjusting both ends. Use tweezers for precision, ensuring they fit comfortably and look natural.
Blend with Mascara: Once the lashes are securely in place, apply a coat of mascara. This helps integrate the faux lashes with your natural ones, creating a seamless and voluminous look.
Eyeliner for a Seamless Finish: To blend the lash band with your natural lash line, apply a thin line of eyeliner. This step not only hides the glue but also enhances the overall eye makeup, giving a polished look.
By incorporating these steps, you can effortlessly add volume and drama to your eyes with faux lashes, boosting your confidence and highlighting your eyes beautifully.
12. Colored Mascara
Colored mascara is a fun and creative way to enhance your eye makeup, especially after 40, when you might be looking to add a subtle twist to your beauty routine without overwhelming your features.
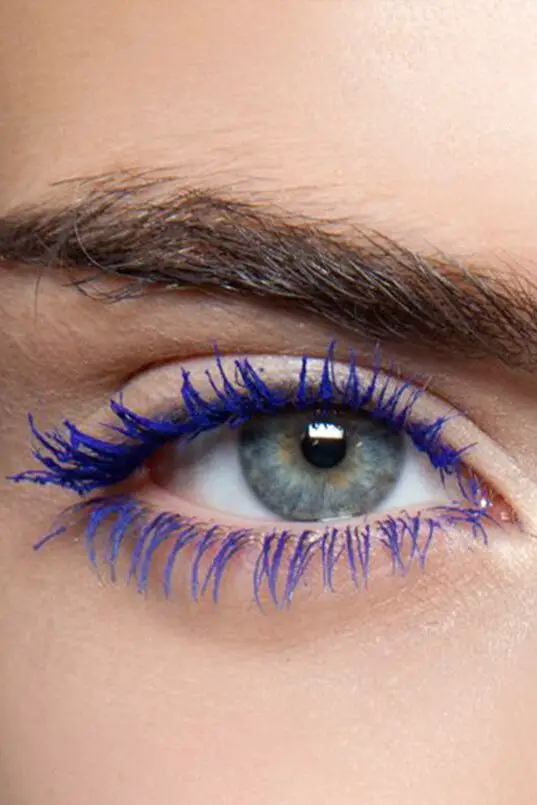
Here’s how you can incorporate colored mascara into your look:
Choosing the Right Shade:
For brown eyes, blue or purple mascara can enhance the warmth and depth, making them pop.
Blue eyes benefit from deep red or black-brown mascara, accentuating their natural vibrancy.
Hazel eyes are complemented by green mascara, which adds dimension and enhances their richness.
Green eyes look stunning with red-toned mascara, like deep burgundy, highlighting their natural green hues.
Gray eyes have versatile options, with deep burgundy or cobalt blue being excellent choices.
Application Tips:
Start by curling your lashes to give them an uplifted shape.
Apply a primer if you have sparse or thinning lashes; this will help maximize the volume and length.
Use the mascara wand to wiggle the product from the base of your lashes to the tips to avoid clumps.
For a more pronounced effect, apply two coats, allowing the first to dry before applying the second.
When to Wear Different Colors:
Navy, dark burgundy, or deep green mascaras are suitable for conservative workplaces as they are subtle yet enhance your eyes.
Brighter colors like pinks or vibrant greens are perfect for your off-time activities or when you want to add a playful touch to your look.
Final Thoughts
Throughout this post, we explored the territory of makeup for those over 40, focusing on techniques and ideas that not only aim to rejuvenate but also bring out the elegance and sophistication inherently present in mature beauty.
Mastering these practices can transform the everyday makeup routine into an art form that celebrates individuality and the timeless allure that comes with experience.
These tips and ideas invite further exploration and experimentation, encouraging a beauty routine that adapts and evolves.


You May Also Like

How To Be Prettier Without Makeup: 12 Effective Tips
Hair Care Tips For Women