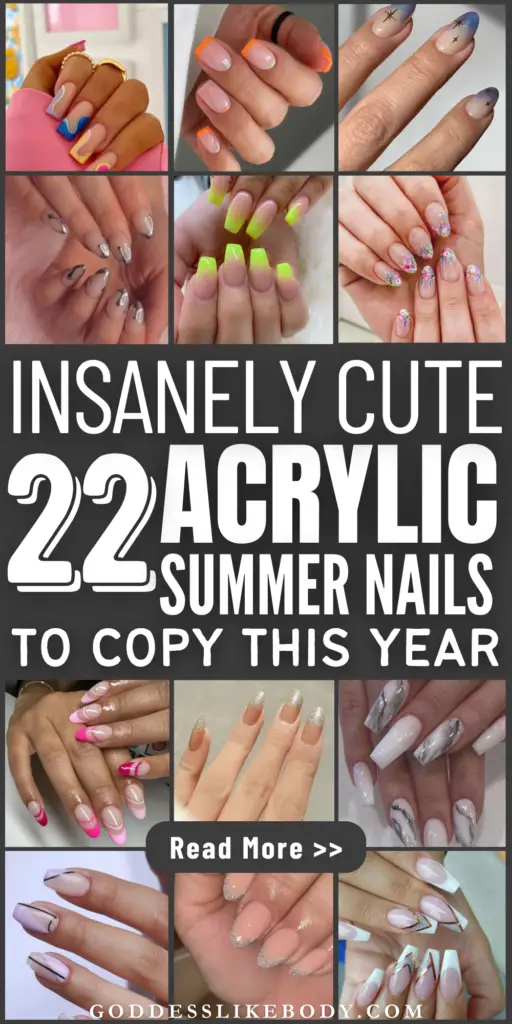
Dive into the vibrant world of Acrylic Summer Nail Ideas and embrace the season with chic, easy-to-recreate nail art designs that are guaranteed to turn heads.
This post will guide you through 22 irresistible nail trends and acrylic nails ideas, ranging from the elegance of geometric accents to the playful charm of mismatched pastel tips and ombre florals.
Prepare to explore a curated selection of nail ideas that combine the latest nail files techniques and luxury nails aesthetics, ensuring your summer vibe is as trendy as it is personal.
Busy? Save this pin for later.
1. Watercolor Wash
The Watercolor Wash technique offers a dreamy, soft blend of colors that mimics the delicate touch of watercolor paintings.
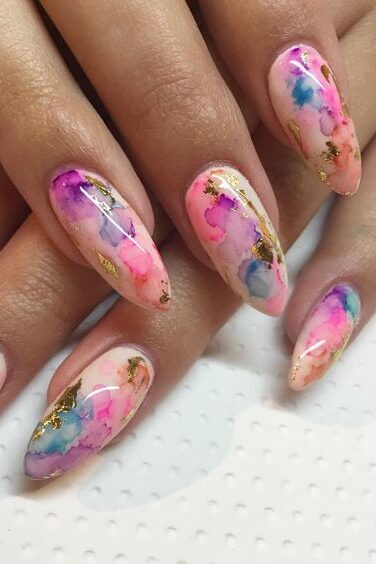
This style is perfect for adding a splash of color to your summer look with acrylic nails. It’s an artistic choice that blends different hues seamlessly on your nails, creating a stunning visual effect.
Best Features
Translucency and Color Blending: The watercolor effect is achieved by diluting acrylic paint, allowing for a semi-transparent finish that beautifully showcases the underlying colors.
Custom Color Creation: You can mix your desired shades by combining different colors, providing a unique palette for each nail.
Layering for Depth: Applying multiple layers allows for a richer depth of color, with each layer adding a subtle complexity to the overall design.
Limitations or Cons
Skill Level Required: Achieving a smooth watercolor effect can be challenging and might require practice or professional assistance.
Durability: Since the technique involves dilute paint, it may not be as long-lasting as traditional acrylic nails without proper sealing.
Step-by-Step Application Process
Base Preparation: Start with a light base color, typically white, to help the colors pop.
Color Mixing: Dilute your acrylic paints with water to achieve the desired transparency.
Application Technique: Use a sponge or thin brush to apply the diluted paint, gently dabbing to avoid harsh lines.
Layering: Allow each layer to dry slightly before applying the next, enhancing the watercolor effect.
Sealing the Design: Finish with a high-quality top coat to seal in the design, ensuring longevity and gloss.
2. Negative Space French Tip
The Negative Space French Tip combines classic elegance with a modern twist, making it a standout choice for acrylic summer nail ideas.
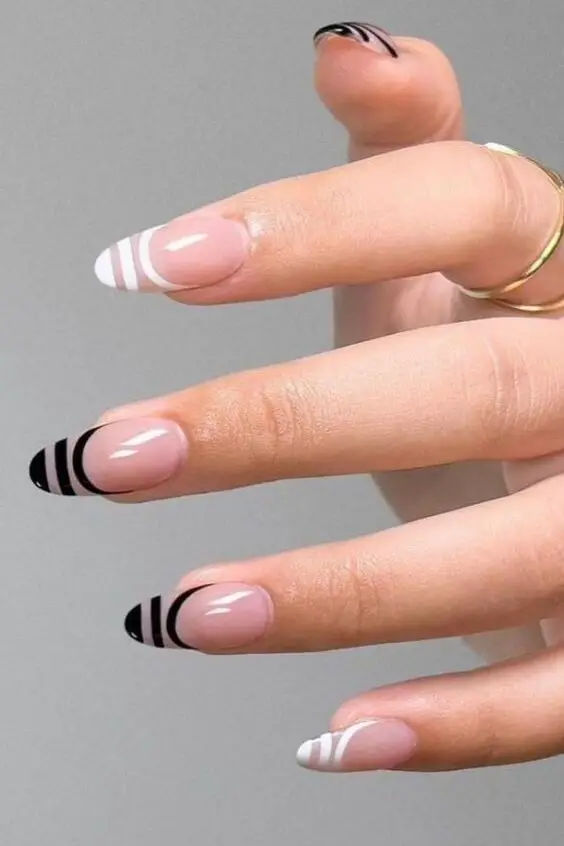
This design cleverly uses the natural color of the nail, incorporating it into the art to create a sophisticated, airy appearance.
Best Features
Elegant Simplicity: The design is sleek and not overly complicated, making it suitable for both casual and formal occasions.
Versatility in Design: You can customize the look by altering the thickness of the lines or adding decorative elements like glitter or rhinestones.
Limitations or Cons
Precision Required: Creating clean, crisp lines requires a steady hand or the use of stencils.
Maintenance: Because this design includes negative space, any chips or wear can be more noticeable, requiring timely touch-ups.
Step-by-Step Application Process
Base Coat Application: Start with a clear base coat to protect your nails and prevent staining.
Drawing the Tip: Use a thin brush to apply white nail polish, creating a French tip. Leave a negative space in the shape of a heart or other desired shapes at the base or middle of the nail.
Adding Decorative Elements: Enhance the design with a thin line of glitter polish along the edge of the negative space or apply rhinestones for a bit of sparkle.
Cleanup and Perfecting Lines: Dip a clean brush in nail polish remover to correct any smudges or uneven lines, ensuring the negative space is sharply defined.
Top Coat Application: Seal your design with a top coat to ensure longevity and a glossy finish.
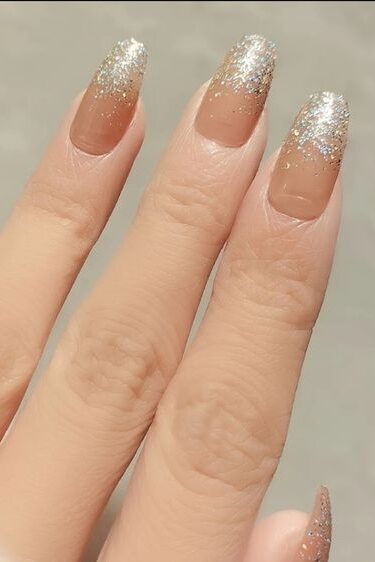
3. French Glitter Fade
The French Glitter Fade is an enchanting twist on the classic French manicure, blending traditional elegance with a sparkling flair.
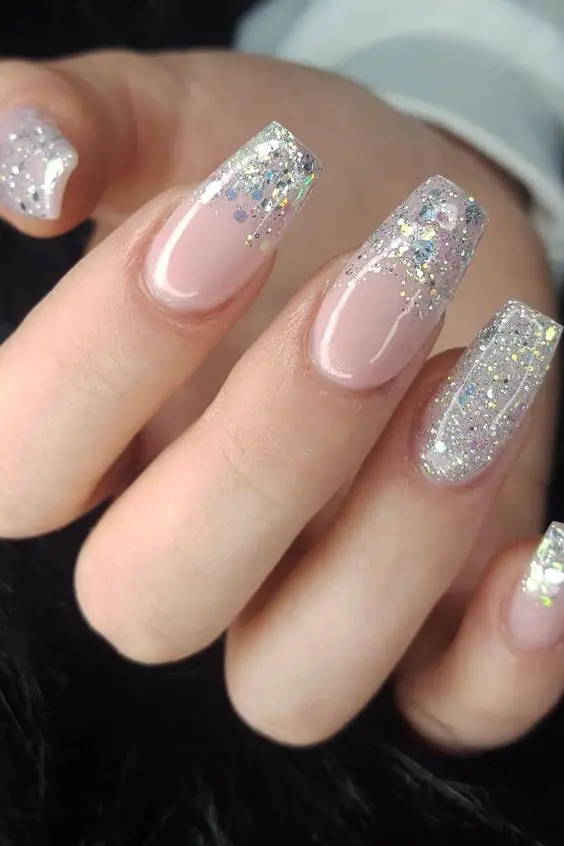
This design incorporates a gradient of glitter that diminishes towards the cuticle, offering a luxurious yet subtle enhancement to the typical French tip.
Best Features
Elegant Transition: The glitter seamlessly fades into the base color, creating a sophisticated gradient effect.
Customizable Glitter Choices: Whether you prefer fine micro-glitter for a subtle shimmer or chunky rhinestones for a bold statement, this style is versatile.
Perfect for Any Occasion: From casual outings to formal events, the French Glitter Fade is adaptable and always in style.
Limitations or Cons
Technique Sensitivity: Achieving a smooth fade requires precision, making it slightly challenging for beginners.
Glitter Placement: Care must be taken to ensure the glitter does not overwhelm the classic French tip look.
Step-by-Step Application Process
Prep the Nail: Apply a base coat and a nude or pale pink polish as the foundation.
Apply the French Tip: Once the base is dry, paint the tips with white polish.
Add Glitter: While the tip is still tacky, lightly dab your choice of glitter, starting densely at the tip and fading out towards the nail bed.
Seal the Design: Apply a top coat to seal in the glitter and enhance the fade effect.
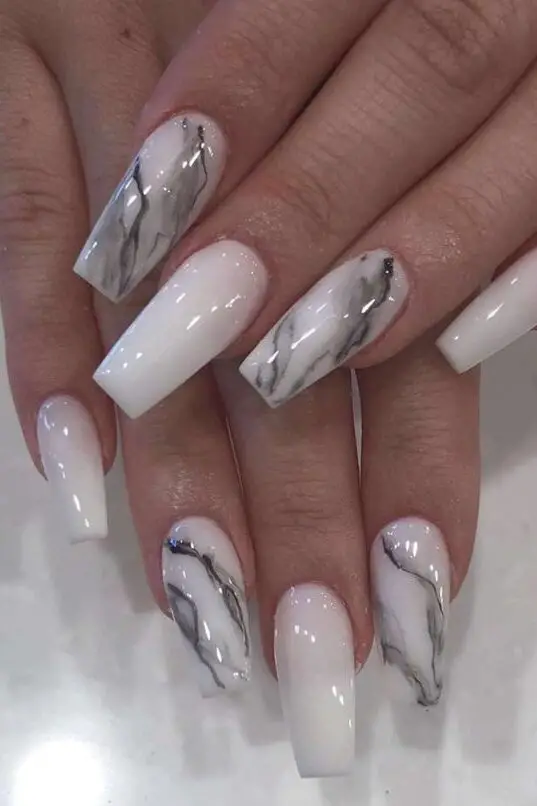
4. Metallic Marble
Metallic Marble acrylic nails blend the classic beauty of marble with the shimmering allure of metallic tones, creating a sophisticated and eye-catching effect.
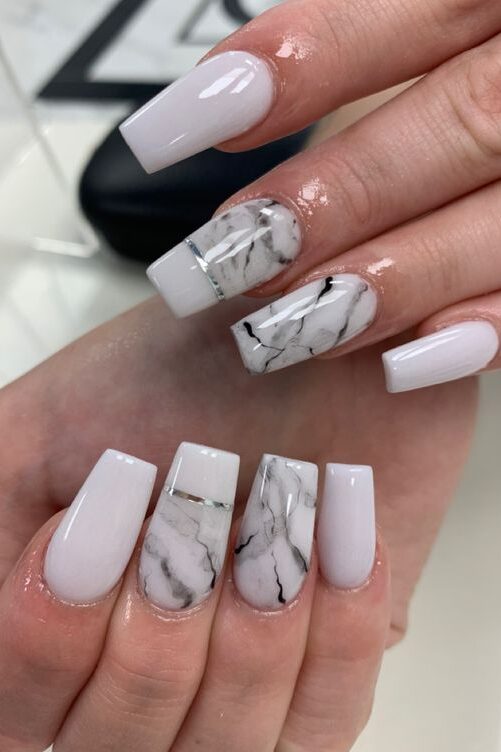
This technique involves skillful blending of metallic colors to mimic the natural veining of marble, perfect for those who love a luxurious and artistic nail design.
Best Features
Visually Striking Appearance: The combination of marble patterns with metallic sheen offers a luxurious and high-end look.
Versatility in Color and Design: You can choose from a variety of metallic shades like gold, silver, or rose gold, tailored to your personal style.
Unique Each Time: Each nail design is unique, mimicking the unpredictable patterns found in natural marble.
Limitations or Cons
Complexity of Technique: Requires precision and skill to effectively recreate the natural flow of marble with metallic paints.
Time-Consuming: This nail art design can be more time-consuming than simpler styles, due to the detailed work needed.
Step-by-Step Application Process
Base Coat Application: Start with a clean, dry nail and apply a base coat.
Creating the Marble Effect: Use a fine brush to swirl your chosen metallic colors on the nail, mimicking marble patterns.
Adding Veins: Introduce white or lighter shades to create the illusion of marble veins, blending slightly with the metallic colors.
Sealing the Design: Apply a top coat to protect the design and add a glossy finish.
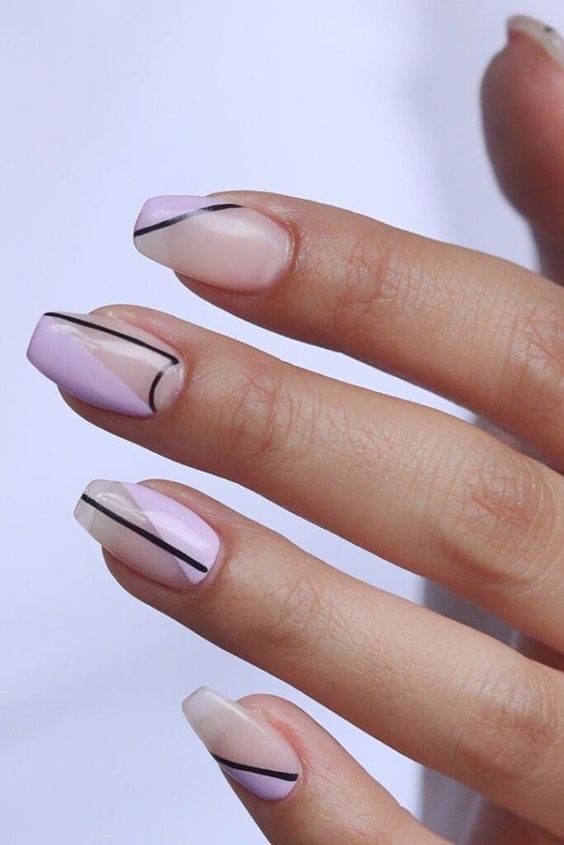
5. Minimalist Abstract Lines
Embrace the elegance of simplicity with Minimalist Abstract Lines, a nail art trend that proves “less is more.”
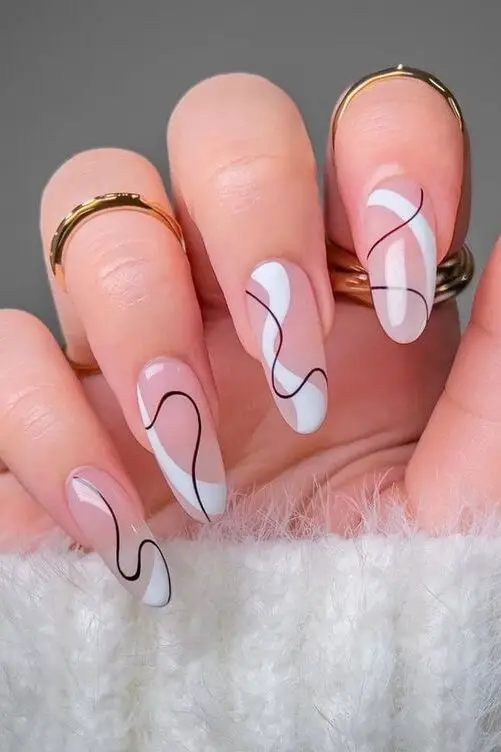
This style focuses on clean, geometric shapes and a restrained color palette to create a sophisticated yet understated look.
Perfect for those who appreciate a chic, modern aesthetic, these designs are all about making a subtle statement.
Best Features
Simplicity and Elegance: The minimalist approach highlights simple abstract patterns, such as lines and curves, which keep the overall look clean and refined.
Versatility: Whether you opt for a muted brown or a classic monochrome, these designs blend well with any outfit and occasion.
Unique Customization: Each design can be personalized with different abstract shapes, making every manicure unique.
Limitations or Cons
Design Precision: Although minimalist, the precision required for perfect lines and curves can be challenging without a steady hand or professional tools.
Subtlety May Not Stand Out: For those who prefer more vibrant and eye-catching designs, minimalist abstract lines may seem too understated.
Step-by-Step Application Process
Choose Your Color Scheme: Start with a neutral base color like soft beige or muted brown to set a minimalist tone.
Designing Abstract Lines: Use a fine brush to paint thin, delicate lines or create soft curves across the nails.
Add Depth: Introduce a secondary color to add dimension without overwhelming the design. This could be a slightly darker or contrasting shade.
Final Touches: Consider a matte top coat to enhance the modern appeal of the minimalist design.
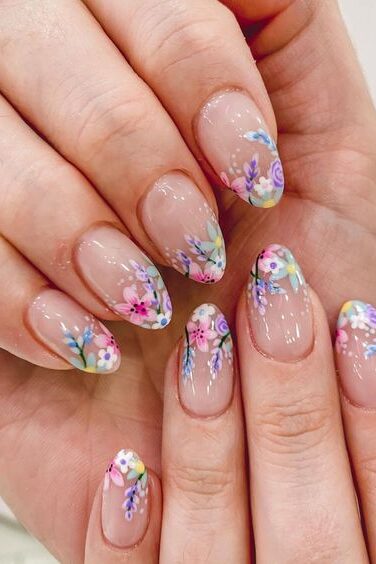
6. Ombre Florals
Ombre Florals in acrylic nail designs blend the soft, gradient hues of ombre with the intricate details of floral art, creating a stunning visual effect that’s perfect for summer.
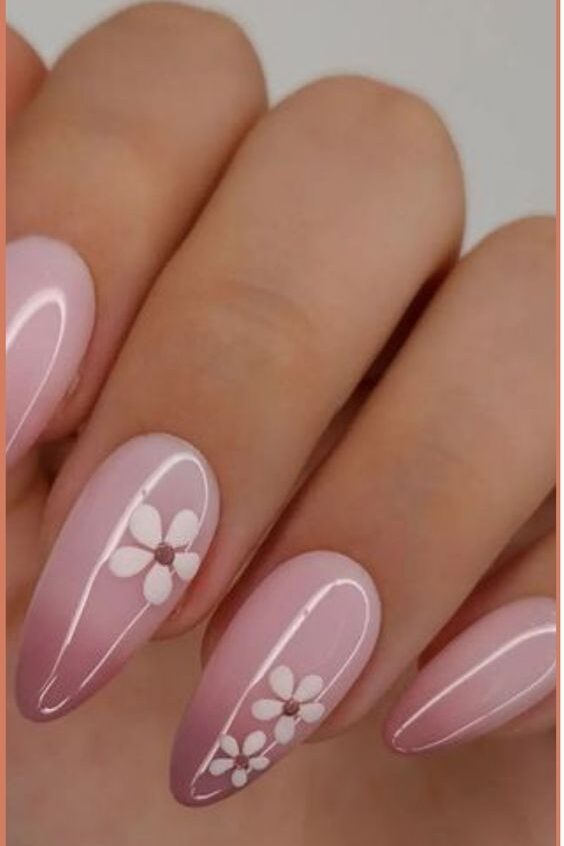
This design leverages the technique of color blending to mimic the natural transition seen in blooming flowers, offering a fresh and elegant look.
Best Features
Gradient Color Transition: The ombre effect provides a seamless color transition, which mimics the natural gradient of petals.
Floral Embellishments: Incorporates 3D acrylic flowers, adding a tactile dimension that enhances the overall aesthetic.
Customization: Allows for personalization with various flower types and colors to match any style or occasion.
Limitations or Cons
Complexity: This design requires precision in blending and placing 3D elements, which might be challenging for beginners.
Time-Consuming: Due to the detailed nature of the design, it can take more time to complete compared to simpler styles.
Step-by-Step Application Process
Prepare the Base: Apply a nude or light pink base coat to set the perfect background for the colors to stand out.
Blend the Ombre: Start with a lighter shade at the cuticle and gradually blend into a darker shade towards the tips using a sponge or brush.
Add Floral Designs: Place 3D acrylic flowers strategically along the gradient for a natural flow. Use a fine brush for detailed petal strokes if painting flat flowers.
Finish with a Top Coat: Seal the design with a clear top coat to enhance durability and shine.
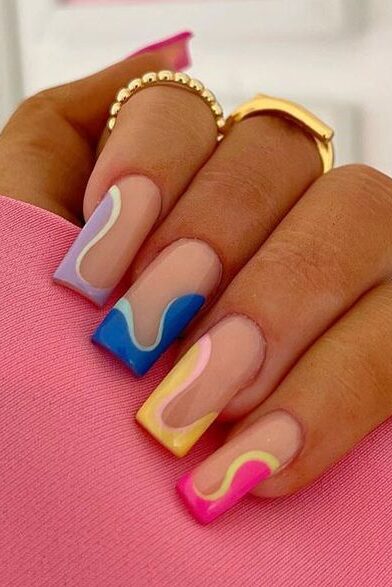
7. Geometric Accents
Geometric nail art has evolved significantly since its debut on the Autumn/Winter 2012 catwalks. Today, these designs are more chic, subtle, and cooler than ever, making them a top choice for trendy nails.
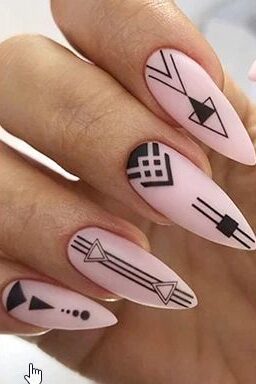
Perfect for adding a creative and fabulous touch to your summer style, geometric accents can transform your nails into a stunning work of art.
Best Features
Versatility and Personalization: Geometric designs offer endless possibilities, from simple lines to complex patterns, allowing you to create a unique look that reflects your personal style.
Bold and Eye-catching: These designs make a statement with their crisp lines and shapes, ensuring your nails stand out.
Suitable for Various Occasions: Whether you’re attending a special event or just want a fun everyday look, geometric nails are versatile enough to complement any outfit.
Limitations or Cons
Precision Needed: Creating perfect geometric patterns requires a steady hand or the use of tools like striping tape.
Time Investment: Depending on the complexity of the design, these nail arts can be time-consuming to apply.
Step-by-Step Application Process
Base Preparation: Apply a base coat to protect your nails and enhance the adhesion of your nail polish.
Design Outline: Use a thin nail art brush or striping tape to outline your desired geometric shapes.
Color Application: Fill in the shapes with your chosen colors, which can range from bold and bright to soft and pastel.
Detailing: For a more intricate design, add additional lines or dots within the larger shapes to create depth and interest.
Top Coat Seal: Finish with a clear top coat to seal in your design and give it a glossy, professional look.
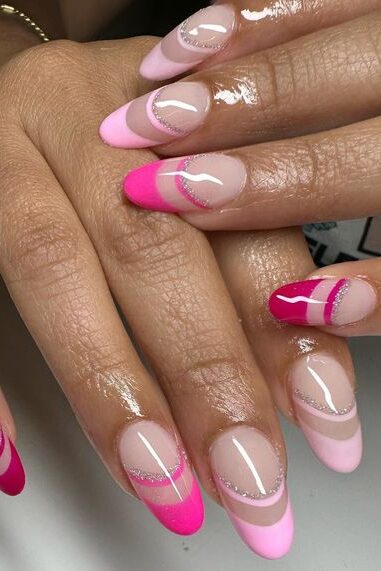
8. Mismatched Pastel Tips
Mismatched Pastel Tips offer a playful and colorful twist to the classic French manicure.
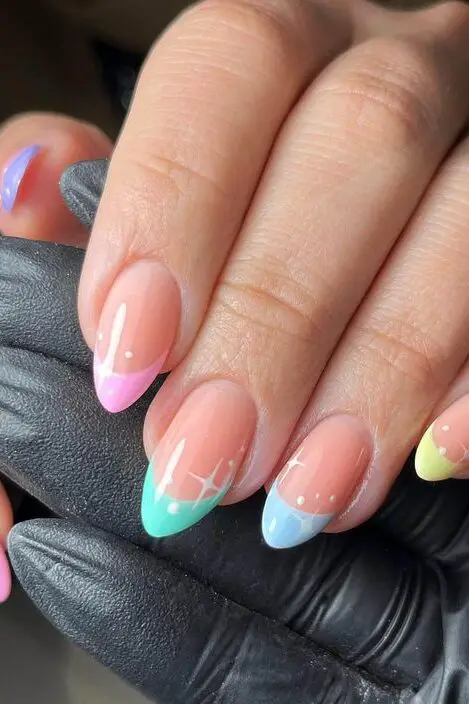
By incorporating a variety of pastel shades, this design allows you to express your creativity and add a whimsical touch to your summer nail wardrobe.
Ideal for those who love a bit of fun without committing to a single nail color, this style uses soft pastel hues like lavender, mint, peach, and baby pink, each applied to different nail tips for a vibrant yet harmonious look.
Best Features
Variety of Colors: Enjoy a spectrum of pastel shades on your fingertips, perfect for matching with different outfits or moods.
Personalization: Each nail can feature a different pastel color, making every manicure genuinely unique.
Playful Aesthetics: The mismatched approach is not only trendy but also adds a fun, casual flair to your overall style.
Limitations or Cons
Color Coordination: Choosing colors that complement each other well can be challenging and might require some experimentation.
Maintenance: As with any light-colored nail polish, pastel shades might require more frequent touch-ups to maintain a pristine look.
Step-by-Step Application Process
Base Coat: Start with a clear base coat to protect your nails and ensure a smooth application.
Color Selection: Choose your pastel shades. Aim for colors that contrast yet complement each other for visual harmony.
Applying the Tips: Carefully paint each nail tip with a different pastel color. Use tape or stencils for precise lines.
Clean Up: Use a small brush dipped in nail polish remover to clean any smudges or overrun.
Top Coat: Finish with a clear top coat to seal in the design and add a glossy finish.
9. French with a Pop
The “French with a Pop” style revolutionizes the traditional French manicure by injecting vivid, eye-catching colors into the classic design.
This approach maintains the elegance of the original while embracing the playful spirit of summer with bright shades that truly stand out.
Best Features
Vibrant Color Selection: Incorporate a spectrum of colors from neon yellow to hot pink, allowing each nail to make a bold statement.
Creative Flexibility: Mix and match different colors on each nail or choose a single pop color to maintain uniformity with a twist.
Enhanced Visual Appeal: The bright colors contrast sharply with the classic white tips, making the nails more striking and photogenic.
Limitations or Cons
Color Matching Challenges: Selecting harmonious bright colors that also complement your skin tone and attire might require some trial and error.
More Frequent Maintenance: Bright colors might show chips more visibly, necessitating regular touch-ups to keep the manicure looking fresh.
Step-by-Step Application Process
Base Color Application: Begin with a sheer pink or nude gel polish as a base to enhance the natural look of the nails.
Tip Preparation: Apply a white polish on the tips, then cure under UV light to set the foundation for bright colors.
Adding the Pop Color: Choose your vivid color and apply it over the white tip. This technique ensures the color pops.
Detailing with Liner Brush: Use a liner brush for precise edges and to add any desired fine details or patterns.
Seal with Top Coat: Finish with a high-quality top coat to seal in the color and add a glossy finish.
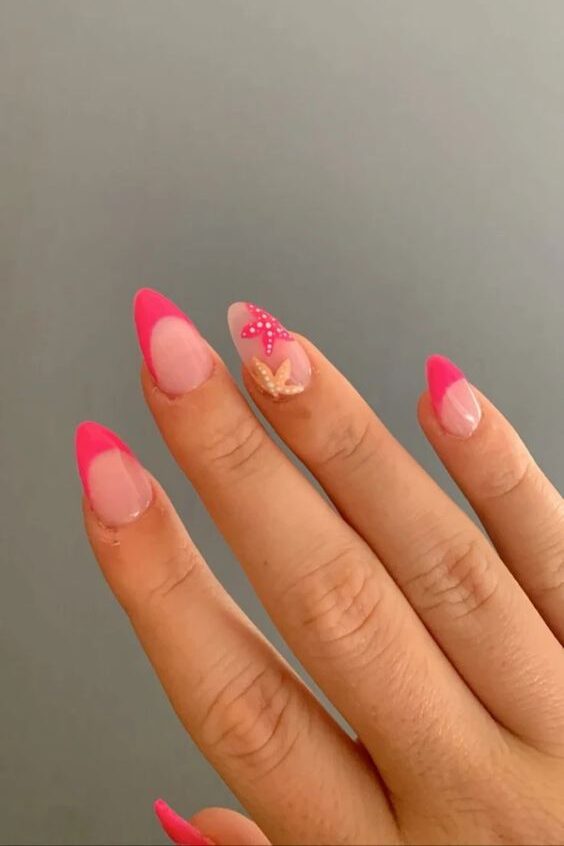
10. Seashell Delights
Seashell Delights captures the essence of the ocean with its intricate designs and elements that reflect the beauty of the sea.
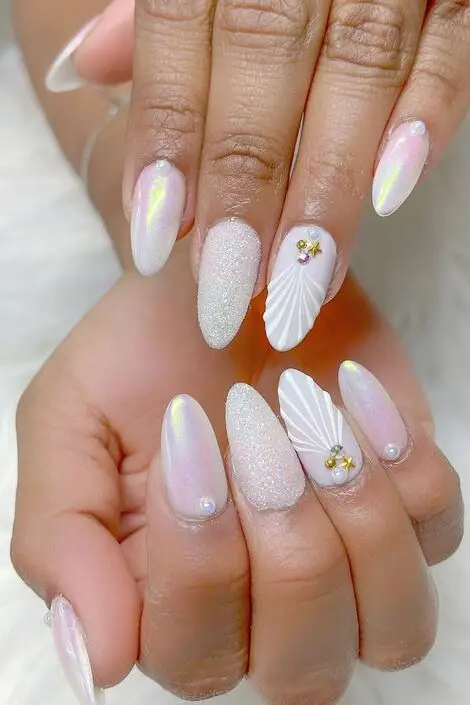
This style is perfect for anyone who loves the beach or wants to carry a piece of the ocean with them. Featuring a variety of techniques from 3D textures to iridescent finishes, these nails are as versatile as they are beautiful.
Best Features
Variety of Textures: From smooth, pearly finishes to rugged, 3D seashell textures, the tactile variations make each nail a tiny artwork.
Iridescent and Metallic Shades: Mimicking the inside of a seashell, these shades shift and shimmer with light, offering an ethereal quality to your manicure.
Incorporation of Real Elements: Utilizing actual seashell pieces or pearls enhances the authenticity and luxury of the design.
Limitations or Cons
Complexity of Design: The intricate details may require more time and a skilled nail artist to perfect.
Durability: 3D elements and finer details may be prone to catching and require careful maintenance.
Step-by-Step Application Process
Base Preparation: Start with a base coat to protect your nails and create a smooth canvas.
Color Application: Apply a gradient or solid base color that complements the oceanic theme.
Adding Seashell Elements: Strategically place seashell pieces, pearls, or iridescent flakes to mimic the ocean floor.
Detailing: Use fine brushes to add details like lines or dots that enhance the seashell effect.
Top Coat Seal: Finish with a glossy or matte top coat to protect your design and add longevity.
11. Chrome French Chevron
The Chrome French Chevron is a sophisticated take on the classic French manicure, incorporating a shiny chrome finish with a sharp chevron pattern.
This style is perfect for those who want to add a modern twist to their nails, combining elegance with a contemporary flair.
Best Features
Distinctive Chevron Pattern: The V-shaped chevron adds a dynamic and geometric touch to the traditional French tip.
Shiny Chrome Finish: The chrome gives a sleek and reflective look, making the nails stand out with a mirror-like shine.
Versatility in Design: This nail style can be adapted to various color combinations and chrome finishes, allowing for personal customization.
Limitations or Cons
Precision Required: Achieving the sharp lines of the chevron pattern requires a steady hand or the use of stencils.
Maintenance: Chrome finishes can show smudges and fingerprints, requiring regular upkeep to maintain their shine.
Step-by-Step Application Process
Base Preparation: Apply a base coat to protect your nails and create a smooth surface.
Apply Base Color: Choose a dark or vivid color as the base to enhance the chrome effect.
Chevron Stenciling: Place chevron stencils or tape at the tips of your nails to outline the V-shaped pattern.
Chrome Application: Use a sponge or brush to apply the chrome powder over the stencils, focusing on the tips.
Peel and Perfect: Carefully remove the stencils to reveal the chevron design, and clean up any excess with a small brush.
Top Coat Seal: Finish with a top coat to seal in the design and enhance the durability of your chrome tips.
12. Textured French
Textured French nails elevate the classic French manicure by adding dimensional elements that enhance both the look and feel of the nails.

This style incorporates various techniques to create a tactile experience that goes beyond visual aesthetics, making it a standout choice for those who appreciate a sophisticated yet unique nail design.
Best Features
Enhanced Texture: Utilizes materials like raw acrylic powder to create a raised, textured surface that is visually appealing and pleasant to touch.
Versatility in Design: Can be combined with other nail art techniques for a more complex and personalized look.
Visual Depth: The added texture provides a depth to the nail design, making it more dynamic and interesting.
Limitations or Cons
Complexity in Application: Requires precision and skill to apply the texture evenly without compromising the overall design.
Maintenance: Textured nails may require more care to maintain their appearance and prevent damage.
Step-by-Step Application Process
Prepare the Base: Apply a base coat and your chosen color for the French tip.
Apply the Texture: While the tip is still tacky, sprinkle raw acrylic powder over it to create a matte, textured look.
Cure and Seal: Flash cure the textured tip to set the design, then apply a top coat to seal everything in place.
13. Negative Space Nail Art
Negative Space Nail Art is a modern trend that combines bold designs with untouched areas of the nail, creating striking patterns that showcase the natural nail.
This style is perfect for those who appreciate a minimalist yet bold aesthetic.
Best Features
Visually Striking Designs: The contrast between painted and unpainted areas makes each design stand out.
Versatility: This style can be adapted to any shape or length of nail, using any color palette.
Customization: Each design can be unique, allowing for personal expression through nail art.
Limitations or Cons
Precision Required: Creating clean, sharp lines that define the negative space can be challenging.
Maintenance: As the nail grows, the negative space can lose its intended shape, requiring more frequent touch-ups.
Step-by-Step Application Process
Base Coat Application: Start by applying a clear base coat to protect your nails and enhance the polish adhesion.
Design Planning: Sketch your design with a thin brush or use tape to outline the areas that will remain polish-free.
Polish Application: Carefully apply polish around the negative space. Use a fine brush for precision.
Clean-Up: Use a small brush dipped in nail polish remover to correct any imperfections and sharpen the edges of the negative space.
Top Coat Seal: Apply a top coat to seal in your design and add a glossy finish.
14. Double French Manicure
The Double French Manicure takes the classic French tip to a new level by adding an additional stripe of color, creating a chic and sophisticated look.
This style is perfect for those who appreciate a twist on the traditional while maintaining an elegant appearance.
Best Features
Dual-Color Design: Offers a unique take on the classic French manicure by incorporating two contrasting colors at the tip.
Customization: Allows for endless color combinations to match any outfit or occasion.
Versatile Aesthetics: Suitable for both casual and formal settings, depending on the colors chosen.
Limitations or Cons
Precision Required: Achieving neat and even stripes can be challenging without a steady hand or the use of guiding tools.
Time-Consumption: This style may take longer to perfect due to the additional detailing.
Step-by-Step Application Process
Base Coat Application: Start with a clear base coat to protect your nails.
First Stripe Application: Apply the first color stripe at the tip of the nail, using a striping brush for precision.
Second Stripe Application: Once the first stripe dries, apply the second color just above the first, ensuring both stripes are of equal thickness.
Clean-Up: Use a small brush dipped in nail polish remover to clean up any imperfections.
Top Coat Seal: Finish with a top coat to seal the design and add a glossy look.
15. Glitter Dipped Tips
Glitter Dipped Tips are a dazzling way to add sparkle and sophistication to your acrylic nails.
This technique involves dipping the tips of your nails into glitter, creating a radiant and eye-catching effect. It’s perfect for those who want a touch of glamour without overwhelming their overall look.
Best Features
Sparkling Finish: The tips of your nails will catch the light beautifully, making them stand out.
Customizable: You can choose from a variety of glitter sizes and colors to match your style or occasion.
Easy to Apply: Even beginners can achieve this look with some practice, as it doesn’t require intricate skills like detailed painting.
Limitations or Cons
Messiness: Working with glitter can be messy, and it might take some time to perfect the technique without spreading glitter everywhere.
Durability: Glitter may shed if not properly sealed with a top coat.
Step-by-Step Application Process
Base Preparation: Apply a base coat to protect your nails and create an even surface.
Color Application: Paint your nails with a color that complements the glitter. Let it dry completely.
Glitter Dipping: Dip the tip of your nail into a container of glitter. For a more precise application, use a small brush to pick up the glitter and apply it to the tips.
Brush Off Excess: Gently brush off any excess glitter not adhering to the nail polish.
Seal the Design: Apply a top coat to seal in the glitter, ensuring it stays in place and adds a glossy finish.
16. Mismatched Marble
Mismatched Marble acrylic nails are the epitome of artistic freedom in nail design, blending various marble techniques into one unique manicure.
This style is perfect for those who adore the classic marble look but also want to add a personal twist to each nail.
Best Features
Diverse Techniques: Utilizes different marbling methods across the nails, such as swirling, dragging, and layering, to create individual designs on each finger.
Color Variations: Offers the flexibility to mix and match colors, making each nail a distinct piece of art.
Creative Expression: Each nail can be uniquely crafted, reflecting personal style and creativity.
Limitations or Cons
Skill Intensive: Requires a good level of skill to effectively blend and marble different designs.
Time-Consuming: Each nail might need individual attention, making the process longer than simpler designs.
Step-by-Step Application Process
Base Preparation: Apply a base coat to protect the nails and ensure a smooth canvas for the colors.
Color Selection and Placement: Choose different color combinations for each nail. Apply a light base color to start.
Marbling Technique: For each nail, use a fine brush or marbling tool to swirl and mix colors directly on the nail. Techniques can vary from simple swirls to complex multi-color blends.
Detailing and Effects: Add small details like veins or flecks with a thin brush or sponge for added texture.
Sealing the Design: Finish with a top coat to protect the designs and add a glossy finish.
17. French with Dried Flowers
French with Dried Flowers combines the classic elegance of French manicures with the natural beauty of dried flowers, encapsulating them in clear acrylic for a stunning and unique look.
This style is perfect for those who appreciate a touch of nature and a dash of sophistication in their nail art.
Best Features
Natural Aesthetic: The use of real dried flowers adds an organic touch to each nail.
Customizable Designs: You can choose different flowers and arrangements to create a personalized look.
Elegant Finish: The clear acrylic overlay protects the flowers while enhancing the depth and intricacy of the design.
Limitations or Cons
Delicacy of Flowers: Handling and applying dried flowers requires care as they are delicate.
Time-Consuming: The process can be intricate, demanding more time than simpler nail designs.
Step-by-Step Application Process
Prep and Base: Start with a clean, buffed nail and apply a base coat.
French Tip Application: Paint a classic French tip with white or a soft pastel color.
Placing the Flowers: Before the base dries, carefully place the dried flowers on the nail. Use tweezers for precision.
Encapsulating with Acrylic: Cover the entire nail with clear acrylic, ensuring the flowers are completely sealed.
Finishing Touches: After the acrylic has set, file and buff the nails to a smooth finish and apply a top coat for extra shine and protection.
18. Metallic Drip Art
Metallic Drip Art nails are a stunning choice for anyone looking to add a dramatic and glamorous twist to their summer nail wardrobe.
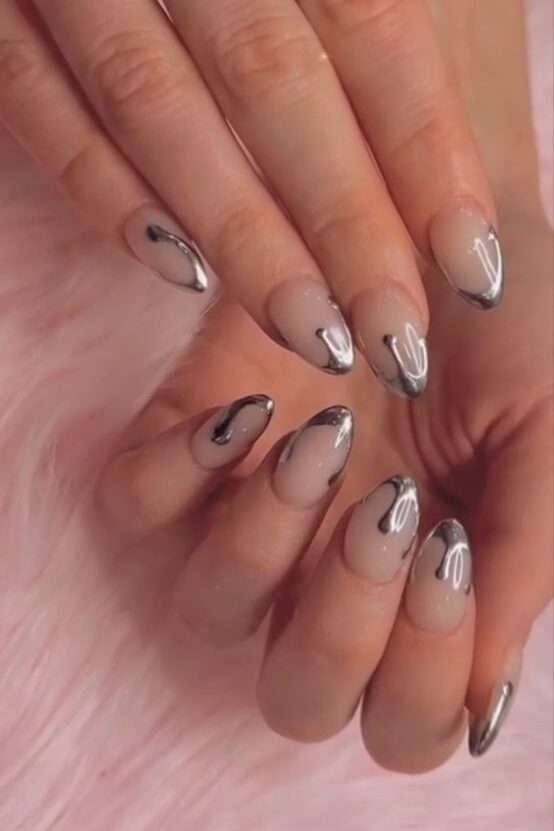
This nail design features metallic polish applied in a drip pattern, creating an effect that resembles molten metal cascading down the nails. It’s a bold look that’s perfect for making a statement at any summer event.
Best Features
Striking Visual Impact: The metallic drip creates a unique, eye-catching look that stands out.
Versatility in Metallic Shades: You can choose from silver, gold, or any metallic shade that suits your style.
Customizable Patterns: Each nail can have its own unique drip pattern, allowing for a personalized touch.
Limitations or Cons
Application Skill Required: Achieving a smooth and realistic drip effect can be challenging and might require practice or professional help.
Wear and Tear: Metallic polishes may show signs of wear more visibly, necessitating careful maintenance.
Step-by-Step Application Process
Base Coat Application: Start with a solid base coat to protect your nails and ensure a smooth application of the metallic polish.
Metallic Polish Application: Apply your chosen metallic polish at the tip and along the free edge of your nail.
Creating the Drip Effect: While the polish is tacky, use a thin brush to drag the polish downwards in a drip pattern.
Adding Details: Use a dotting tool to add varied drip sizes for a more dynamic effect.
Top Coat for Durability: Seal your design with a high-gloss top coat to enhance the metallic effect and ensure longevity.
19. Neon French Fade
The Neon French Fade combines the classic elegance of a French manicure with the vibrant, playful spirit of neon colors.
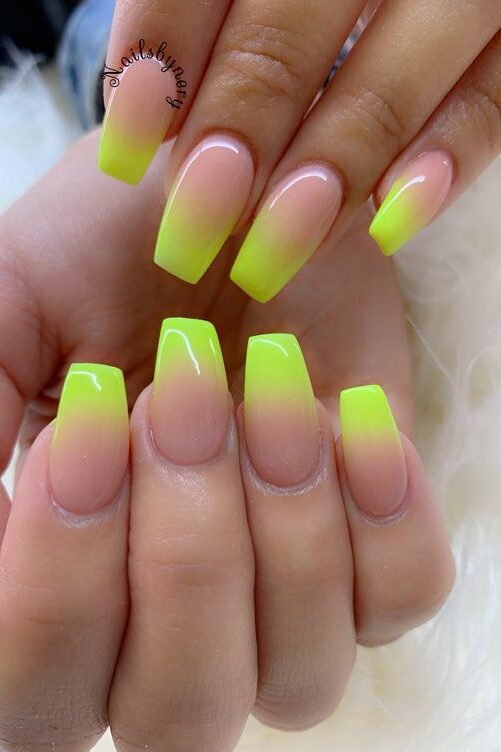
This acrylic nail design transitions smoothly from a bright neon shade at the tip to a softer tone near the cuticle, creating a striking yet sophisticated look. It’s perfect for adding a pop of color to your summer style.
Best Features
Vibrant Color Transition: The fade from neon to more subdued tones makes this design both eye-catching and suitable for various occasions.
Customizable Color Choices: You can choose from a range of neon colors like electric blue, hot pink, or vivid green to personalize your look.
Versatility: This style works well with different nail shapes and lengths, making it a flexible choice for everyone.
Limitations or Cons
Skill Required: Achieving a smooth gradient effect can be challenging and may require professional help for best results.
Color Fading: Neon colors may fade faster than more traditional nail polishes, requiring more frequent touch-ups.
Step-by-Step Application Process
Base Preparation: Begin with a clear base coat to protect your nails.
Apply the French Tip: Paint the tips of your nails with a neon polish of your choice.
Create the Fade Effect: While the tip is still wet, gently blend the neon color towards the cuticle using a small sponge or brush.
Finalize the Design: Apply a top coat to seal the design and enhance the durability of your manicure.
20. Negative Space Starscapes
Negative Space Starscapes in acrylic nail designs offer a celestial twist to the trendy negative space manicures.
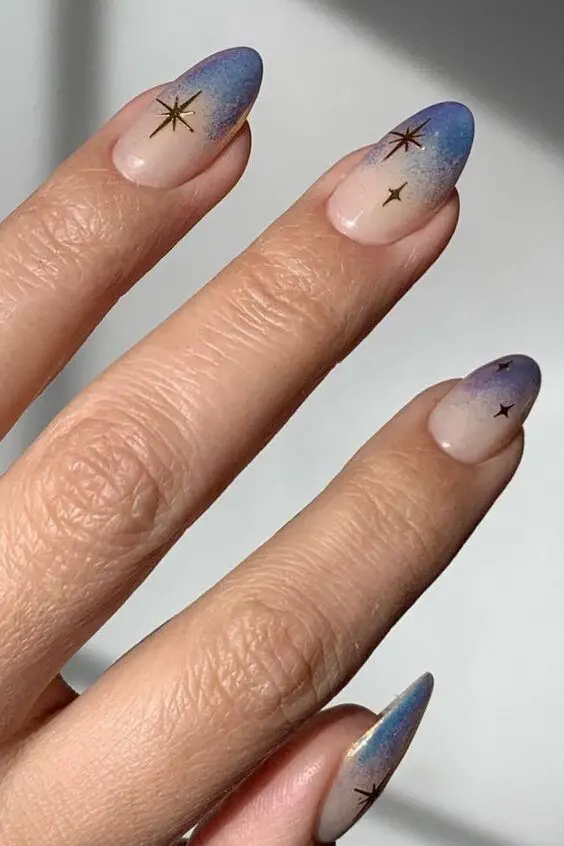
By strategically using the natural color of your nails as part of the design, these manicures create stunning patterns that resemble starry night skies. This technique is perfect for those who love a minimalist yet bold look.
Best Features
Celestial Theme: The star-inspired patterns provide a cosmic allure.
Versatility: This style can be adapted to any nail shape and size, making it universally appealing.
Customization: You can choose different patterns and colors to create a unique starscape on each nail.
Limitations or Cons
Precision Required: The intricate designs need a steady hand or professional tools.
Maintenance: As your nails grow, the designs may need adjustments to keep the intended look.
Step-by-Step Application Process
Base Preparation: Start with a clear base coat to protect your nails.
Tape Placement: Apply thin strips of tape in patterns that mimic constellations or random star placements.
Color Application: Paint over the tape with your chosen polish colors. Dark shades like navy or black enhance the star effect.
Tape Removal: Carefully remove the tape while the polish is semi-dry to ensure crisp lines.
Detailing: Use a fine brush or a dotting tool to add smaller stars or dots, representing distant stars.
Top Coat Seal: Finish with a glossy top coat to seal in your design and add a celestial shine.
21. Mismatched French Textures
Embrace the innovative trend of Mismatched French Textures, where the timeless elegance of French manicures meets modern creativity.
This style allows you to experiment with different textures and designs on each nail, creating a unique and personalized look.
Ideal for those who love to mix traditional and contemporary styles, this manicure offers endless possibilities for customization.
Best Features
Diverse Textural Play: From glossy finishes to matte surfaces and everything in between, you can mix textures for an eye-catching contrast.
Personalization: Each nail can feature a different texture, allowing for a highly customized look.
Visual Interest: This style adds a layer of sophistication and uniqueness to your nails, making them a conversation starter.
Limitations or Cons
Complexity: Achieving a harmonious look while using different textures can be challenging.
Time-Consuming: More intricate textures may require additional time and skill to perfect.
Step-by-Step Application Process
Base Preparation: Start with a clear base coat to protect your nails and ensure a smooth application.
Texture Selection: Decide on the textures for each nail. You might choose a matte finish for one, a glossy coat for another, and perhaps a sprinkle of glitter or a velvet effect for others.
Application: Apply the base colors first, then carefully add your chosen textures. Use tools like sponges, brushes, or even cling film to create different effects.
Detailing: Add any additional elements like thin lines or dots to enhance the textural contrast.
Top Coat: Seal your design with a top coat to protect the textures and ensure longevity.
22. Micro French with Neon Accents
Micro French with Neon Accents is a chic and modern twist on the traditional French manicure.
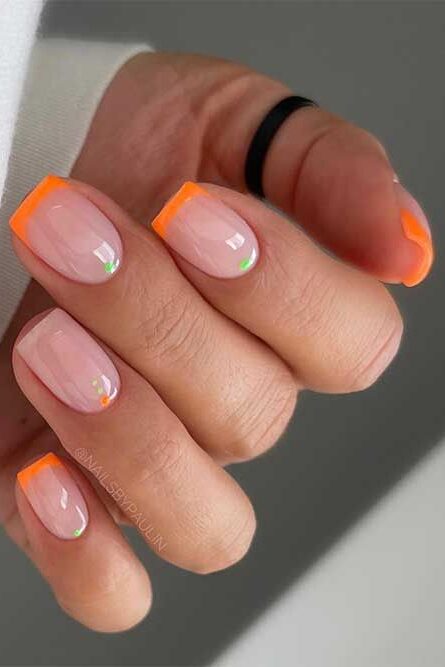
This nail design features ultra-thin tips highlighted with vibrant neon colors, creating a subtle yet striking look.
Perfect for those who appreciate minimalist nail art with a pop of color, this style is both easy to execute and incredibly stylish for summer.
Best Features
Subtle Elegance: The micro French tip is delicate and refined, offering a sophisticated take on the classic French manicure.
Vibrant Neon Accents: Neon accents provide a vivid contrast, perfect for adding a playful touch to your summer outfits.
Customizable: You can choose from various neon colors to personalize your look, from electric blue to hot pink.
Limitations or Cons
Steady Hand Required: Precision is key for achieving the perfect thin neon lines.
Color Fading: Neon colors may require maintenance to keep them bright and vibrant.
Step-by-Step Application Process
Base Preparation: Start with a nude or light pink base to enhance the neon colors.
Applying the Micro French Tip: Use a highly pigmented white polish to create a thin line at the tip of your nails.
Adding Neon Accents: Carefully apply your chosen neon color just above the white tip using a thin brush or striping tape for precision.
Seal the Design: Finish with a high-gloss top coat to protect your manicure and make the colors pop.
Final thoughts
Exploring the vast array of chic and vibrant acrylic summer nail ideas, from the delicate artistry of watercolor washes to the innovative designs of micro French with neon accents, we are reminded of the endless possibilities that nail art offers to express our individual style and creativity.
Each technique, whether it be the sophisticated elegance of chrome French chevrons or the playful allure of mismatched pastel tips, presents a unique way to embrace the summer season through personal expression and aesthetic exploration.
As we conclude this journey through some of this year’s most enticing acrylic nail designs, it becomes clear that the true charm of nail art lies in its versatility and the personal joy it brings.


Leave a Reply