Searching for the perfect Red Summer Nail ideas can be an overwhelming journey, with countless options ranging from timeless classics to the latest trends in nail art designs.
The season calls for nail designs that not only reflect the warmth and vitality of summer but also showcase your personal style through unique and imaginative creations.
This post delves into 18 strikingly lovely red nail ideas suitable for the summer season, from the boldness of neon watermelon rind red with white French tips to the subtlety of red and gold flakes.
As you navigate through these curated nail art suggestions, you’ll discover not just an array of nail art designs that span the spectrum from almond nails to French tips but also tips for achieving that flawless summer nail look.
Busy? Save this pin for later.
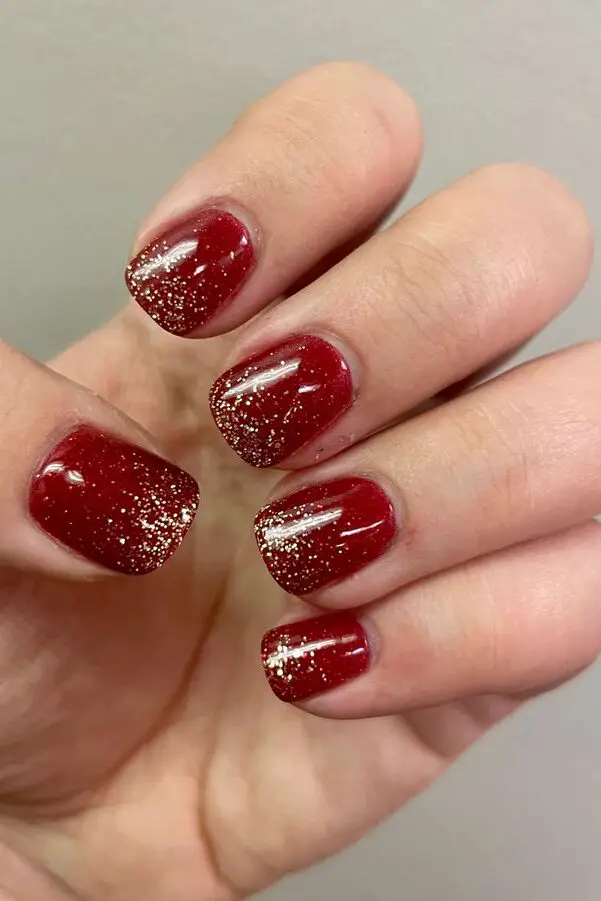
1. Cherry Tomato Red with Glitter Tips
Cherry Tomato Red with Glitter Tips is an eye-catching choice for those who love to add a touch of sparkle to their summer nail designs.
Key Features of Cherry Tomato Red with Glitter Tips
Vibrant Color: Cherry tomato red is a bold and attractive color that makes your nails stand out, perfect for both daytime and evening events.
Glitter Tips: The addition of glitter tips provides a festive and glamorous look, making it ideal for celebrations and special occasions.
Versatility: This nail design is suitable for a wide range of occasions, from casual gatherings to more formal events.
How to Achieve This Look
Nail Polish Application: You can achieve the cherry tomato red shade with a simple nail polish application.
Professional Services: For a more intricate and detailed design, you might consider visiting a professional nail technician.
Maintenance Tips
Durability: To ensure the design lasts longer, opt for a long-lasting nail polish or gel polish.
Care: Avoid contact with water or harsh chemicals. Regularly use a base and top coat, and keep your nails trimmed and filed to prevent chipping.
Additional Styling Tip
Red Glitter Tips: For an enhanced glitz and glam effect, consider using chunky red glitter polish on the tips of your nails. This can add an extra layer of sparkle and make your nail art stand out even more during the summer festivities.
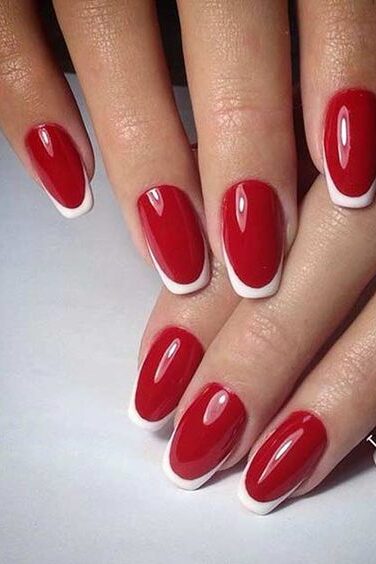
2. Watermelon Rind Red with White French Tips
Watermelon Rind Red with White French Tips offers a refreshing twist on the classic French manicure, perfect for those looking to make a bold statement with their summer nail designs.
This design pairs a vivid neon red base with crisp white tips, evoking the fresh and vibrant feel of summer.
Key Features of Watermelon Rind Red with White French Tips
Vivid Neon Red Base: The base of the nails is painted with a high-gloss, red polish that captures the essence of summer vibrancy.
Crisp White French Tips: Contrasting with the red, the white tips add a classic, refined touch to the design.
Summer Vibe: This color combination is not only eye-catching but also perfect for summer festivities, beach days, and outdoor events.
How to Achieve This Look
Base Application: Start with a clean, dry nail and apply a base coat. Then, apply two coats of watermelon red nail polish for a vivid look.
Tip Detailing: Once the base color is dry, carefully paint the tips with white nail polish. Use French tip guides or tape for precision if needed.
Seal the Design: Finish with a top coat to seal the design and add extra shine.
Maintenance Tips
Regular Touch-Ups: Due to the vivid colors, any chips might be noticeable. Keep some polish on hand for quick touch-ups.
Protective Top Coat: Reapply a top coat every few days to prolong the life of your manicure and keep it looking glossy.
Additional Styling Tip
Accessorize: Complement your watermelon red nails with vibrant jewelry or a coordinating clutch to make a full summer style statement.
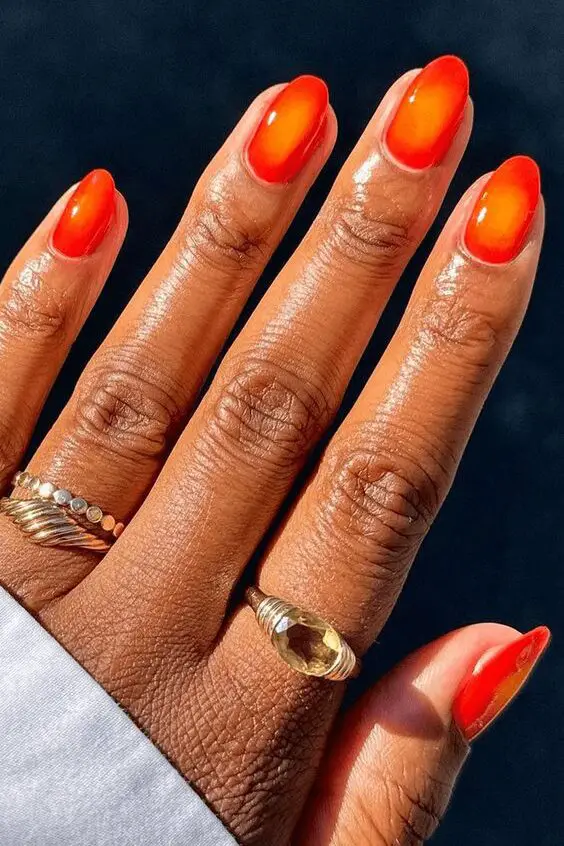
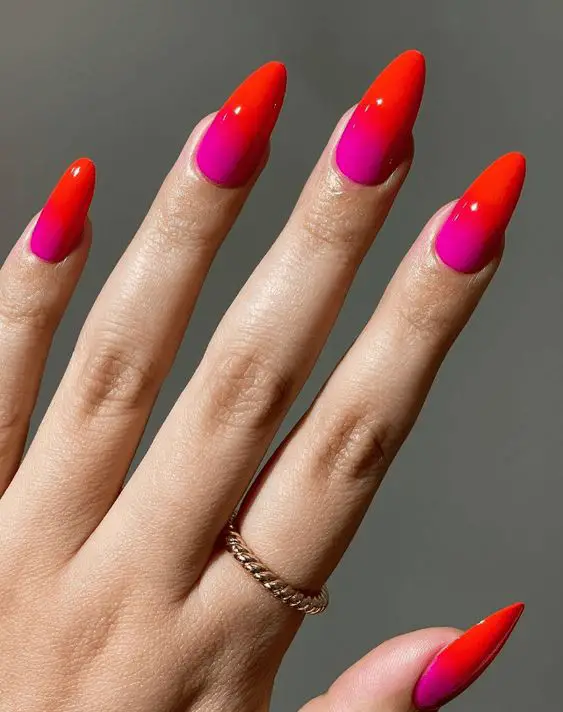
3. Sunset Gradient: Red to Orange
Sunset Gradient: Red to Orange captures the breathtaking hues of a summer sunset, blending fiery reds into vibrant oranges.
This nail design is a fantastic choice for anyone looking to sport a dynamic and colorful look during the warmer months.
Key Features of Sunset Gradient: Red to Orange
Vivid Color Transition: The design features a seamless transition from a deep red to a bright orange, mimicking the natural gradient seen in sunsets.
Gold Flake Accents: A top coat containing gold flakes adds a sparkling effect, reminiscent of sunlight reflecting off the ocean.
Versatility: This gradient can be styled both casually and formally, making it a great option for various summer events.
How to Achieve This Look
Base Preparation: Begin with a yellow base coat to set the foundation for the gradient effect.
Gradient Technique: Use a makeup sponge to apply the red and orange nail polishes. Start with red at the base of the nail and gradually blend into orange towards the tip.
Dabbing Method: Dab the sponge in a crisscross pattern over the nails to enhance the gradient effect.
Gold Flake Application: Apply a clear polish mixed with gold flakes over the gradient for added sparkle.
Finishing Touch: Seal everything with a top coat to smooth the surface and enhance the design’s durability.
Maintenance Tips
Top Coat Reapplication: To maintain the shine and prevent chipping, reapply the top coat every few days.
Gentle Use: Be mindful of activities that can chip nail polish, and wear gloves if necessary to protect your manicure.
Additional Styling Tips
Accessorizing: Pair your sunset gradient nails with summer-themed accessories like sun hats and sandals for a cohesive look.
Color Matching: Wear clothing in shades of red, orange, or yellow to complement your nails and create a striking summer outfit.
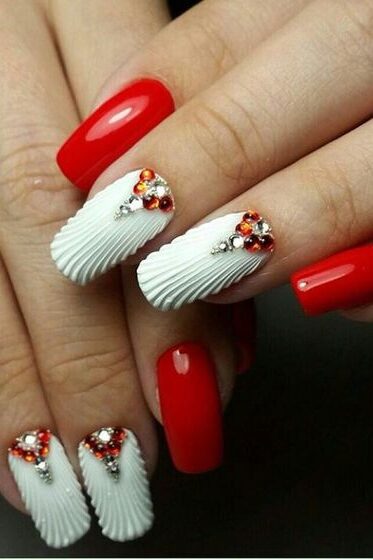
4. Seashell Nail Art with Red Accents
Seashell Nail Art with Red Accents offers a delightful blend of coastal charm and vibrant flair, perfect for enhancing your summer nail designs.
This style captures the essence of the beach with a touch of elegance, making it an excellent choice for both day-to-day wear and special summer occasions.
Key Features of Seashell Nail Art with Red Accents
Coastal Inspiration: Drawing from the beauty of the sea, seashell nail art can include designs like oyster shells or scalloped edges, which bring a natural and serene vibe to your nails.
3D Effect: For a more lifelike seashell appearance, a visit to a nail salon is recommended. Professionals use techniques that add depth and realism to the nail art, creating an eye-catching 3D effect.
Red Accents: Integrating red accents through pearls, gems, or a shimmery red topcoat not only complements the seashell design but also adds a bold pop of color, perfect for summer.
How to Achieve This Look
Base Color Application: Start with a base coat of your choice that will show through the clearer layers, setting a perfect background for the seashell design.
Building the Design: Using UV Pure White Builder Gel and an ultra-thin brush, draw one straight line down the middle of the nail. Add semi-parallel lines starting from the tip, flowing slightly diagonally to meet the center line at the base.
Curing and Embellishing: After curing the UV gel under a lamp, apply a top coat for shine and durability. Embellish with pearls or gems at the base or atop the shell design to enhance the 3D effect.
Adding Red Accents: Incorporate red elements by placing red pearls or gems strategically or using a red shimmery top coat to finalize the look.
Maintenance Tips
Regular Top Coat Application: To maintain the gloss and protect the design, apply a top coat every few days.
Gentle Handling: Be cautious with activities that could chip or damage your nail art. Consider wearing gloves for chores that could pose a risk to your nails.
Additional Styling Tips
Accessorize Thoughtfully: Pair your seashell nails with light, airy fabrics and beach-inspired accessories to fully embrace the summer vibe.
Color Coordination: Wear outfits in light blues, greens, or sandy tones to complement the coastal theme of your nails.
5. Red and White Gingham Check
Red and White Gingham Check nails bring a charming and playful pattern to your summer nail art repertoire.
This design, inspired by the classic gingham fabric pattern, features crisp white and vibrant red checks, making it a perfect choice for various casual and everyday settings.
Key Features of Red and White Gingham Check
Classic Pattern: Gingham, known for its simple intersecting stripes creating squares, is a beloved design in both fashion and now, nail art.
Color Scheme: The traditional red and white combination offers a striking contrast that is both eye-catching and stylish.
Versatility: This nail design is versatile, ideal for occasions like picnics, barbecues, or just a fun day out.
Step-by-Step Guide to Achieving Red and White Gingham Check Nails
Base Coat Application: Start with a clear base coat to protect your nails and ensure a smooth application of colors.
White Base Color: Apply two coats of white nail polish as the base color. Allow it to dry completely.
Drawing the Check Pattern: Using a thin nail art brush, paint horizontal and vertical lines with red nail polish to create the gingham check pattern.
Finishing Touches: Once the red lines are dry, apply a top coat to seal in the design and add a glossy finish.
Maintenance and Durability
Durability: With proper application and care, this nail design can last up to a week without significant wear or chipping.
Care Tips: To extend the life of your manicure, apply a top coat every few days and avoid activities that can cause chipping.
Creative Variations
Additional Elements: Enhance the basic gingham pattern with embellishments like rhinestones or glitter for a more festive look.
Color Variations: Experiment with different color combinations or add unique elements like a matte top coat for a modern twist.
Suitable Occasions
Casual Events: Perfect for informal gatherings, this nail design adds a touch of whimsy and style to your casual outfits.
Everyday Fashion: A great choice for daily wear, it keeps your style fresh and vibrant.
6. Red Iridescent Nails
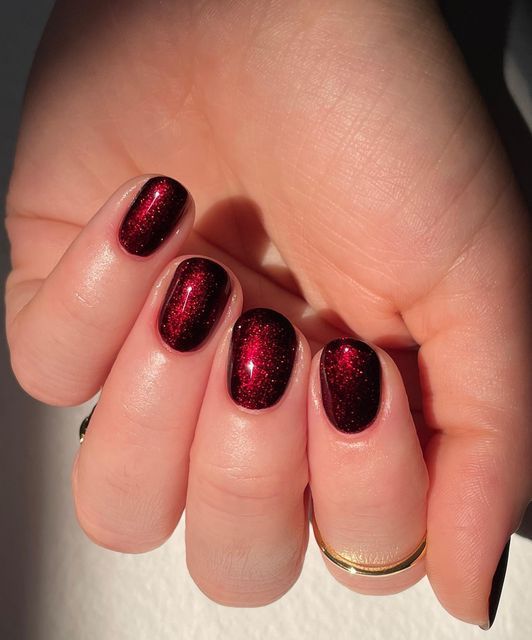
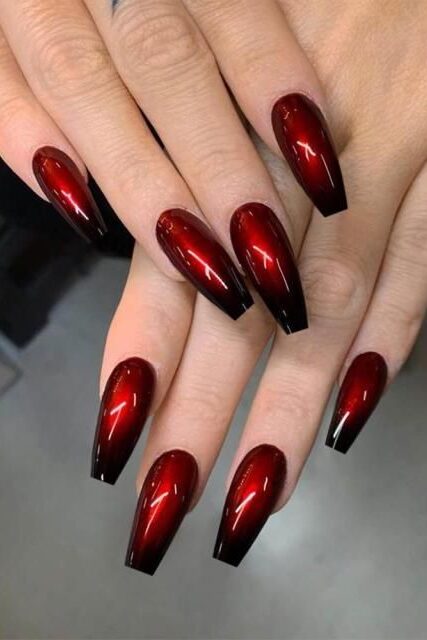
Red Iridescent Nails are gaining traction as a top choice for those seeking a glamorous and eye-catching manicure.
Known for their shimmering, multi-dimensional appearance, these nails reflect light to reveal various hues, making them a perfect match for summer festivities and night events.
Key Features of Red Iridescent Nails
Vivid Iridescence: The main allure of red iridescent nails lies in their ability to shimmer with a spectrum of colors when exposed to light.
Versatility in Design: From subtle pink cuticles to dramatic red waves, the variety of designs that can be incorporated with red iridescent nails is vast.
Trendy for Seasons: Particularly popular during the Christmas season and expected to be a hit in 2024, these nails are perfect for those who love staying ahead in fashion trends.
How to Achieve Red Iridescent Nails
Select Your Shade: Choose from various shades like Red Coral, Poppy Red, or Dark Pansy. Green Flash™ LED Gel Polish offers an excellent range of iridescent shades.
Prepare Your Nails: Start with a clean, buffed nail surface. Apply a base coat to protect your nails and enhance the polish’s adherence.
Apply Iridescent Polish: Paint your nails with the chosen iridescent polish. Apply two coats for a more pronounced effect.
Add Art Elements: Embellish with nail art elements like rhinestones or holographic hearts for an added wow factor.
Seal with a Top Coat: Finish with a top coat to seal in the design and add an extra layer of gloss.
Maintenance Tips
Regular Top Coat Application: To maintain the iridescent effect and protect your nails, apply a top coat every few days.
Gentle Care: Avoid harsh chemicals and rough activities that can chip the polish. Wear gloves when doing household chores to extend the life of your manicure.
Styling Tips with Red Iridescent Nails
Outfit Pairing: Match your nails with outfits that have neutral tones or metallic accents to let your manicure stand out.
Accessorize: Opt for simple yet elegant jewelry to complement the iridescent effect without overwhelming your overall look.
7. Red with Gold Flakes
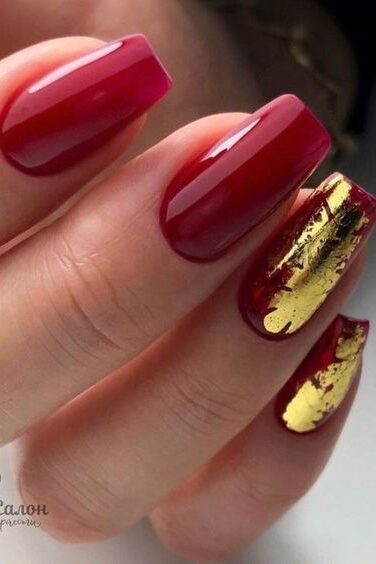
Red with Gold Flakes nails embody elegance and sophistication, making them a stunning choice for those looking to add a touch of luxury to their summer nail designs.
This beginner-friendly design features a cranberry red triangle French cut over a beige or pink acrylic powder base, adorned with shimmering gold flakes that catch the light beautifully.
Key Features of Red with Gold Flakes Nails
Cranberry Red Triangle French Cut: Offers a modern twist on the classic French manicure.
Gold Flakes: Provide a luxurious and festive touch, perfect for special occasions or everyday glamour.
Beige/Pink Acrylic Base: Serves as a subtle and elegant backdrop that enhances the vivid red and gold accents.
How to Achieve This Look
Prepare Your Nails: Start with a clean, buffed surface. Apply a base coat to protect your nails and improve the adherence of the acrylic.
Apply Acrylic Base: Mix the beige or pink acrylic powder with a liquid monomer and apply it to your nails, shaping them as desired.
Add the Red Triangle: Once the base is set, paint a cranberry red triangle at the tip of each nail. You may use tape to achieve sharp lines.
Gold Flakes Application: Pre-shred or break apart gold flakes for easier application. Sprinkle them over the wet nail polish or embed into the acrylic for a seamless finish.
Seal the Design: Apply a top coat to protect your nails and add a glossy finish that makes the gold flakes stand out.
Maintenance Tips
Top Coat Reapplication: To keep your nails looking fresh and to protect the gold flakes, reapply a top coat every few days.
Gentle Care: Avoid activities that can chip or damage the nail art. Wear gloves when doing household tasks.
Styling Tips
Accessorize with Gold: Enhance your red and gold nails by wearing gold jewelry. This can create a cohesive and upscale look.
Outfit Pairing: These nails look stunning with both casual and formal attire, making them versatile for any event.
8. Red and White Nautical Stripes
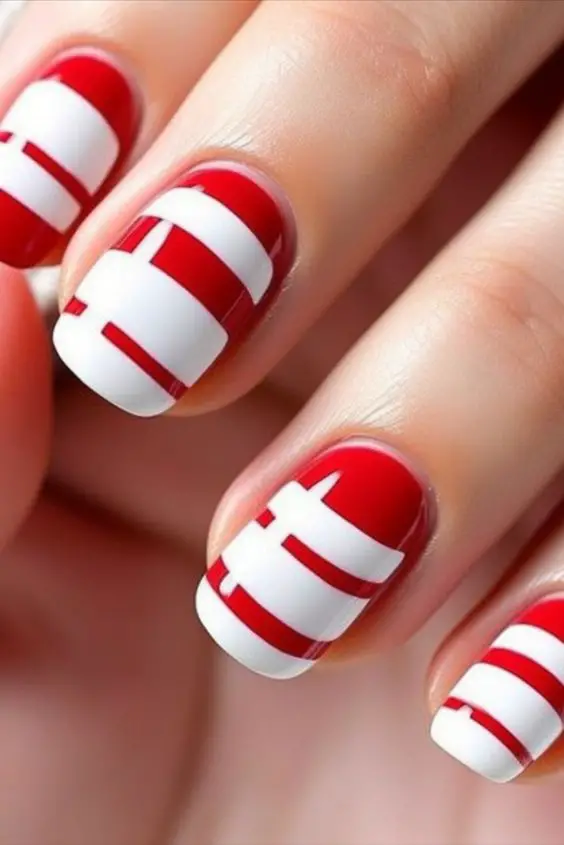
Red and White Nautical Stripes nail design captures the essence of maritime adventure with its crisp and striking color palette.
This style is ideal for those who enjoy themes of the ocean and want to add a classic touch to their summer nail art.
Key Features of Red and White Nautical Stripes
Base Color: A vibrant red polish serves as the base.
Stripes: White stripes are added over the red base to create the nautical effect.
Additional Elements: Designs such as anchors, chevrons, and embellishments enhance the maritime feel.
Step-by-Step Guide to Achieving Red and White Nautical Stripes
Prepare Your Nails: Start with clean, shaped nails. Apply a base coat to protect your nails and help the polish adhere better.
Apply the Red Base: Choose a vibrant red polish and apply two coats, letting it dry completely between applications.
Adding White Stripes: Use a nail art pen or a striper brush to carefully draw white stripes across each nail. You can vary the thickness of the stripes for a more dynamic look.
Embellishments: For a touch of glamour, consider adding small gold or silver elements like microbeads or thin metallic stripes.
Anchor Design: Use a fine brush or a dotting tool to add an anchor design using black or navy polish. This can be placed strategically, such as on the thumb or ring finger for emphasis.
Top Coat: Seal your design with a top coat to ensure it has a glossy finish and lasts longer without chipping.
Tips for Maintenance and Durability
Top Coat Reapplication: Reapply a top coat every few days to maintain the shine and protect the design from wear.
Gentle Use: Be mindful of activities that could chip your nail polish. Wearing gloves during household chores can help protect your manicure.
Styling and Accessorizing with Nautical Stripes
Outfit Pairing: Nautical stripes nails look great with casual maritime-inspired outfits, such as striped shirts or navy and white dresses.
Accessories: Complement your nails with accessories like anchor-themed jewelry or a classic white and navy blue watch.
9. Neon Red with Palm Tree Stencils
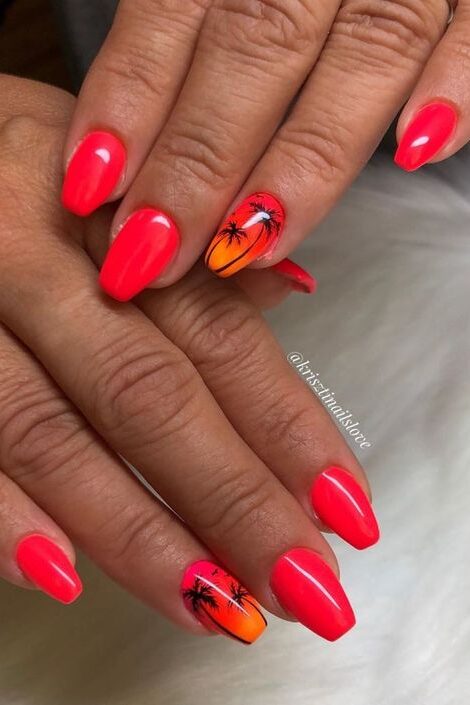
Neon Red with Palm Tree Stencils nails are a vibrant and eye-catching option for those looking to make a bold statement with their summer nail art.
This design is particularly popular for beach vacations, summer parties, and even special events like weddings where a unique, coordinated nail design is desired.
Key Features of Neon Red with Palm Tree Stencils
Vibrant Neon Red: The base of this nail design features a striking neon red color that stands out.
Palm Tree Stencils: These can be applied using pre-made stencils, custom stencils from adhesive tape or paper, or even painted freehand with a thin nail art brush.
Versatility: Suitable for various occasions, adding a fun and tropical flair to any outfit.
How to Achieve This Look
Prepare Your Nails: Start with clean, shaped nails. Apply a base coat to protect your nails and improve the polish adherence.
Apply Neon Red Base: Paint your nails with a neon red polish. Allow it to dry completely.
Stencil Application: Place the palm tree stencil over the nail. If using a freehand method, use a thin brush to carefully draw the palm tree design.
Detailing: Fill in the stencil with a black or dark green polish to define the palm tree. Remove the stencil carefully if used.
Top Coat Application: Apply a clear top coat to seal in the design and add a glossy finish.
Maintenance Tips
Top Coat Reapplication: Reapply a top coat every few days to maintain the design’s vibrancy and protect it from chipping.
Gentle Care: Be cautious with activities that could damage the nail art. Consider wearing gloves for household tasks.
Styling Tips
Event Matching: Consider this nail design for thematic parties or as a fun addition to your vacation wardrobe.
Color Coordination: Pair with outfits that complement the bold neon red, such as white or black clothing, to make the nails pop.
10. Red and White Tie-Dye
Red and White Tie-Dye nails are a vibrant and artistic choice for anyone looking to bring a splash of color and creativity to their summer nail designs.
Inspired by the popular tie-dye technique often seen in fashion, this design blends bold red and white in a unique pattern that’s sure to turn heads.
Key Features of Red and White Tie-Dye
Inspiration from Art and Fashion: This design draws directly from the tie-dye technique, a favorite in both art and clothing.
Unique Color Combination: The use of red and white creates a striking contrast, enhanced by the addition of white to make the colors pop.
Star-like Pattern: By dragging a pin or toothpick through the polish, a distinctive star-like pattern emerges, giving each nail a unique look.
How to Achieve This Look
Base Coat: Start with a white base coat and allow it to dry completely.
Apply Colors: Paint your nails diagonally—first with white, then turquoise, and finish with red at the tips.
Create the Pattern: While the polish is still wet, use a pin or toothpick to drag the white polish through the white and red, extending to the end of the nail to form the tie-dye effect.
Maintenance Tips
Regular Touch-Ups: To keep the design vibrant, touch up any chips as they occur.
Use of Base and Top Coats: Applying a base coat before starting and a top coat after finishing the design can significantly extend its longevity.
Suitability and Styling
Versatile for Many Occasions: Perfect for parties, festivals, or casual outings, this design’s vibrant and youthful appeal makes it suitable for a wide range of events.
Styling Tips: Consider pairing these nails with casual, colorful summer wear or festival attire to fully embrace the fun and free-spirited vibe of the tie-dye pattern.
11. Red French Tips with Neon Pink Accents
Red French Tips with Neon Pink Accents offer a vibrant twist on the classic French manicure, blending bold red with striking neon pink for a look that’s both eye-catching and stylish.
This design is perfect for those who wish to make a bold statement with their nail art.
Key Features of Red French Tips with Neon Pink Accents
Bold Color Combination: The use of red and neon pink provides a dramatic contrast that’s perfect for summer and beyond.
Versatility: This style is suitable for a variety of occasions, from casual outings to more formal events.
Customizable: You can adjust the thickness of the tips and the intensity of the colors to suit your personal style.
Step-by-Step Guide to Achieving Red French Tips with Neon Pink Accents
Prepare Your Nails: Start with a clean, shaped nail. Apply a base coat to protect your nails and improve the adherence of the polish.
Apply Base Color: Choose a neutral base color and apply two coats, letting it dry completely.
Tape for Precision: Use thin tape to mark off where the red tips will begin. This ensures a crisp line and uniformity across all nails.
Paint the Tips: Apply a vibrant red polish to the tips of your nails, removing the tape while the polish is still slightly wet to ensure clean lines.
Add Neon Pink Accents: Once the red polish has dried, use a thin brush to add neon pink accents right next to the red tips.
Seal the Design: Finish with a top coat to protect your design and add a glossy finish.
Maintenance Tips
Top Coat Reapplication: To keep your nails looking fresh and to protect the design, apply a top coat every few days.
Gentle Care: Be mindful of activities that could chip the polish. Consider wearing gloves when doing tasks that could damage your nails.
Styling Tips
Accessorize: Pair your nails with bold and colorful accessories to complement the vibrant design.
Outfit Pairing: These nails work well with both neutral and colorful outfits, making them versatile for any wardrobe.
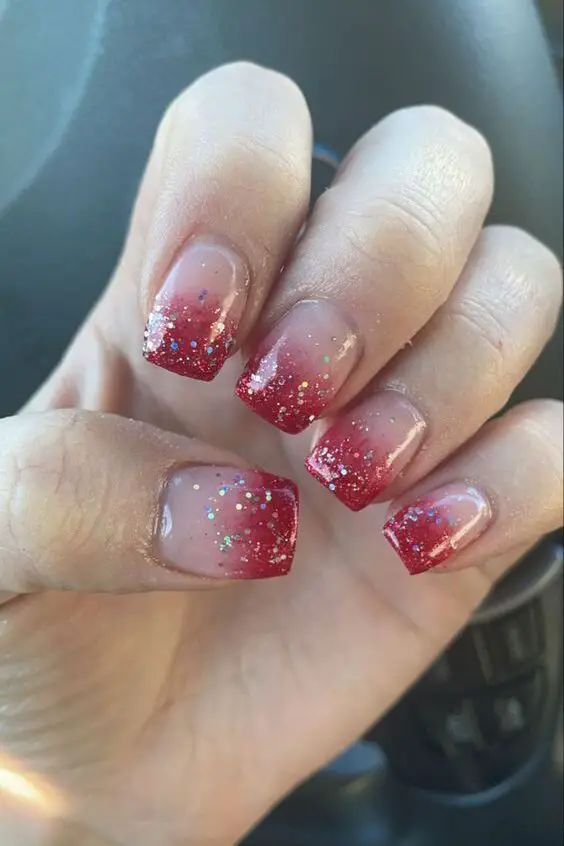
12. Red Glitter Fade
Red Glitter Fade nails are a dazzling choice for those seeking a blend of sophistication and festive flair in their summer nail designs.
This style features a gradient effect that transitions from a solid red to sparkling glitter, creating a captivating look perfect for both day and evening events.
Key Features of Red Glitter Fade
Gradient Effect: Begins with a deep red at the base and fades into a sparkling glitter towards the tips.
Versatility: Suitable for various occasions, from casual outings to more formal gatherings.
Longevity: With proper care, this design can maintain its beauty for up to two weeks.
How to Achieve the Red Glitter Fade Look
Prepare Your Nails: Start with clean, shaped nails. Apply a base coat to protect your nails and enhance polish adherence.
Apply the Red Base: Use a deep red polish as the base color. Apply two coats for a rich hue.
Glitter Application: While the second coat is still tacky, gently dab a sponge with glitter polish starting halfway up the nail and moving towards the tip to create a fade effect.
Top Coat Application: Seal the design with a high-gloss top coat to ensure durability and enhance the sparkle.
Maintenance Tips
Regular Top Coat Reapplication: Extend the life of your manicure by applying a top coat every few days.
Gentle Care: Avoid tasks that can chip the polish, and wear gloves when necessary.
Styling Tips
Accessorize: Complement your glittery nails with subtle yet elegant jewelry to enhance the sparkle without overpowering your overall look.
Outfit Pairing: These nails are versatile enough to match both casual and formal attire, making them a perfect choice for any event this summer.
13. Red with Seashell Embellishments
Seashell nail designs capture the essence of the ocean and are perfect for anyone looking to add a touch of beach-inspired beauty to their summer nail art.
This style is often associated with themes like mermaids and marine life, making it a popular choice for both day-to-day wear and special seaside events.
Key Features of Red with Seashell Embellishments
Theme Inspiration: Draws from beach, mermaid, and marine life motifs.
Versatility: Suitable for both natural and artificial nails, including soft tip extensions.
Decoration Variety: Utilizes nail glitter, sequins, 3D decals, and other ocean-themed decorations.
How to Achieve This Look
Base Preparation: Start with a base coat of red polish on clean, shaped nails.
Seashell Placement: Apply seashell decals or stamps strategically on the nails. These can range from small, subtle designs to larger, more noticeable decorations.
Additional Decorations: Enhance the design with nail glitter or sequins that complement the ocean theme.
Top Coat Application: Seal the design with a clear top coat to protect your artwork and add a glossy finish.
Maintenance Tips
Regular Top Coat Reapplication: To maintain the look and durability of your nail art, apply a top coat every few days.
Gentle Care: Avoid activities that could chip or damage the decorations. Wearing gloves during household tasks can help protect your nails.
Styling with Red with Seashell Embellishments
Outfit Pairing: These nails look stunning when paired with light, airy summer dresses or beachwear.
Accessorizing: Opt for simple jewelry to keep the focus on your beautifully decorated nails.
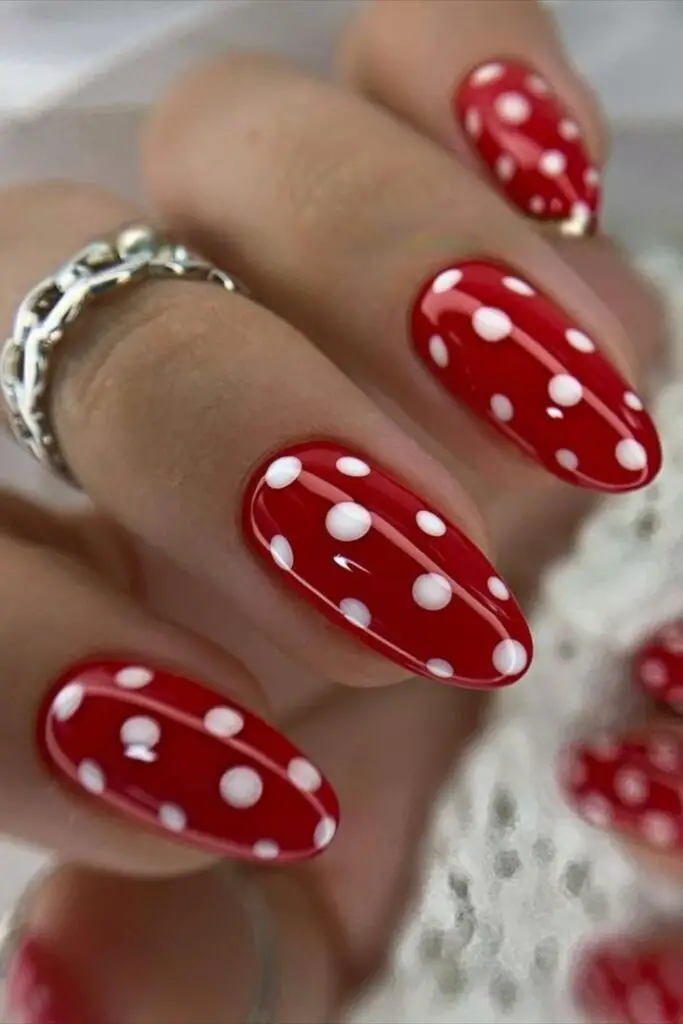
14. Red and White Polka Dots
Red and White Polka Dots nail design is a delightful choice for those seeking a playful, youthful, and chic look.
Key Features of Red and White Polka Dots
Playful Design: The polka dots create a fun and whimsical appearance.
Versatility: Suitable for a wide range of events from formal to casual.
Customizable: Easy to adapt in size and density of the dots to match personal style preferences.
How to Achieve This Look
Base Coat Application: Start with a clean, dry nail and apply a base coat like OPI Big Apple Red to protect your nails and enhance the color.
Polka Dot Creation: Dip a dotting tool or the rounded end of a bobby pin into white nail polish (OPI Alpine Snow recommended for its opacity).
Dot Placement: Gently press the tool onto your nail to create dots. Space them evenly for a symmetrical pattern or randomly for a more playful effect.
Top Coat for Finish: Once the dots are dry, apply a matte topcoat to give your design a modern look and to protect the polish.
Maintenance Tips
Top Coat Reapplication: Reapply a matte top coat every few days to maintain the look and protect the design from chipping.
Gentle Use: Avoid tasks that can chip the polish, and consider wearing gloves for protection during household chores.
Styling Tips
Accessorizing: Complement your nails with playful accessories like polka dot scarves or jewelry to match the theme.
Outfit Pairing: These nails work well with both bold and subtle outfits, making them versatile for any wardrobe.
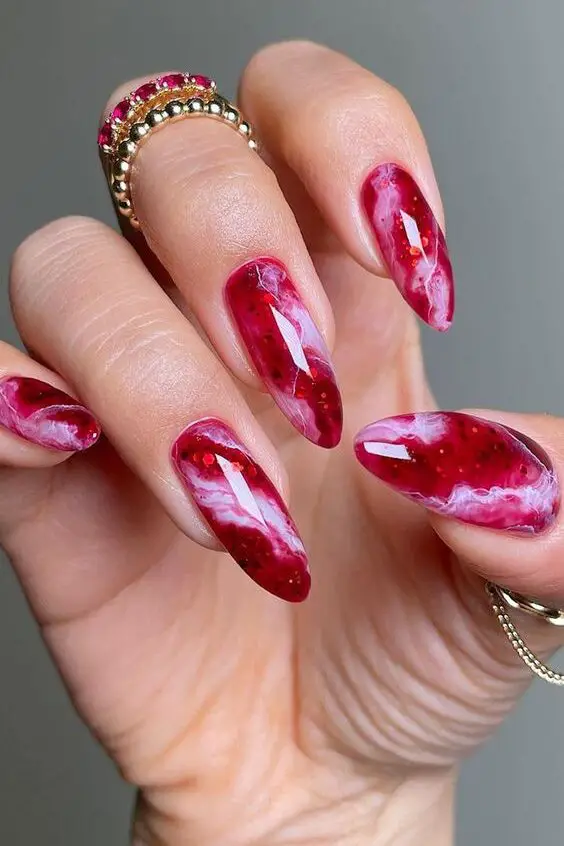
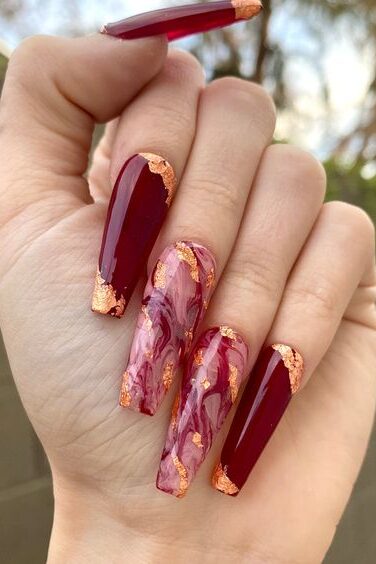
15. Red Marble Nails with a Hint of Gold
Red Marble Nails with a Hint of Gold offer a sophisticated and luxurious look that’s perfect for those seeking an elegant yet striking manicure.
This popular design combines the classic appeal of red with the opulent shimmer of gold, making it a top choice for both special occasions and everyday glam.
Key Features of Red Marble Nails with a Hint of Gold
Sophisticated Design: The red marble base coat provides a rich, deep color that is beautifully complemented by gold accents.
Versatility: Suitable for gel, acrylic, or polygel applications, this style is widely available at most nail salons.
Durability: With proper care, this nail design can last up to two weeks.
How to Achieve This Look
Base Preparation: Start with a clean, buffed nail surface. Apply a base coat to protect your nails and enhance the polish adherence.
Apply Red Marble Effect: Use a marbling technique with red and white nail polishes to create the marble effect. Swirl the colors using a fine brush or a marbling tool.
Gold Accents: Once the marble effect is dry, add gold foil or gold glitter accents to enhance the luxurious feel.
Seal with Top Coat: Apply a clear top coat to protect your design and add a glossy finish.
Maintenance Tips
Top Coat Reapplication: To maintain the gloss and protect the design, apply a top coat every few days.
Gentle Handling: Be cautious with activities that could chip or damage your nail art. Consider wearing gloves for chores that could pose a risk to your nails.
Additional Styling Tips
Accessorize: Pair your red marble nails with gold jewelry to enhance the luxurious feel of your manicure.
Outfit Pairing: These nails look stunning with both formal and casual attire, making them versatile for any event.
Trending on Social Media
Whether you are attending a glamorous event or just want to add a touch of luxury to your everyday style, Red Marble Nails with a Hint of Gold are a beautiful and timeless choice.
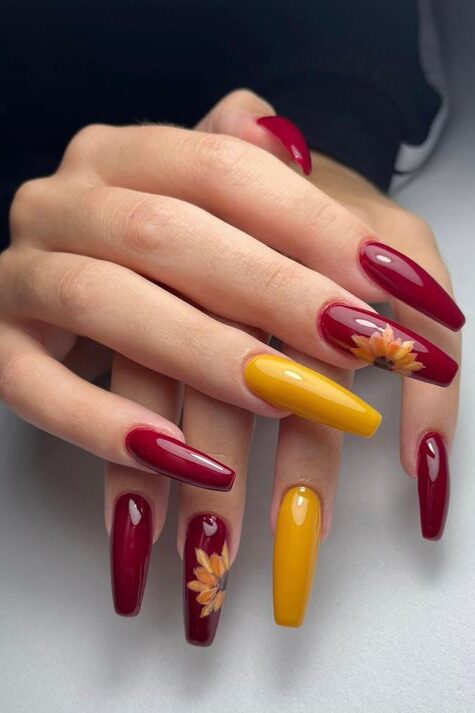
16. Red and Yellow Sunflower Nail Art
Red and Yellow Sunflower Nail Art designs offer a vibrant and cheerful addition to your summer nail repertoire, perfect for those looking to infuse their style with a touch of nature’s beauty.
These designs can be achieved through various techniques, ensuring there is a style to suit everyone’s skill level and preference.
Key Features of Red and Yellow Sunflower Nail Art
Techniques Used: Achievable through hand painting, nail stickers, or gel application, providing flexibility in method based on your comfort and the resources available.
Design Versatility: Can stand alone as a statement piece or be paired with other complementary designs for a more intricate look.
Customization Options: Tailor the nail art to your personal taste by choosing the length, shape, and finish of the nails.
How to Achieve This Look
Select Your Technique: Decide whether you want to use hand painting, nail stickers, or gel. Each method offers different advantages in terms of ease and finish.
Prepare Your Nails: Start with a clean, smooth base. Apply a base coat to protect your nails and ensure a better application of the colors.
Apply Base Color: Use a vibrant red polish as the base to make the yellow sunflower pop.
Create Sunflower Design: Hand-paint the sunflower with a fine brush or apply a sunflower sticker. If using gel, cure under a UV lamp as required.
Detailing: Add details like seeds in the center of the sunflowers using a darker color or tiny beads for a 3D effect.
Finish with a Top Coat: Seal your design with a top coat to enhance durability and give a glossy finish.
Maintenance Tips
Regular Top Coat Application: Extend the life of your nail art by applying a top coat every few days.
Gentle Care: Avoid harsh activities that might chip your nails. Wear gloves when doing household chores to protect your manicure.
Occasions and Styling
Sunflower nail art is suitable for a variety of occasions, reflecting personal style and creativity. These designs are particularly popular for summer events, outdoor parties, and casual gatherings.
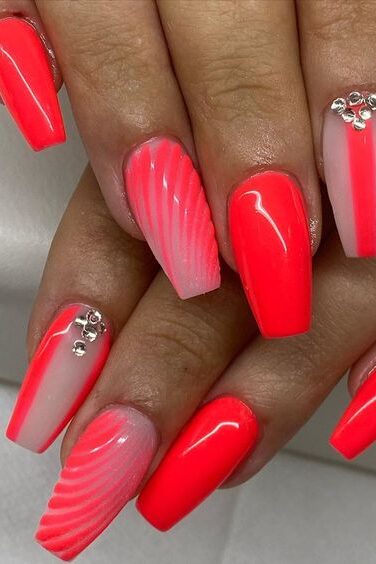
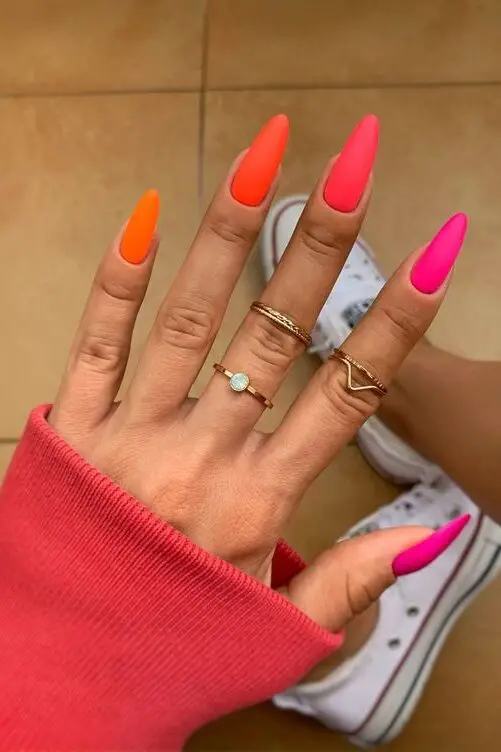
17. Red with Neon Coral Accents
Red with Neon Coral Accents is a nail design that masterfully combines the classic allure of red with the vibrant, contemporary pop of neon coral.
Key Features
Bold Color Fusion: The striking contrast between the deep red and the bright neon coral gives this design a unique edge that stands out.
Technique Variety: Achievable through several techniques such as ombre, gradient, or geometric patterns, this design offers flexibility in style and complexity.
How to Achieve This Look
Choose Your Technique: Decide whether you want an ombre, gradient, or a geometric pattern involving both red and neon coral.
Preparation: Start with a clean, prepped nail, applying a base coat to protect your nails and ensure better polish adhesion.
Application: Apply the red polish as the base color. Once dry, add the neon coral accents using your chosen technique.
Finishing Touches: Seal the design with a top coat to enhance durability and maintain the vibrancy of the colors.
Maintenance and Durability
Durability: Similar to regular nail polish, this design should last about a week to ten days. Regular touch-ups can extend its longevity.
Care Tips: Apply a top coat every few days to maintain the shine and protect the design from wear and tear.
DIY Tips
Tutorials: Numerous online tutorials and guides are available to help you achieve this look from the comfort of your home.
Tools Needed: Basic nail art tools like brushes or sponges might be needed, especially for detailed patterns.
Versatility of the Design
This design’s adaptability makes it suitable for various settings, enhancing its appeal. It can be toned down for a day at the office or spiced up for a night out, making it a go-to choice for many.
Product Spotlight: ILNP Studio Color Nail Polish
Shade: ‘Summer (Warm Neon Coral Pink)’
Features: This polish is opaque, providing excellent coverage with a vibrant finish, and comes in a 12ml bottle.
Ingredients: Includes components like Butyl Acetate and Nitrocellulose among others, ensuring a durable and glossy finish.
User Ratings: Highly recommended with an average rating of 4.88 out of 5 from 339 reviews, indicating high satisfaction among users.
18. Red Neon French Tips (Matte Finish)
Red Neon French Tips with a Matte Finish offer a striking and contemporary twist to the traditional French manicure, blending bright neon hues with a sophisticated matte texture.
This nail design is versatile, suitable for various nail lengths, including the currently trending short nails, and can be a standout choice for both day-to-day wear and special occasions.
Key Features of Red Neon French Tips with Matte Finish
Vibrant Neon Red: The tips are painted in a vivid neon red, making them pop against the natural nail color.
Matte Finish: A matte top coat is applied over the neon tips, giving the nails a modern and edgy look.
Versatility: This style is adaptable to all nail shapes and lengths, particularly flattering on shorter nails.
Step-by-Step Guide to Achieving Red Neon French Tips with Matte Finish
Nail Preparation: Begin with clean, shaped nails. Apply a base coat to protect your nails and ensure better polish adherence.
Applying Neon Red: Following the technique suggested by nail artist Lolly Koon, place the polish brush at the center of the nail tip, make a small dash, and then create arcs connecting to the dash on each side to form the French tip.
Matte Top Coat: Once the neon red tips are dry, apply a matte finish top coat to transform the glossy neon into a chic, matte appearance.
Additional Design Elements
Solid Accent Nail: For a subtle twist, paint one nail on each hand in solid neon red covered with a matte finish. This accentuates the French tips and adds an element of surprise to the design.
Maintenance and Durability
Durability: This design can last up to two weeks with proper care.
Care Tips: To maintain the matte finish, avoid using hand creams or oils that can add shine to the matte surface. Reapply the matte top coat every few days to keep the nails looking fresh.
Styling Tips
Outfit Pairing: These nails look stunning with both casual and formal attire, adding a pop of color and a modern twist to any outfit.
Accessorizing: Keep accessories minimal to let the bold nails stand out, or choose monochromatic pieces that complement the neon red.
Conclusion
As we conclude, remember that these red summer nail ideas are more than just trends; they are an extension of personal expression and style.
The significance of choosing the perfect design goes beyond aesthetics, touching on the joy and confidence a beautiful set of nails can bring.


Leave a Reply
You must be logged in to post a comment.