Toe nail designs have evolved far beyond the classic french pedicure, incorporating everything from intricate patterns to bold color splashes, making them a crucial aspect of summer fashion trends.
This post will show you 18 irresistible summer toe nail designs that are sure to elevate your pedicure game this season.
Get ready to dip your toes into a sea of creativity and color that will not only complement your summer wardrobe but also put a spring in your step.
Busy? Save this pin for later.

1. Daisy Chain Accents
Embrace the fun and simplicity of Daisy Chain Accents this summer! This delightful design is perfect if you’re looking for a way to add a playful touch to your pedicure without needing too many tools or skills.
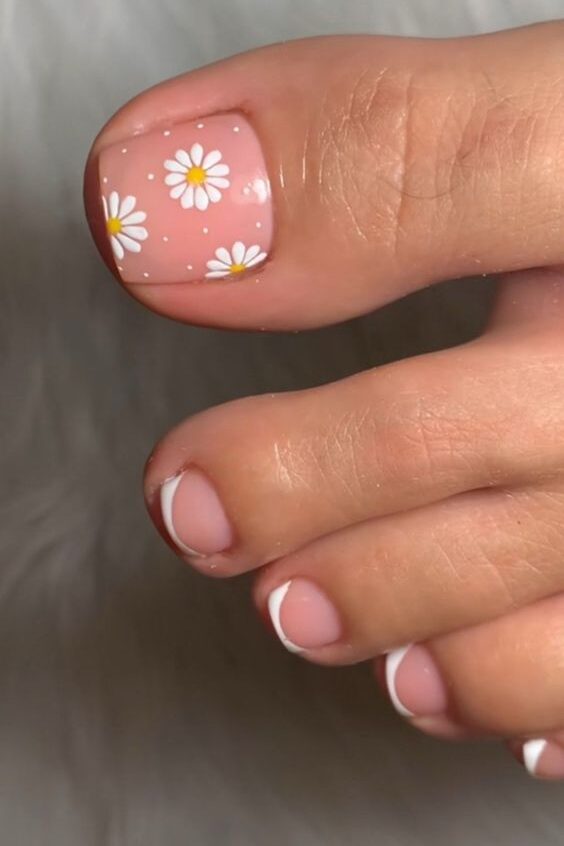
Starting with a base coat of any color that tickles your fancy, the versatility of this design shines through, allowing you to match it with your favorite summer outfit or even your mood!
To create the charming daisy accents, you’ll use a dotting tool—no need for professional brushes here. Begin by dipping the larger end of your tool into a vibrant polish like lovey-dovey.
Carefully place five dots in a circular pattern to form the petals of your daisy. The beauty of this design is in its simplicity and the way it allows the base color to peek through, enhancing the overall look.
Next, switch to the smaller end of the dotting tool to pull the polish toward the center of each petal, creating more defined shapes.
This step doesn’t require perfection; the slight variations in each petal add to the whimsical nature of the design.
Once your petals are set, add a pop of contrast with a dot of lemon meringue in the center of each flower, bringing your daisies to life.
2. Sunset Ombre
This design is a fantastic choice if you’re looking to bring a vibrant, colorful flair to your toes.
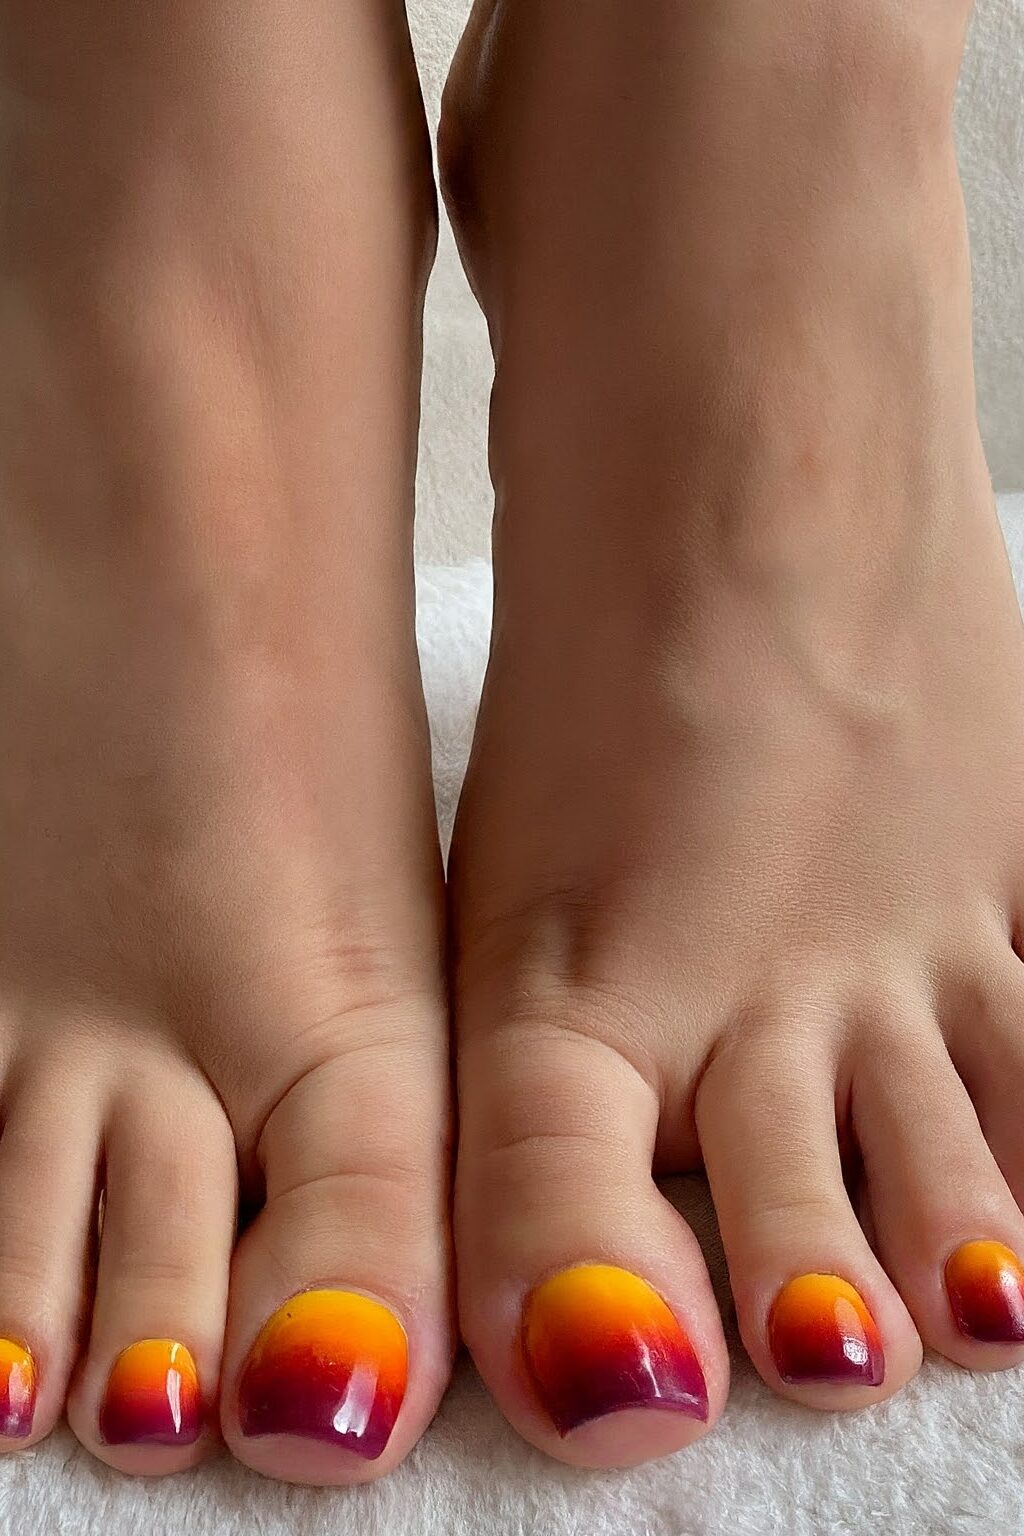
The gradient mimics the stunning transition of colors seen in a sunset, blending from a deep purple to a fiery orange and mellow yellow, creating a breathtaking visual effect on your nails.
To achieve the sunset ombre look, you’ll start with a white base coat to ensure the colors pop.
The use of neon colors is highly recommended as they enhance the gradient effect, making each color stand out with a bold, vivid clarity. You’ll need shades of purple, neon pink, orange, and bright yellow to create this look.
The technique involves using a sponge to dab the polish onto your nails. This method helps in achieving a smooth gradient that looks airbrushed.
It’s essential to apply the colors in layers, starting with purple at the base of your nail, followed by pink, blending into orange, and finally, yellow towards the tip. Each layer should be sponged on carefully to ensure they merge well without harsh lines.
One of the keys to perfecting this design is patience, especially when allowing the white base coat to dry completely before starting with the colors. If the base coat is still tacky, the colors may not blend smoothly and can ruin the base.
After applying the colors, a top coat is crucial to seal in the design, enhance the colors’ vibrancy, and ensure longevity.
The top coat gives a glossy finish that brings out the richness of the sunset ombre and protects your pedicure from chipping.
3. Tropical Punch Polka Dots
This design is a hit for those who adore a bit of classic charm mixed with a splash of fun.

Perfect for beginners or if you simply crave a cute, timeless look, these polka dots are sure to add a tropical twist to your summer style.
First off, you’ll want to prep your nails to ensure a flawless application. Start by applying a base coat to protect your nails from staining and to strengthen them.
This step is crucial as it forms the foundation of your vibrant design. Once your base coat is dry, take a piece of scotch tape and place it diagonally across each nail. Make sure to press it down firmly to prevent any polish from seeping underneath.
Next, choose a bold black polish for the tips of your nails. Apply two thin coats, waiting about two minutes between each coat. Be patient and let them dry almost completely.
The anticipation is part of the fun! Once you’re confident they’re set, gently peel off the tape. You’ll be left with crisp, clean lines that make the perfect backdrop for your polka dots.
Now, for the tropical punch! Put a small blob of white polish on a piece of paper. Dip your dotting tool into the polish and begin to add polka dots over the black tips.
There’s no right or wrong way to do this; random placement works best to keep things lively and spirited. If you feel adventurous, rotate the hand you’re working on to add dots from different angles, keeping the tool steady.
4. Popsicle Pizzazz
Get ready to add a splash of fun and color to your summer with the Popsicle Pizzazz toe nail design! This playful style is perfect for those sunny days when you want your toes to be as vibrant and joyful as your summer adventures.
Imagine your nails mimicking the whimsical colors of popsicles, featuring bright and bold patterns that are sure to turn heads.
To start, choose a palette of colorful polishes. Think about the neon pinks, brilliant blues, sunny yellows, and vibrant greens that remind you of your favorite summer treats.
The key here is to be bold and expressive. Apply a base coat of your lightest color to make the other colors pop even more.
Once your base coat is dry, it’s time to get creative with your design. You can use a thin brush or a dotting tool to add stripes, dots, or even swirls of color that overlap and interact in fun ways.
Layer the colors while they’re still a bit tacky to help them blend together, creating that perfect popsicle melt effect.
5. Beach Ball Tips
This design captures the essence of fun under the sun, perfect for days spent frolicking on the sand or enjoying a casual stroll along the boardwalk.
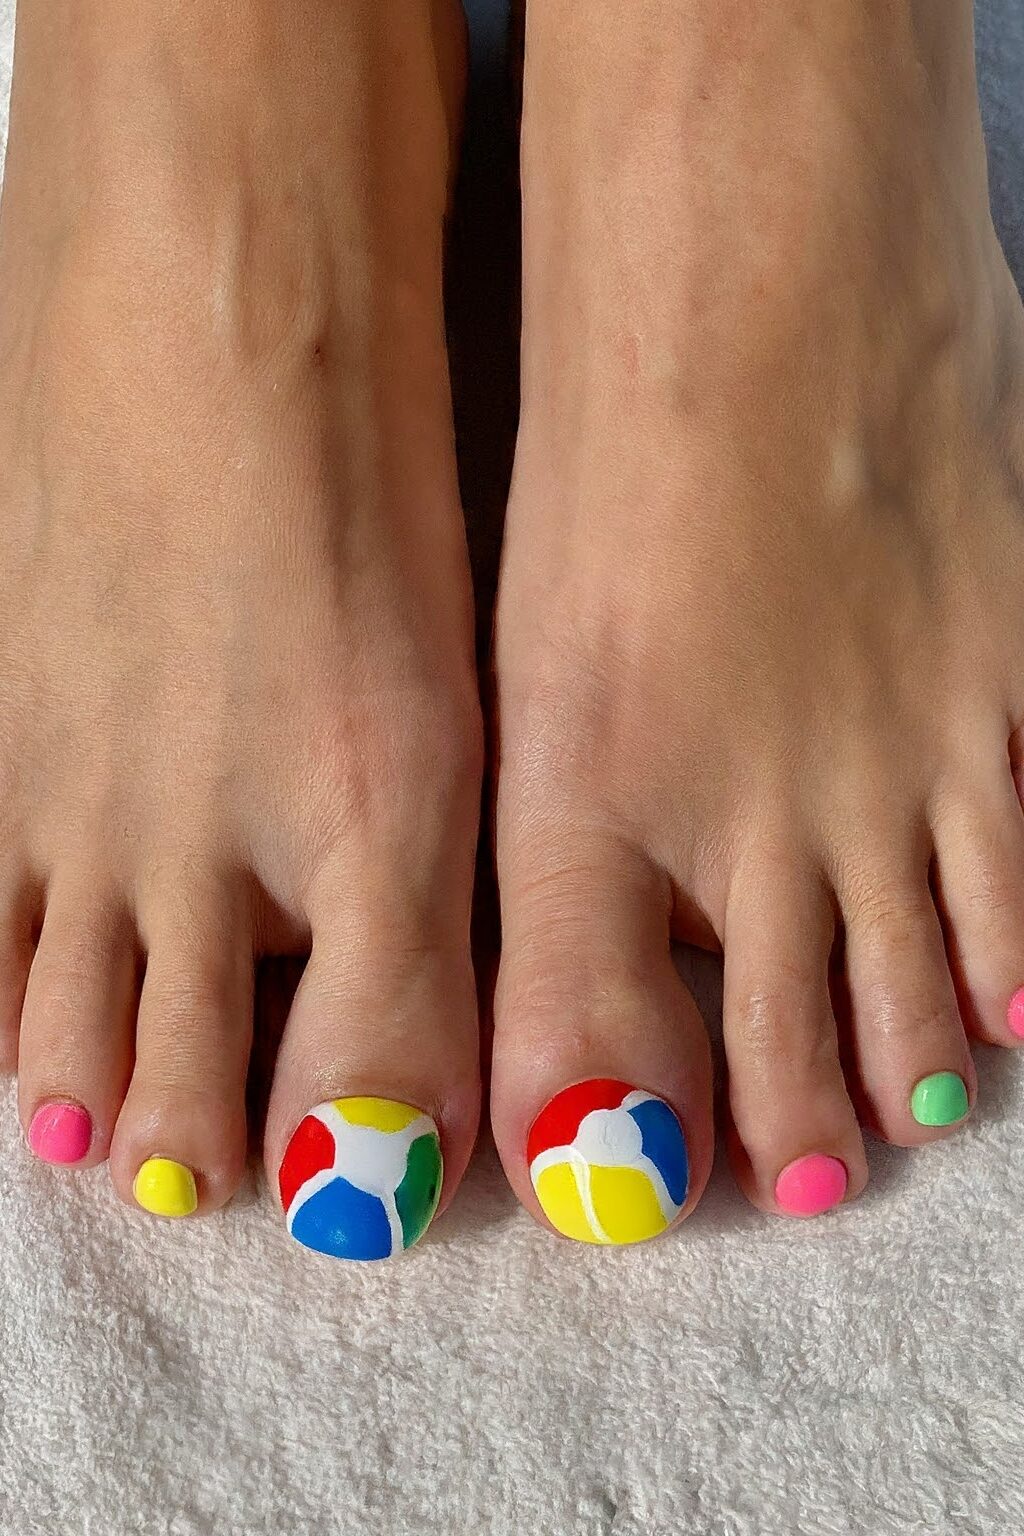
You’ll love how this bold, cheerful pattern adds a pop of color and whimsy to your summer outfits.
Start by choosing a bright base color like sky blue or sandy beige to represent the beach. This will serve as the backdrop for your beach ball-inspired tips.
Once your base coat has dried, it’s time to add the beach ball stripes. Use a fine brush to paint curved stripes in classic beach ball colors—vibrant red, bold blue, and sunny yellow work wonderfully.
The stripes should converge at a point near the tip of your nail, mimicking the look of a beach ball.
For a touch of realism, add a small white highlight on the top side of each stripe, which will give the appearance of glossy, inflated beach balls. This small detail can make your design stand out, bringing the playful beach theme to life.
6. Lemon Slice Details
Brighten up your summer with Lemon Slice Details on your toes, a design that’s as refreshing as a cool glass of lemonade on a hot day.

This juicy style is perfect for anyone looking to add a vibrant, playful touch to their summer pedicure. With a nod to summer nail designs, fruit slice nails, and specifically kiwi lemon nails, this trend is a part of the broader 2025 nail trends that celebrate colorful nails and trendy nail ideas.
The beauty of Lemon Slice Details lies in their versatility and the joy they bring. Starting with a base of light pink polish, this design sets a soft, summery backdrop for the vibrant yellow lemon slices that will adorn your nails.
Using a nail art brush or the polish brush, draw a circle shape on the edge of your nail. Once dry, overlay a smaller circle with a pastel yellow, leaving a thin border of bright yellow showing to mimic the rind of a lemon slice.
With a striper brush, draw lines down to the corner of your nail to define the slice. Adding dots to the rest of your nail with white polish using a dotting tool creates a bubbly effect that’s both fun and sophisticated.
To achieve this, draw ovals and then add two rounded ends onto each oval. Accentuate your lemons with green polish for leaves and white polish for detailed dots on each lemon. Smooth it all down with a topcoat for a glossy finish that makes your lemony design pop.
The Lemon Slice Details and full lemon patterns are not just about the visual appeal; they’re a celebration of summer’s zest and creativity.
7. Hibiscus Blooms
Step into the tropical paradise with your pedicure by embracing the vibrant and alluring Hibiscus Blooms design.
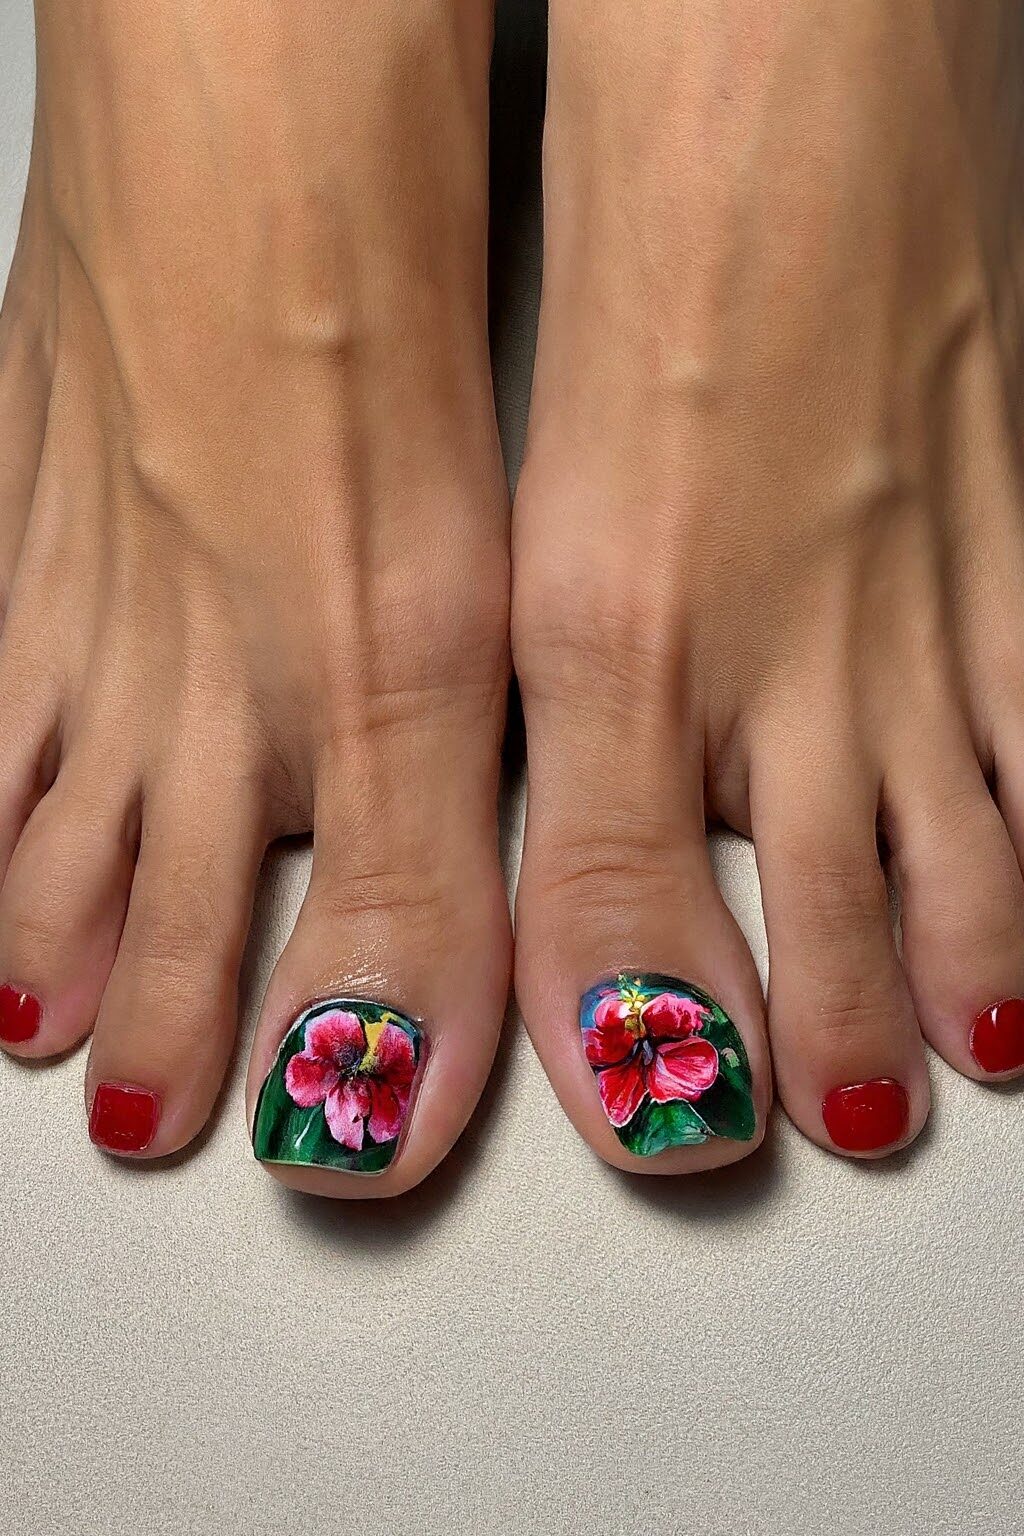
Renowned for its bold and beautiful presence, the hibiscus flower is a staple in tropical-themed art and fashion, making it a perfect choice for your summer toe nail designs.
This design not only captures the essence of a beach getaway but also adds a floral elegance to your overall look.
To start, choose a bright base color like coral or pale pink which will serve as the perfect canvas for your hibiscus flowers.
The versatility of hibiscus flowers allows them to be painted in a range of colors—think deep reds, vibrant oranges, and sunny yellows. Each hue will pop beautifully against your chosen base.
The process of painting the hibiscus on your nails can be quite simple with the right tools. You can use a stencil for a more uniform look or a freehand technique for a more organic feel.
If you’re going the freehand route, start by creating the petals with a small brush. Paint five extended strokes around a central point to form the base of your flower. These strokes should be slightly curved, mimicking the natural flow of hibiscus petals.
Next, using a dotting tool or the tip of a bobby pin, add the intricate details. For the stamen, place a cluster of tiny yellow or black dots at the center of each flower.
8. Seafoam Green Waves
Embrace the tranquil vibes of the ocean with the Seafoam Green Waves toe nail design, perfect for your summer escapades.
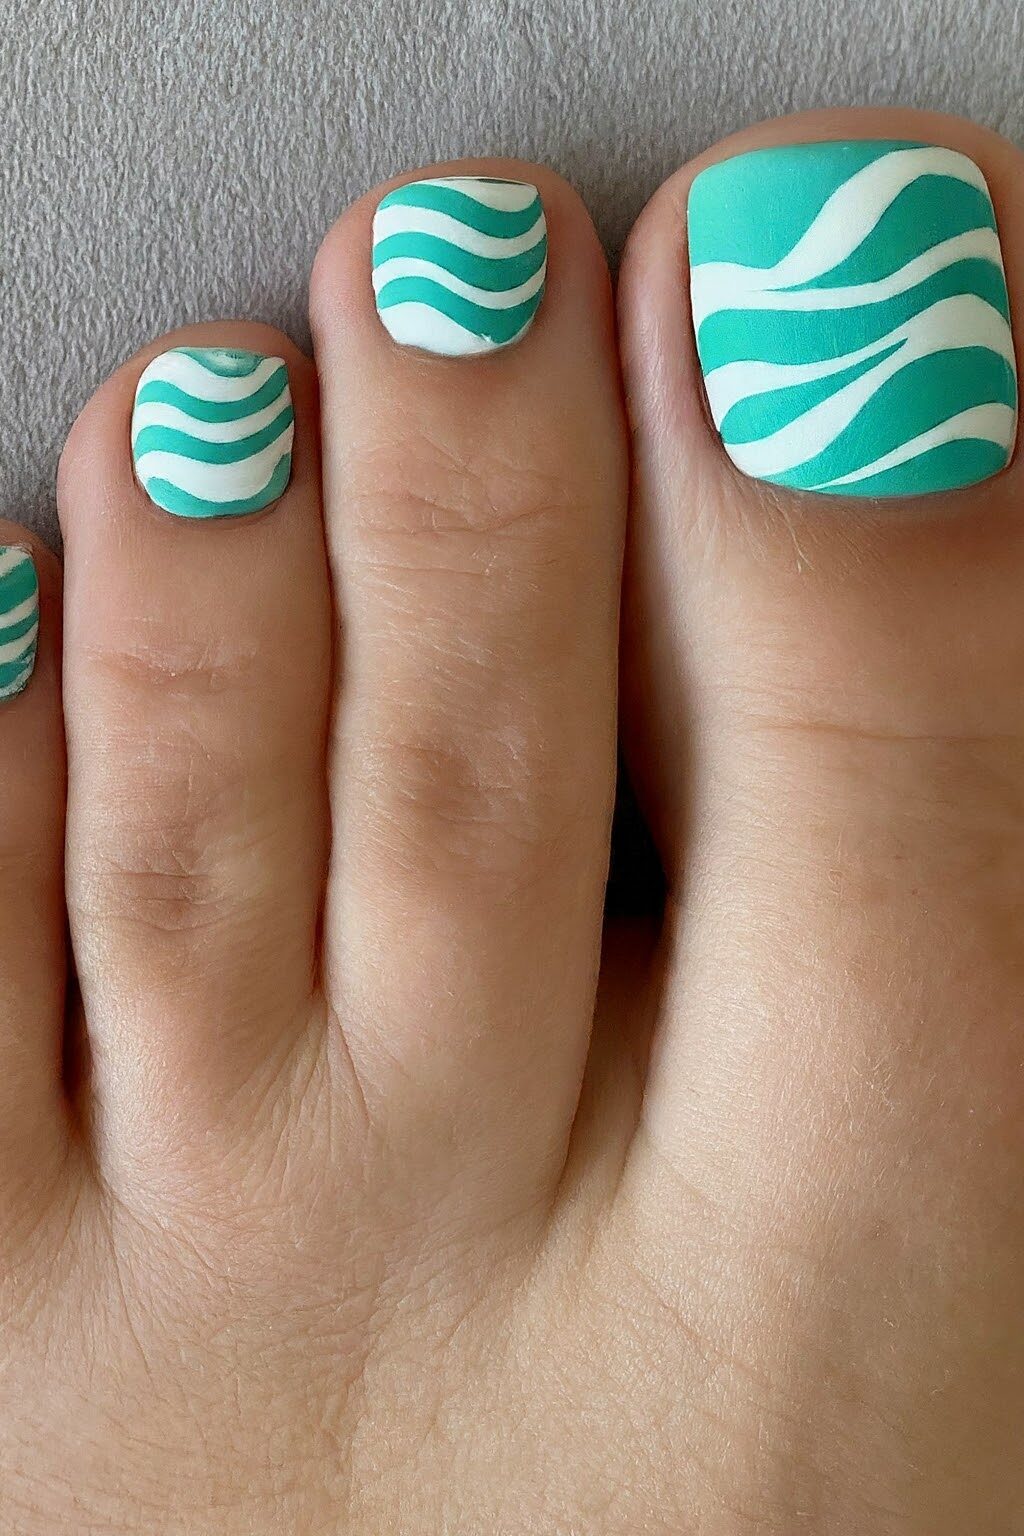
This refreshing design draws inspiration from the serene hues of the sea, blending minty greens and turquoise blues to create a look that’s as calming as a day at the beach.
To start, choose a seafoam green polish as your base. This color not only sets a cool, crisp foundation but also evokes the essence of clear, shallow waters.
For an added touch of oceanic charm, you can play around with shades like cool mint and platinum turquoise to give more depth and dimension to your nails.
The real magic happens when you add the wave effects. Using a thin brush, swirl together phthalo turquoise and a bit of white to mimic the frothy, rolling waves of the sea.
The technique here is to gently blend the colors on your nail, creating soft, wavy lines that look like water moving back and forth.
You can enhance the wave effect by adding a little transparent topcoat mixed with white to give that misty, seafoam appearance.
For those who love a bit of texture and want to bring the beach vibe to life, consider sprinkling a tiny amount of fine sand-colored glitter over the wet polish.
This will mimic the sparkling sands found on your favorite beaches. Seal your design with a topcoat to ensure it lasts as long as your summer adventures.
9. Butterfly Garden Toes
Step into a whimsical world with Butterfly Garden Toes, a design that captures the essence of a vibrant summer garden on your nails.
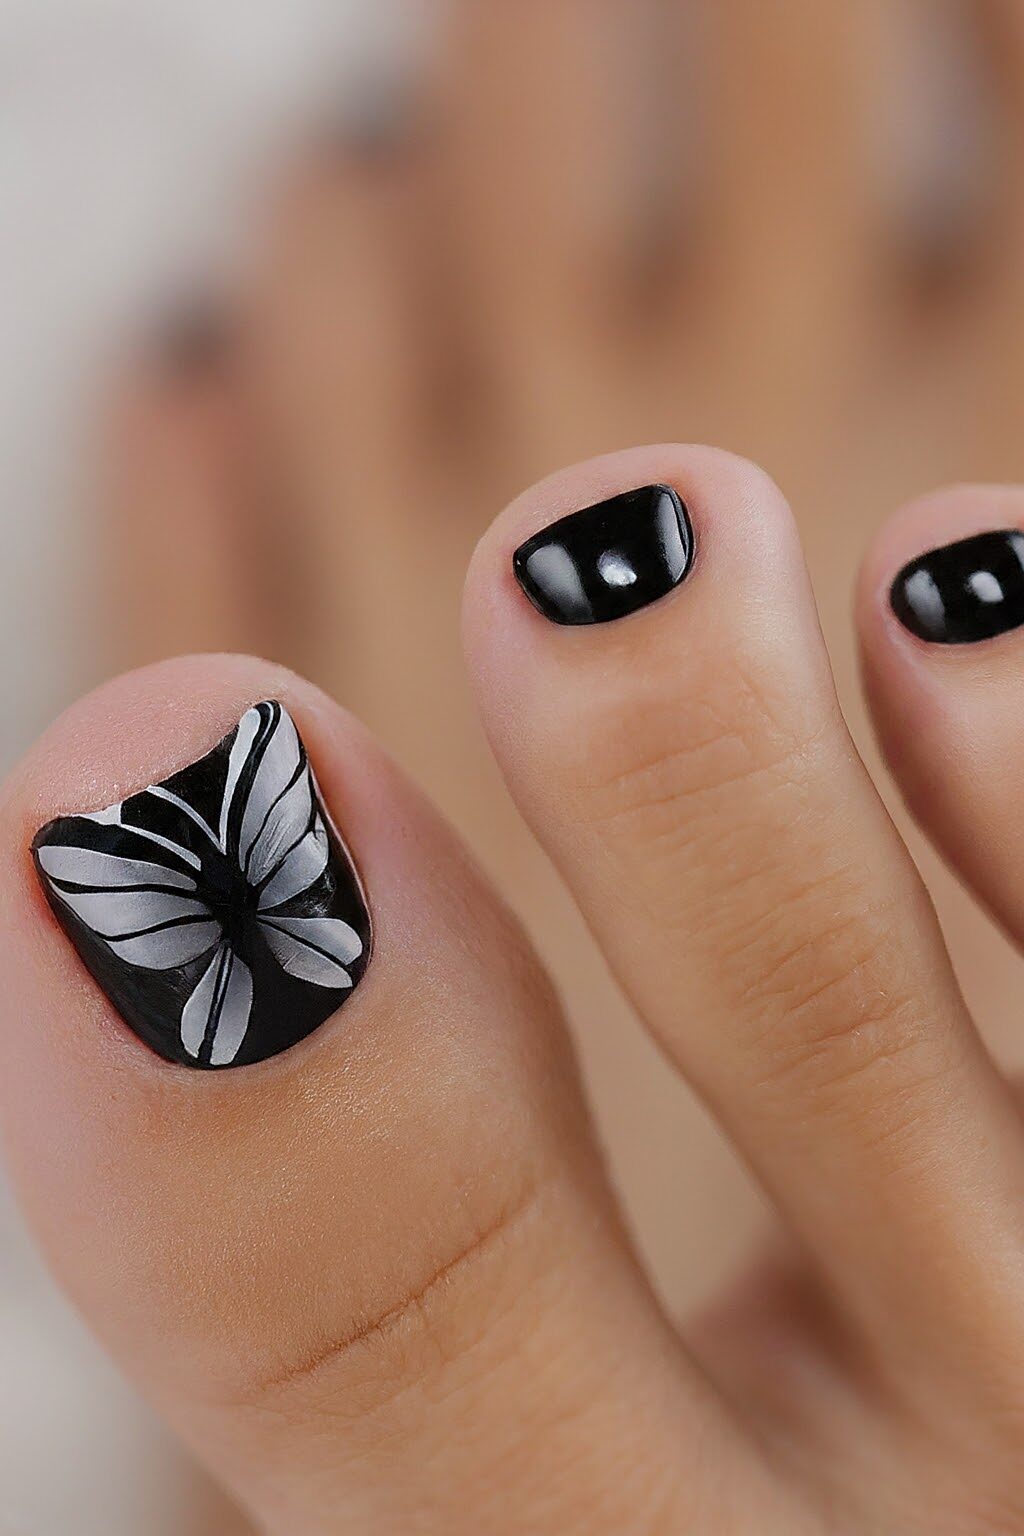
This delightful style is perfect for anyone looking to add a touch of nature-inspired elegance to their summer look. With butterfly motifs and delicate wing patterns, this design combines artistic flair with the playful vibes of the season.
Start by applying a base coat of your chosen color. Soft pastels or clear polish work wonderfully as they allow the vibrant colors of the butterfly designs to stand out.
Once your base is dry, it’s time to create the butterfly. Using a black striper, begin by drawing the body of the butterfly in the center of your nail. Start with a thicker line at the top and taper it down to create a slim tail.
Next, outline the wings with the same black striper. Remember, the lines don’t have to be perfectly symmetrical as the natural imperfection adds to the charm of your butterfly.
Fill in the wings with a silver polish, leaving some of the black outline visible to enhance the design’s details. If necessary, touch up the black outlines to ensure they are crisp and clear.
10. Bubblegum Pink with Glitter
This design is perfect for anyone who loves to add a touch of sparkle and a pop of vibrant color to their summer look.
The bubblegum pink serves as a fantastic backdrop for the glitter, making your toes stand out beautifully against the sandy beaches and sunny skies.
Starting with a bubblegum pink base, the color itself is cheerful and bright, ideal for those sunny days. Whether you choose a gel or acrylic formulation, the key is to get that perfect shade of pink that feels like summer. Once your base color is set, it’s time to bring on the glitter.
Glitter can transform your simple pink nails into a stunning display of style. You might want to sprinkle chunky glitter across the entire nail for that bold, eye-catching look.
Alternatively, for a more refined and sophisticated vibe, opt for fine glitter, dusting it lightly to create a subtle shimmer that catches the light with every movement.
For those who adore a bit of artistic flair, applying a thin layer of fairy Bell glitter gel to the tips can create a magical fading effect, much like an ombre.
This technique involves a light hand to allow the pink to show through, giving it a whimsical, confetti-like appearance.
11. Ocean Waves with Gold Accents
Immerse yourself in the serene beauty of the ocean with the Ocean Waves with Gold Accents toe nail design.
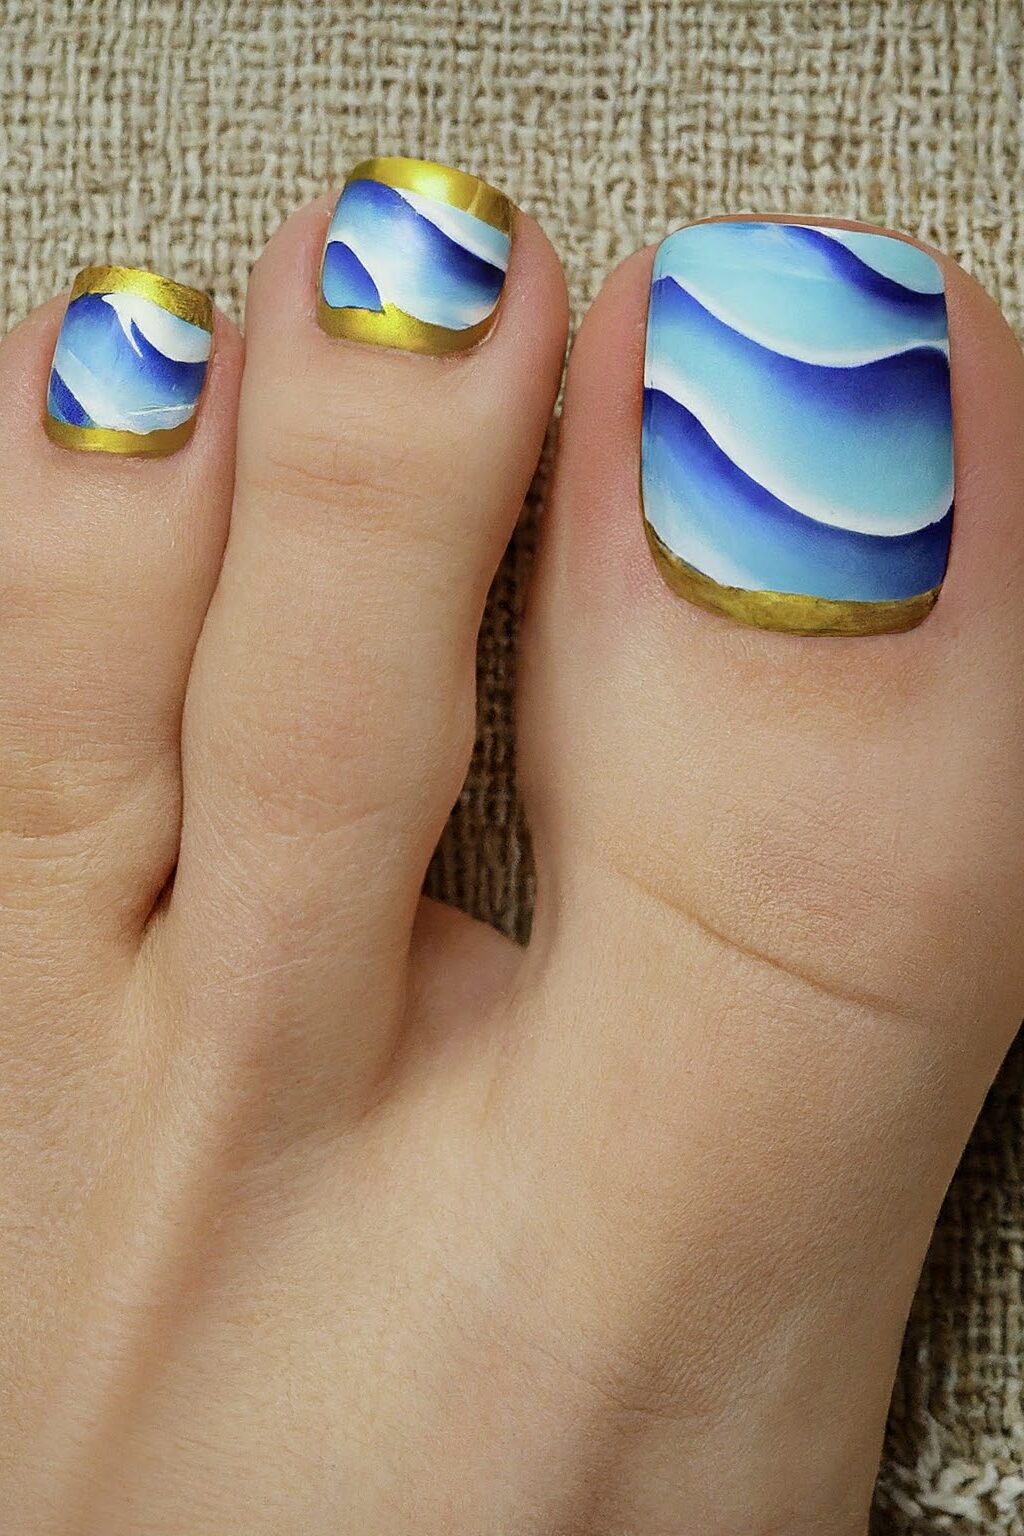
This look captures the tranquil essence of the sea, combining soothing aquatic hues with luxurious gold accents to create a stunning visual effect that’s perfect for any summer occasion.
Start by selecting a deep sea blue or coastal blue polish as your base. This shade will serve as the backdrop, reminiscent of the vast, beautiful ocean.
Once your base coat dries, the magic begins. Using a thin brush, paint gentle, wavy lines across each nail to mimic the natural rhythm of ocean waves.
The key here is to use a lighter blue or even a white polish to create a soft, marbled effect that looks like water rippling in the breeze.
Now, for the touch of luxury, add gold accents. You can use a gold nail striper or a small brush dipped in gold polish to outline some of the waves, adding a shimmering contrast that catches the light beautifully. This detail not only enhances the wave pattern but also brings a touch of elegance to the design.
12. Palm Tree Silhouettes
Bring the exotic allure of the tropics to your toes with the Palm Tree Silhouettes design.
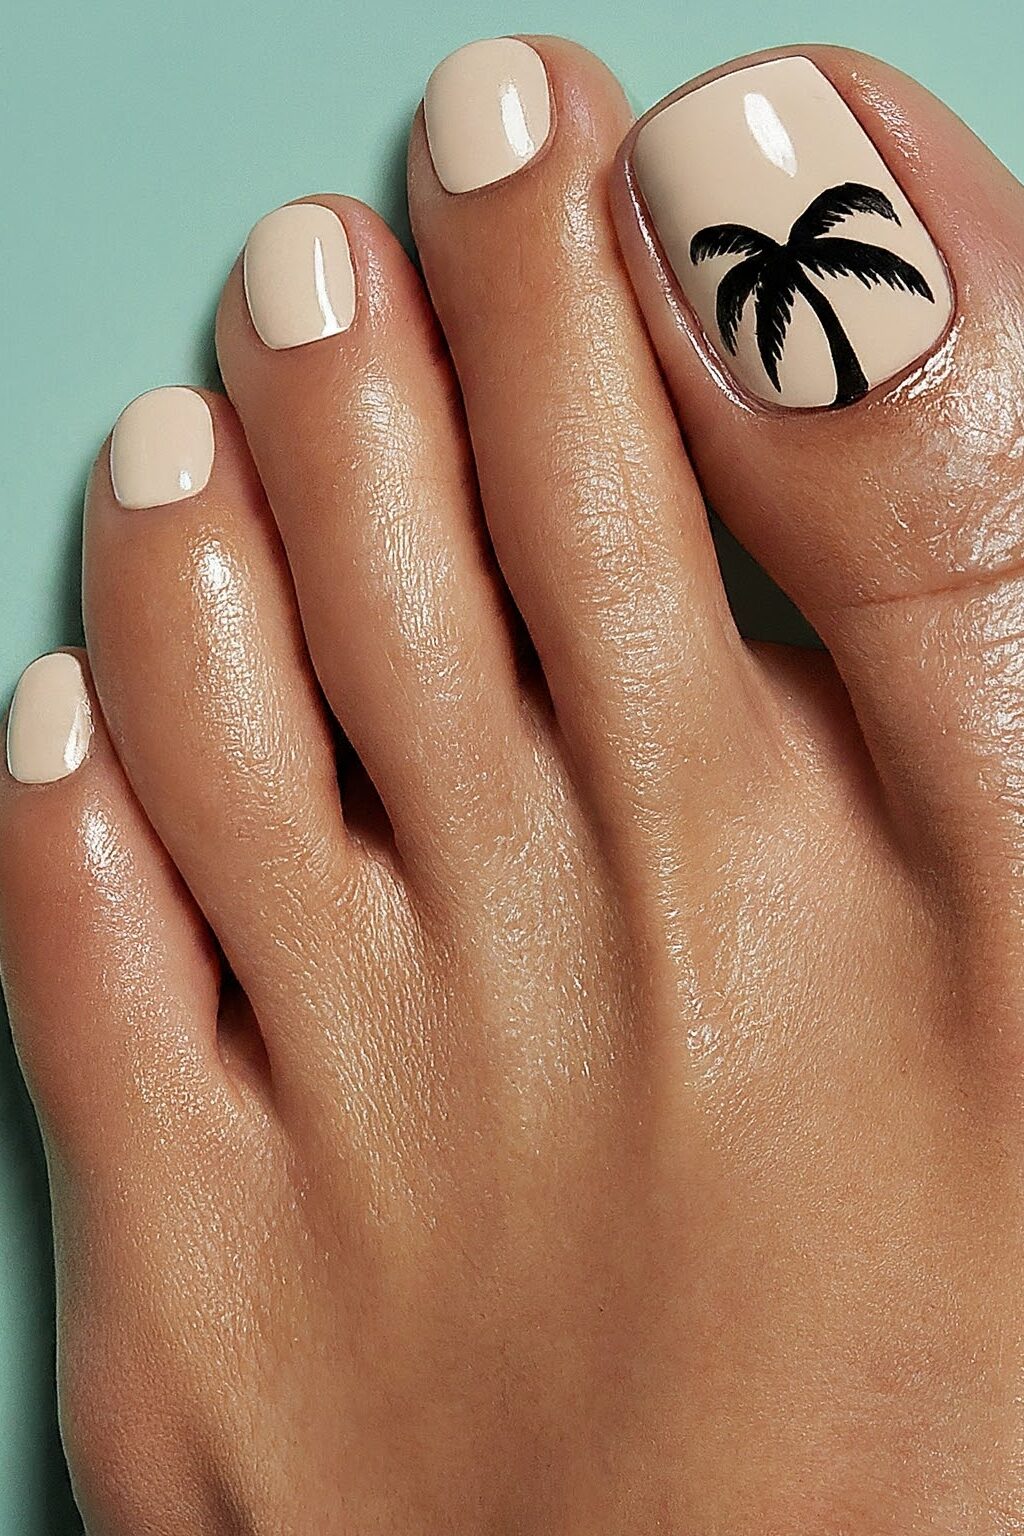
This style captures the essence of a beach vacation and infuses it into your summer pedicure. It’s perfect for those who love a bit of tropical flair in their look.
Start by creating a serene beach backdrop using a seafoam green or sandy beige polish as your base color. This will set the stage for the striking black silhouettes of palm trees.
Once your base coat has dried, it’s time to sketch the iconic palm trees that symbolize relaxation and tropical beauty.
Using a black liner gel, draw the trunk of the palm tree extending from the lower part of your nail upwards. The simplicity of the black against a light background will create a bold contrast, making the palm trees pop.
For the palm leaves, use the same black liner gel with a fine-tip brush to add the delicate fronds fanning out from the top of the trunk.
The key here is to keep the lines light and airy to mimic the movement of palm leaves swaying in a gentle breeze.
If you’re not confident in your freehand skills, stencils or stamps with palm designs are great alternatives that can help achieve a clean and precise look.
To enhance the tropical vibe, consider adding a setting sun or small birds in the background using orange or yellow polish.
These small details can transform your pedicure into a miniature piece of art that captures the vibrant life of tropical locales.
13. Watercolor Florals
Dive into the delicate and artistic world of Watercolor Florals with this toe nail design that brings the soft and ethereal charm of watercolor paintings to your pedicure.
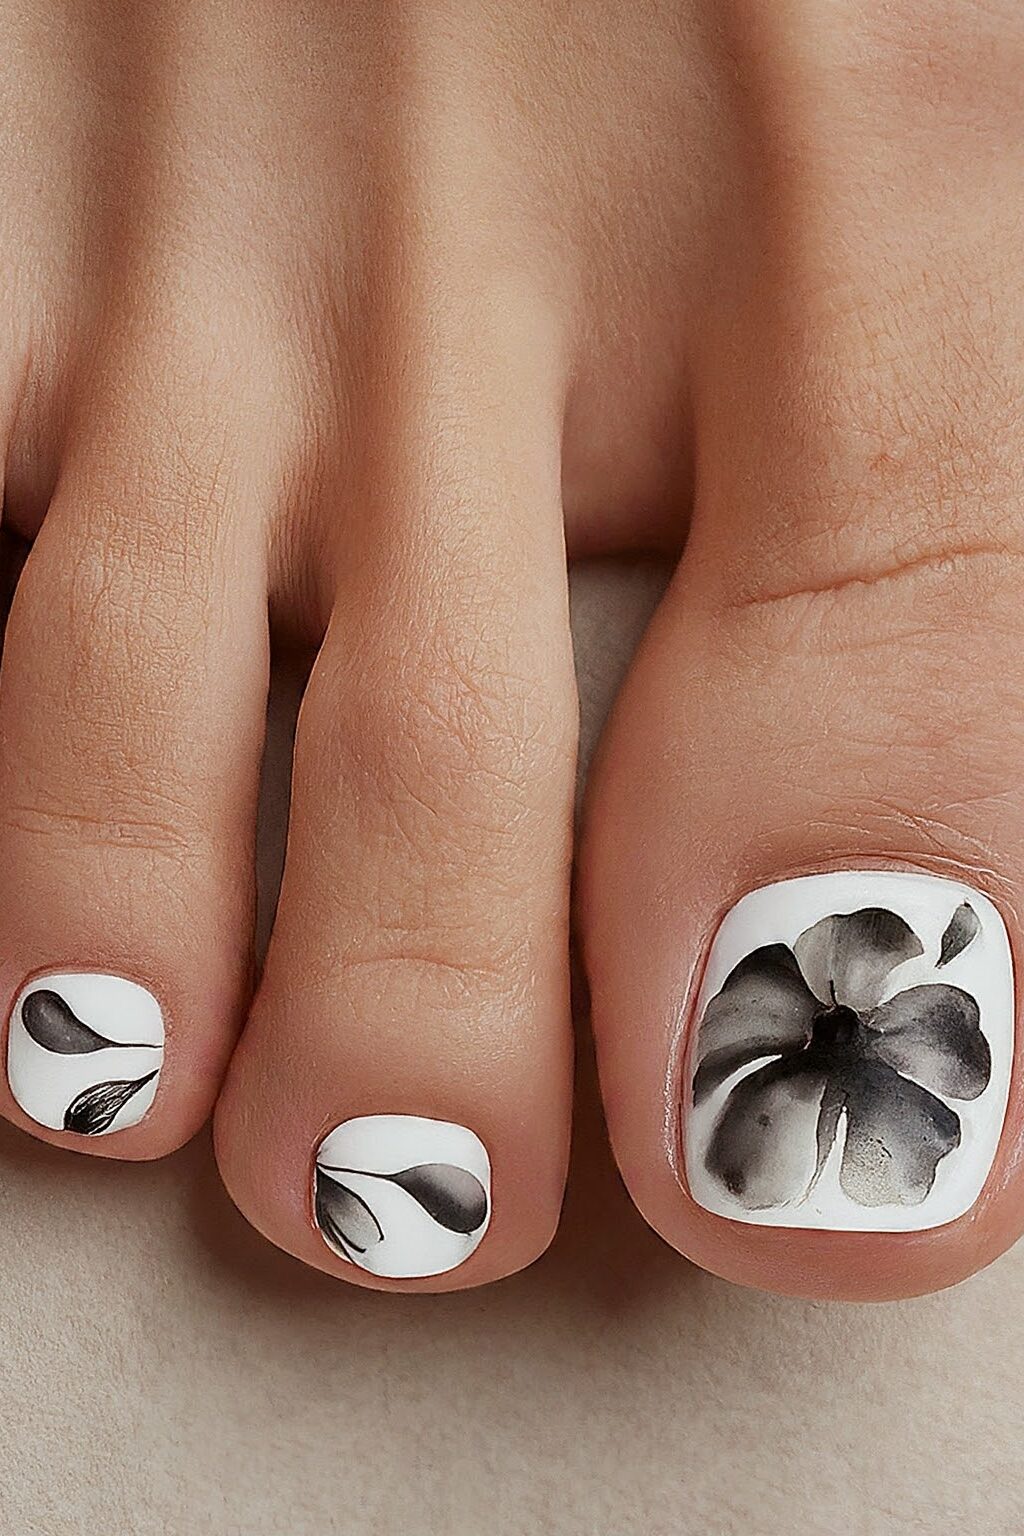
This design is perfect for those who appreciate the subtle beauty of floral art and want to incorporate it into their summer style.
Begin by painting your nails with a light color base, such as white or pale pink, which will help the colors of the watercolor flowers stand out.
Once your base coat has dried, it’s time to create the watercolor effect. You’ll need to water down black paint to achieve the soft, diffused look typical of watercolor.
A simple way to do this is by filling a small container halfway with water and adding a few drops of black nail polish. Mix it well until you achieve a thin, watery consistency.
Start in the middle of your nail, painting a simple five-petal flower. Don’t worry about making it too perfect; the beauty of watercolor is its natural, flowing appearance.
Add partial flowers around the edges of your nail to fill in the space and give the impression of a full bouquet. The watered-down paint should bead up slightly on your nails, creating interesting textures and outlines as it dries.
Once the black flowers have dried, add more dimension to your design by using watered-down white paint.
Dip your brush lightly into white paint, then into water, and gently add highlights to the tips of each petal. This technique enhances the petals’ delicate appearance, making them pop against the darker outlines.
14. Tie-Dye Fun
This trend offers a playful explosion of colors, perfect for adding a splash of creativity to your look.
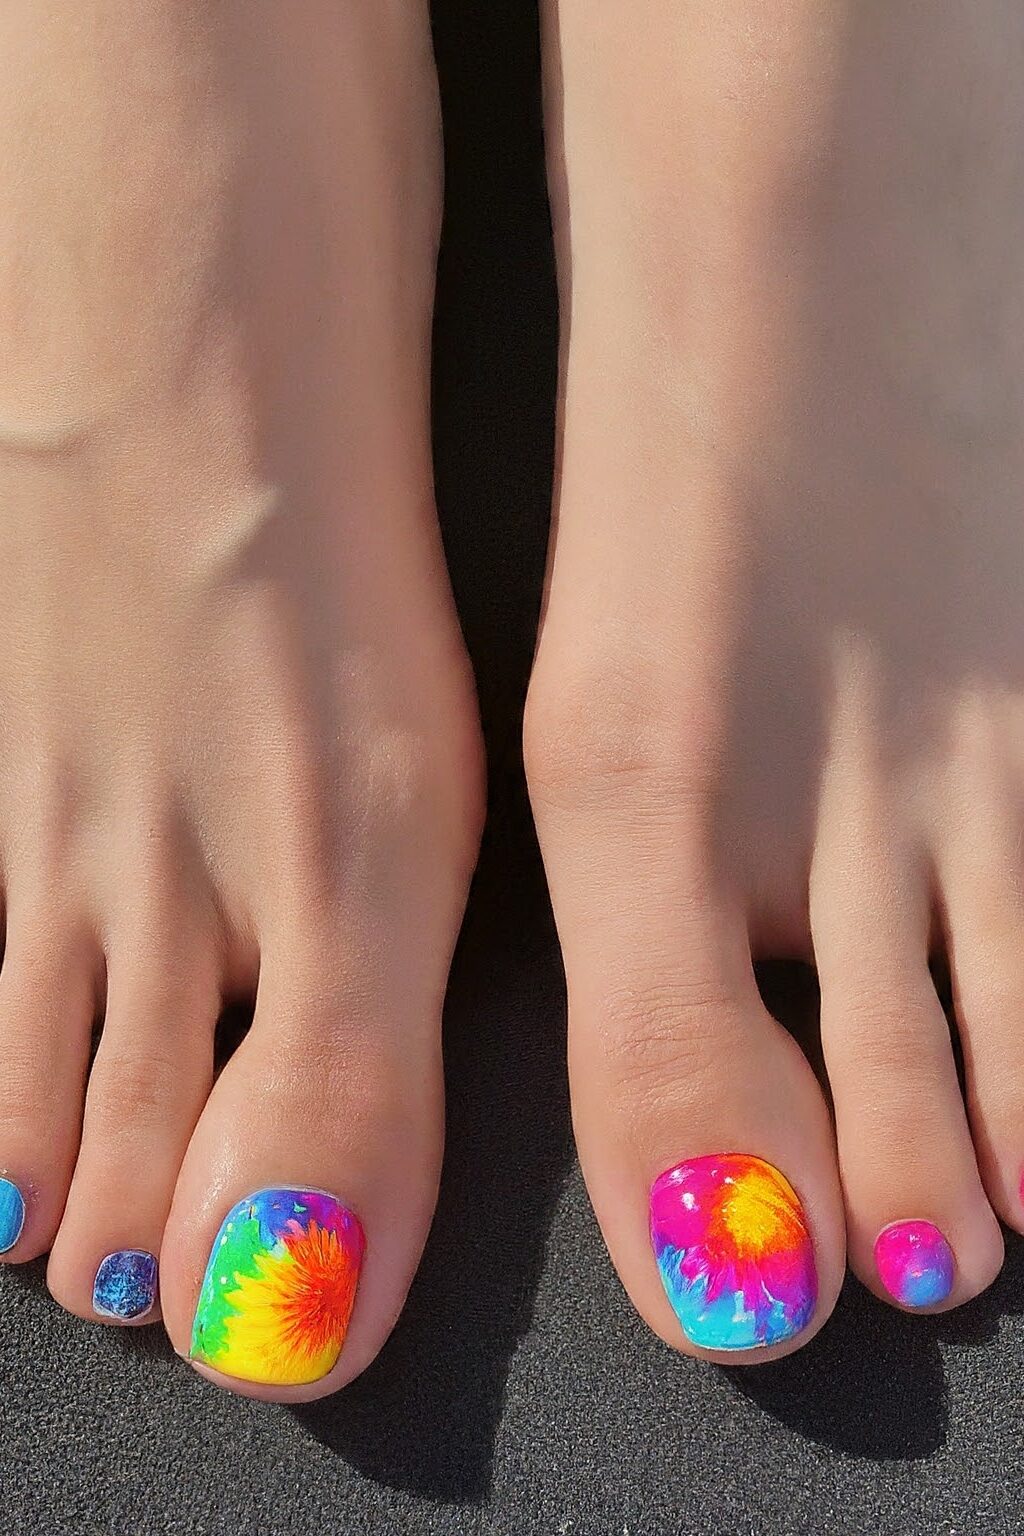
Start by choosing a white or light-colored base, which will make the colors of your tie-dye design truly pop. Once your base coat is dry, it’s time to add your tie-dye effect.
For a classic spiral pattern, place a small dot of your first color in the center of the nail. Then, using a thin brush or a toothpick, draw concentric circles around the dot with various bright colors. You can use as many colors as you like—the more, the merrier!
Next, take a clean toothpick and start at the center of your nail, dragging the tool through the circles towards the edge of the nail.
This technique will pull the colors outward, creating the iconic tie-dye swirls. Repeat this step around the entire nail to enhance the tie-dye effect. Remember, the key is to work quickly while the polish is still wet to ensure smooth, vibrant swirls.
If you prefer a more abstract look, try the smoosh technique. Simply add random dots of different colors to your nail, then cover it with a sandwich bag.
Gently press and twist the plastic to blend the colors together, creating a unique tie-dye pattern. Peel off the bag carefully, and you’ll see a beautiful, marbled design that’s both eye-catching and stylish.
15. Candy Striped Toes
A delightful pedicure choice that brings a playful and sweet twist to your summer style.
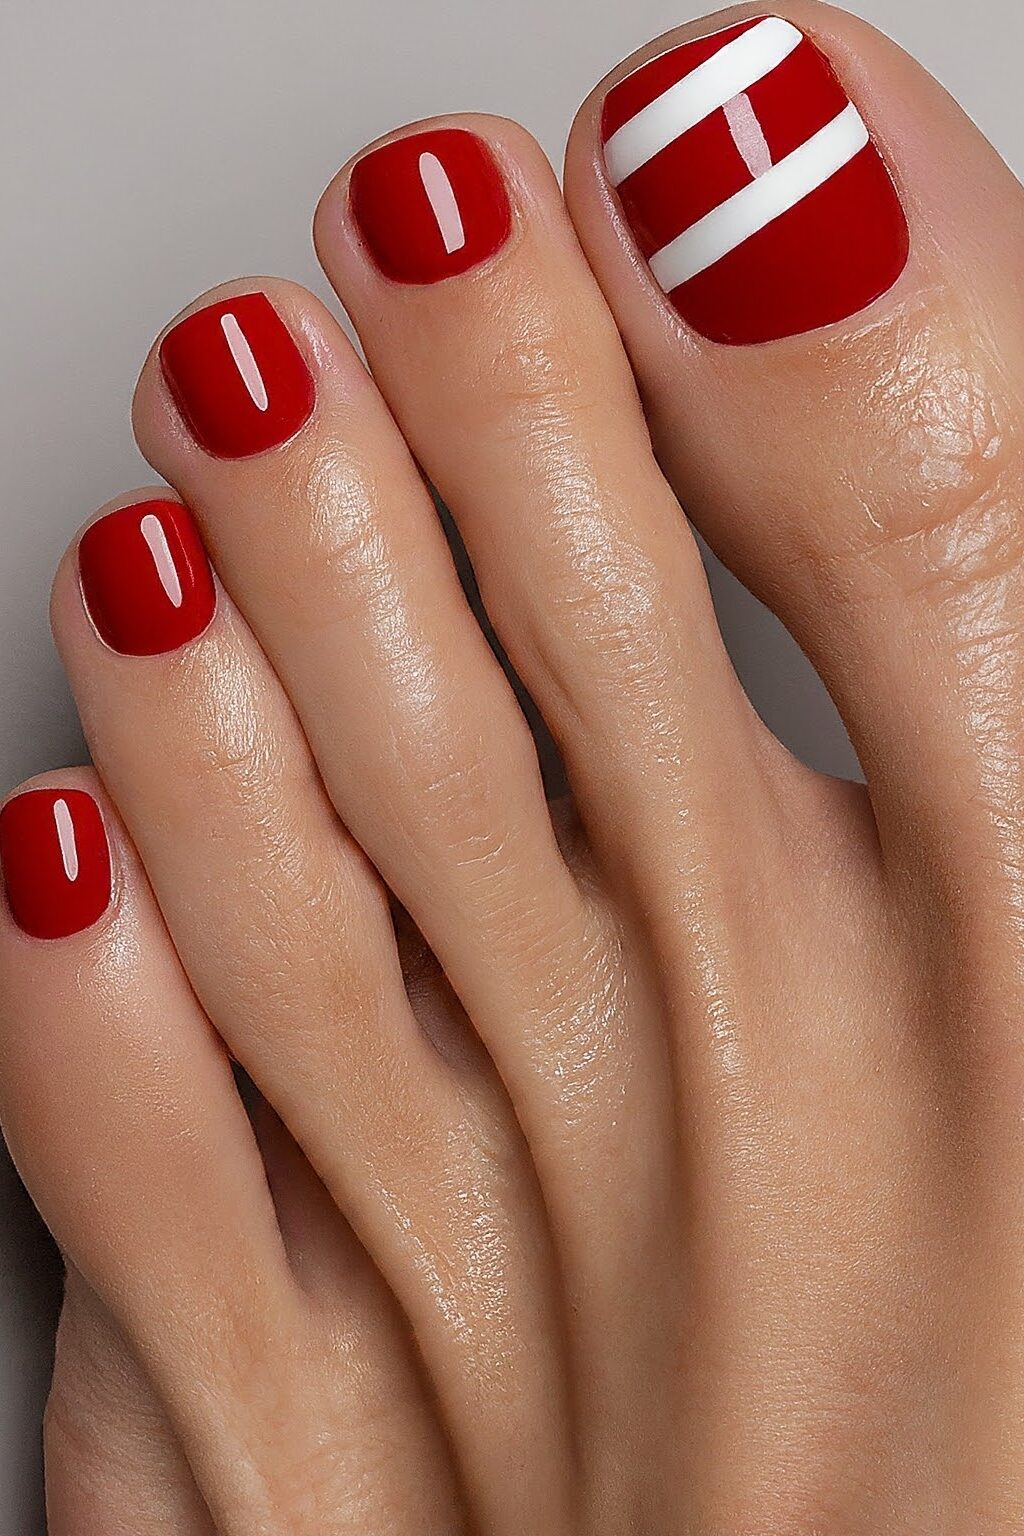
To create this eye-catching look, you’ll start with a base coat of your favorite bold color. Reds, pinks, or even a daring turquoise can serve as a fantastic canvas for your candy stripes.
Once your base coat is dry, the real fun begins. Using striping tape, lay down thin lines across each toe nail, spacing them evenly. The tape acts as a barrier, ensuring your stripes are clean and sharp.
With your base color set, choose a contrasting polish for the stripes. Classic candy-striped colors like white or silver are perfect for creating that iconic look.
Apply the polish carefully between the taped lines, and then, while the polish is still tacky, gently remove the striping tape to reveal your precise, crisp stripes.
16. Coral Reef Designs
Coral Reef Designs toe nail art, perfect for showcasing your love for the ocean’s beauty during the summer.
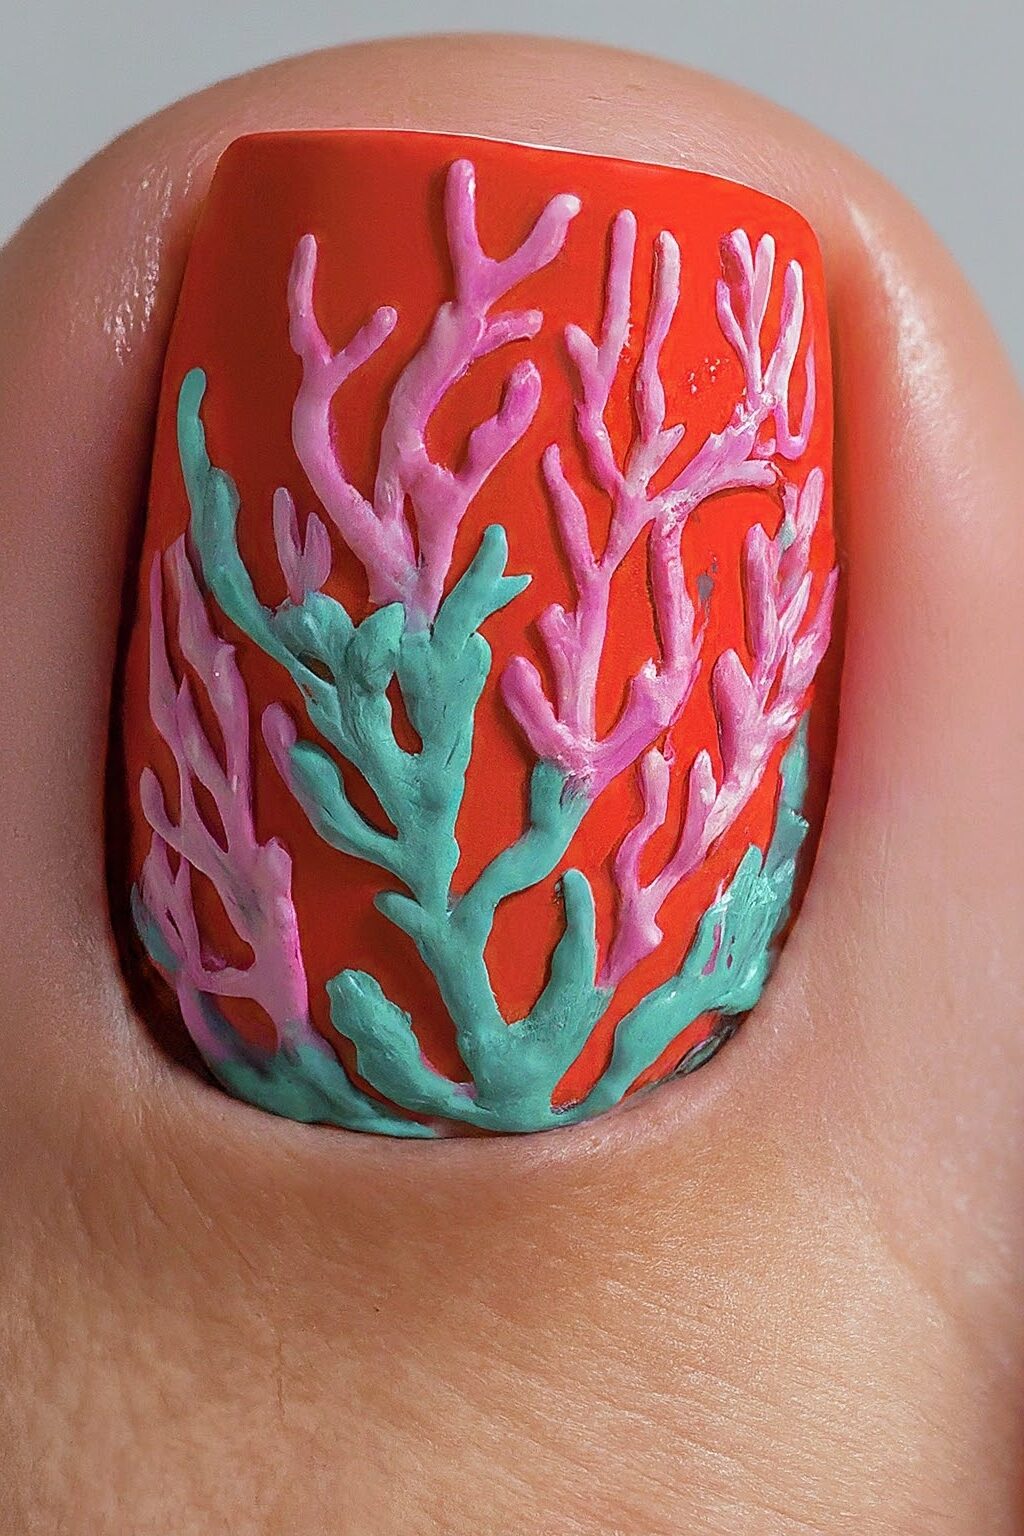
This design captures the essence of the coral ecosystem, using a palette of coral, turquoise, and hints of glittering gold to mimic the natural brilliance found beneath the sea.
Begin by painting your nails with a vivid coral base, evoking the lively color of tropical reefs. This cheerful hue not only serves as a great background but also complements the summer vibe.
Once your base color is dry, use a thin brush to draw delicate patterns resembling coral branches. Opt for turquoise to add a touch of the ocean’s depth to your design.
To create a more dynamic look, sculpt tiny coral pieces from nail materials. Start with a basic shape, then carefully add details like holes and textures to mimic real coral.
These can be painted in different shades like pink or green for a more colorful effect. Arrange these pieces on your nails in a way that they appear to be part of an underwater coral landscape.
17. Summer Fruit Frenzy
Get ready to make your toes pop with the Summer Fruit Frenzy toe nail design, perfect for adding a playful and vibrant twist to your summer wardrobe.
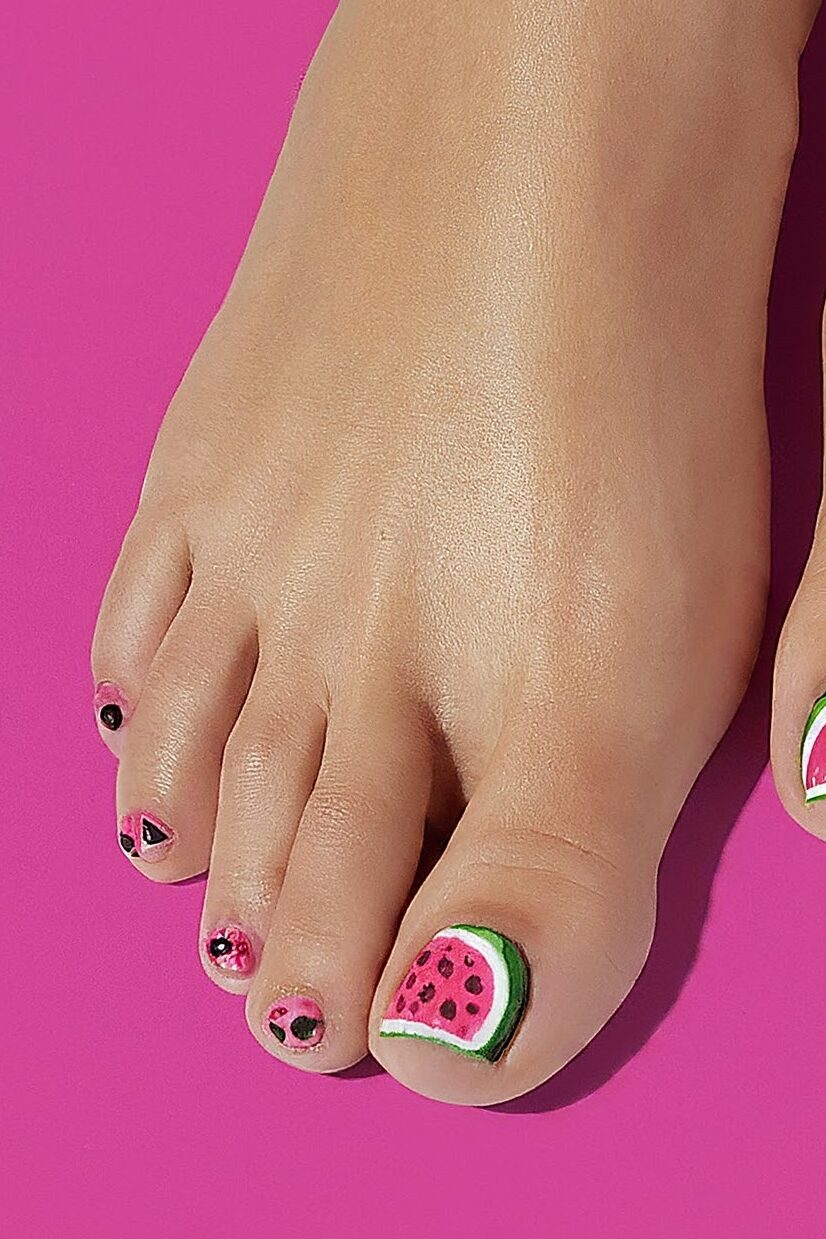
This design is all about celebrating the juicy colors and fun shapes of summer’s favorite fruits, making it a fantastic choice for beach days, pool parties, or just lounging in the sun.
Start by painting your toenails with a hot pink color, applying two coats to ensure a bright and solid base. Let the polish dry completely to set the stage for your fruity creations.
Next, it’s time to add some zest with fimo fruit slices. These tiny, pre-made fruit designs are perfect for nail art and can be found online.
They typically come in a variety of fruit shapes like kiwis, oranges, and strawberries, giving you plenty of options to customize your look.
For your big toenail, apply a coat of topcoat and carefully place several fimo fruit slices onto the nail. The glossy topcoat will act as an adhesive, ensuring your fruit pieces stay in place.
For the smaller toenails, a cute idea is to cut kiwi slices in half and arrange them near the cuticle area, creating a fun and summery vibe across all your toes.
18. Minimalist Sunbursts
Perfect for those who appreciate clean lines and subtle artistry, this design is all about bringing a touch of sunshine to your toes without overwhelming your style.
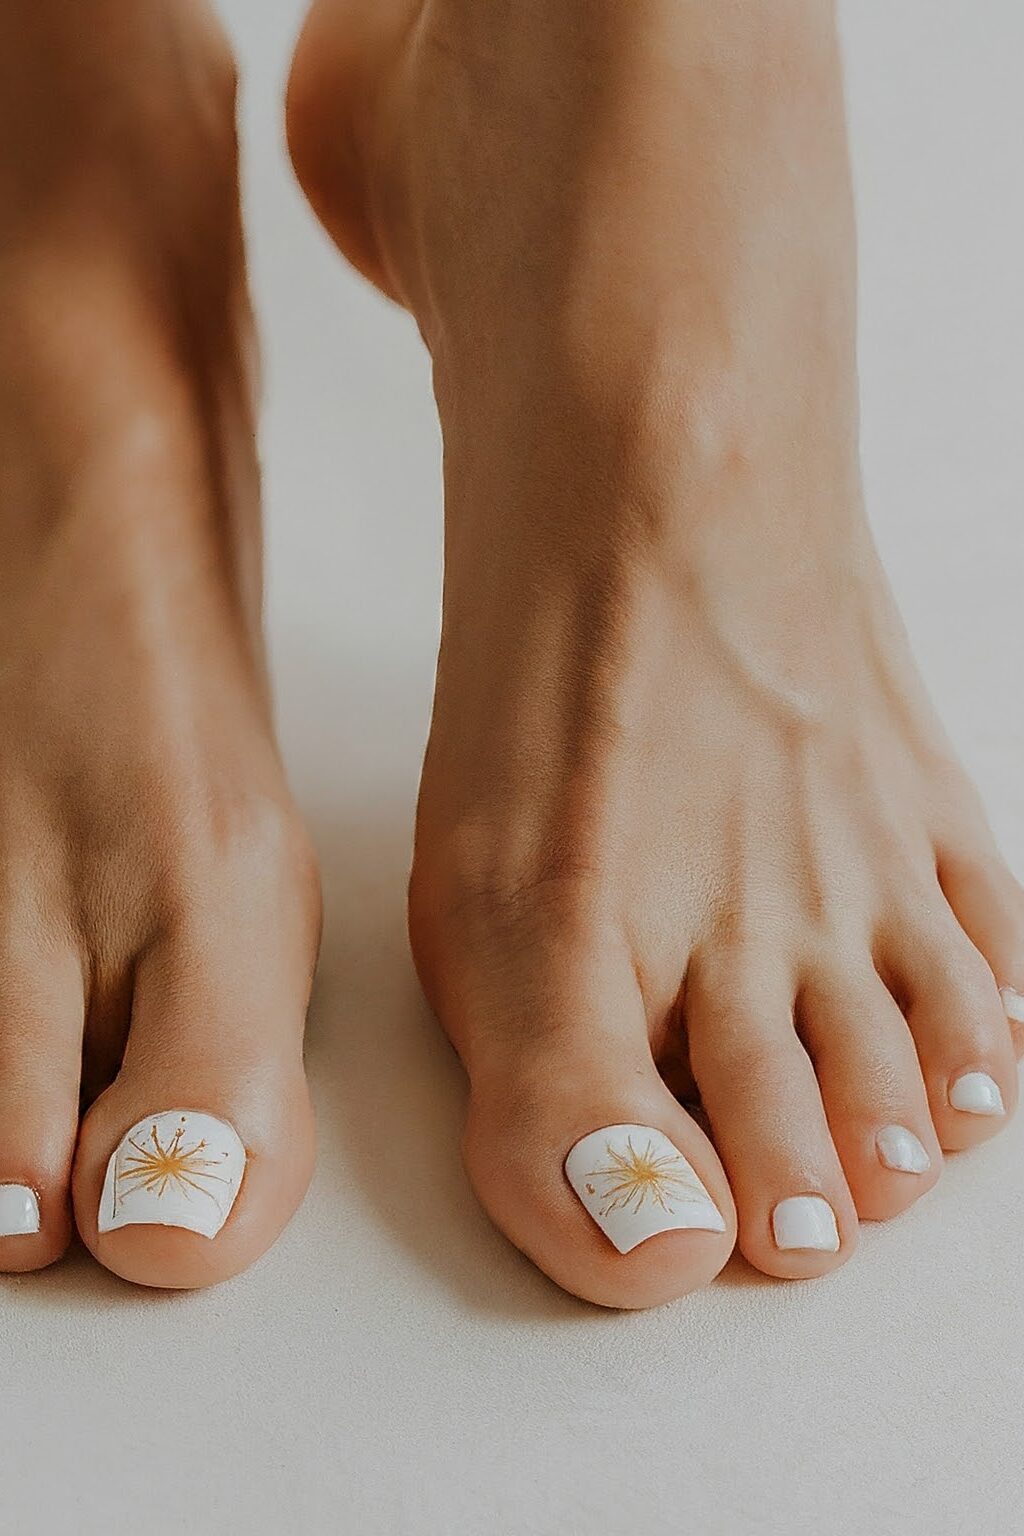
Begin by choosing a sheer base coat that enhances the natural beauty of your nails, setting a delicate canvas for your design. The sheer quality of the base adds a hint of gloss and smoothness, preparing your nails for the sunburst effect.
For the sunbursts, select a bright color like coral-red or a soft magenta. Using a nail striping brush, start from the corner of your toe nail and gently drag the brush to the center of the nail, creating a radiant pattern that resembles the rays of the sun.
The beauty of this design lies in its simplicity; you can control the number of rays to suit your taste, whether you prefer a subtle hint of sunshine or a more dramatic effect.
Final Thoughts
Through the exploration of 18 must-try summer toe nail designs for 2025, we’ve embarked on a colorful journey that encapsulates everything from the playful charm of daisy accents and sunset ombres to the refreshing simplicity of minimalist sunburst.
Each design not only promises to elevate the pedicure game this season but also serves as a personal expression of style and summer spirit.
The creativity unleashed through each nail art concept goes beyond mere aesthetics; it embodies the vibrant energy and dynamic palette of the season, offering endless possibilities for customization and experimentation.
As we wrap up this vibrant expedition into summer toe nail aesthetics, it is evident that the right nail design can truly transform one’s outlook, adding a touch of flair and confidence with every step.
These designs, rich in color, texture, and imagination, invite you to embrace the warmer days with open arms and adorned toes.


Leave a Reply
You must be logged in to post a comment.