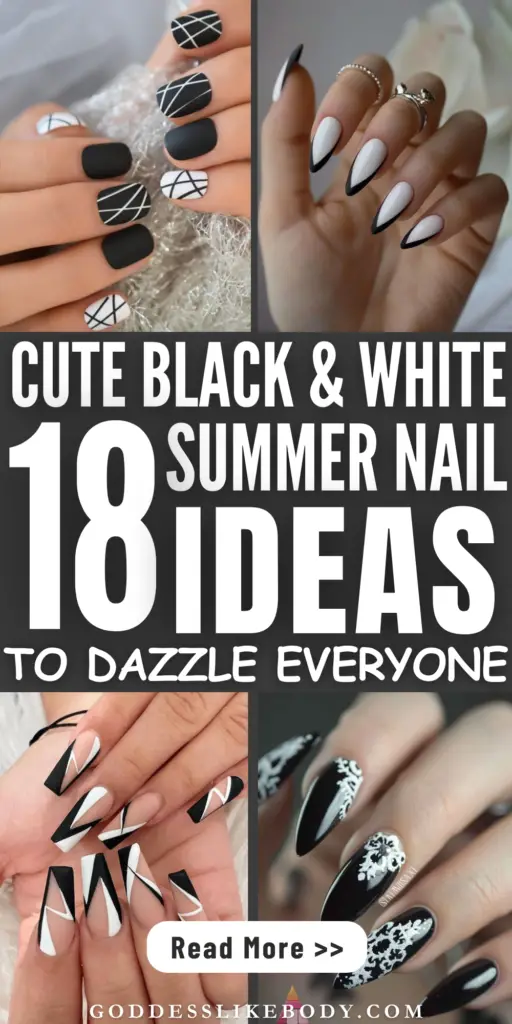
Summer 2024 is all about making bold statements with your nail art, and if you’re intrigued by contrasting hues, this compilation of 18 cute black & white summer nail ideas is bound to dazzle everyone.
As you dive into exploring chic black and white nails, including matte nails design and black nails with white tips, you’ll discover that simplicity paired with creativity can truly set you apart.
From classic black French tips to inventive nail designs with black and white, this collection promises to arm you with inspiration for every occasion.
Busy? Save this pin for later.
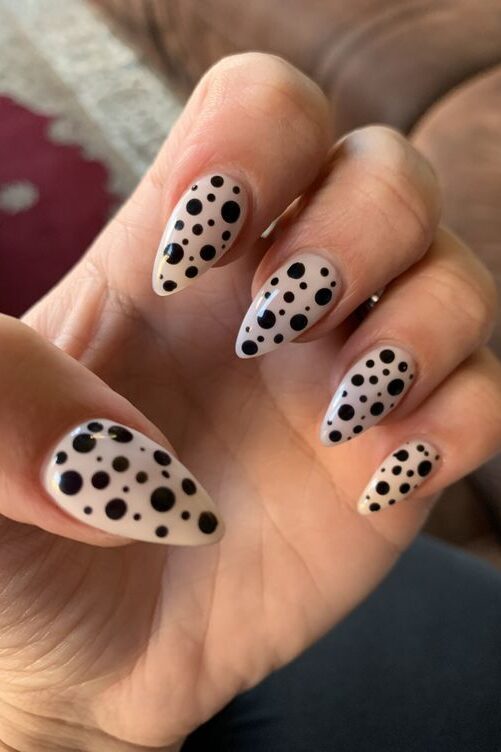
1. Bold Polka Dots
Polka dots provide a fun and playful appearance, making for adorable nail art. Classic polka dot nail designs feature evenly spaced dots on a contrasting base color, offering a simple yet elegant look.
Modern polka dot designs can include different colors, sizes, and arrangements to create unique patterns. Experiment with gradient dots or negative space designs for a creative manicure.
Use simple DIY techniques like a toothpick, bobby pin, or the tip of a pen to create flawless polka dot designs at home.
Base Preparation
Start with a clean, well-prepped nail surface. Apply a base of dried white nail polish, using two coats of Ciaté London’s Carpe Diem without a topcoat for a smooth canvas.
Techniques Using Different Tools
Uniball Signo Gel Pen – Obtainable from office supply or stationery stores worldwide. To apply dots, press the pen tip onto the nail and lift up.
Dotting Tool – Available on eBay. Dip the tool into a drop of nail polish on a palette and apply dots to the nail.
Toothpick – A common household item that can double as a dotting tool.
Sewing Needle in a Pencil Eraser – Provides more control over the needle. Apply dots in the same way as with the toothpick.
Additional Tips
For smaller dots, apply less pressure when using a dotting tool or toothpick.
Using a gel pen creates smaller and more even dots compared to other methods.
The choice of tool depends on personal preference and availability.
Applying Top Coat
Be gentle when applying the top coat to prevent smudging the dots. Ensure there’s a good amount of top coat on the brush for a glossy finish that lasts.
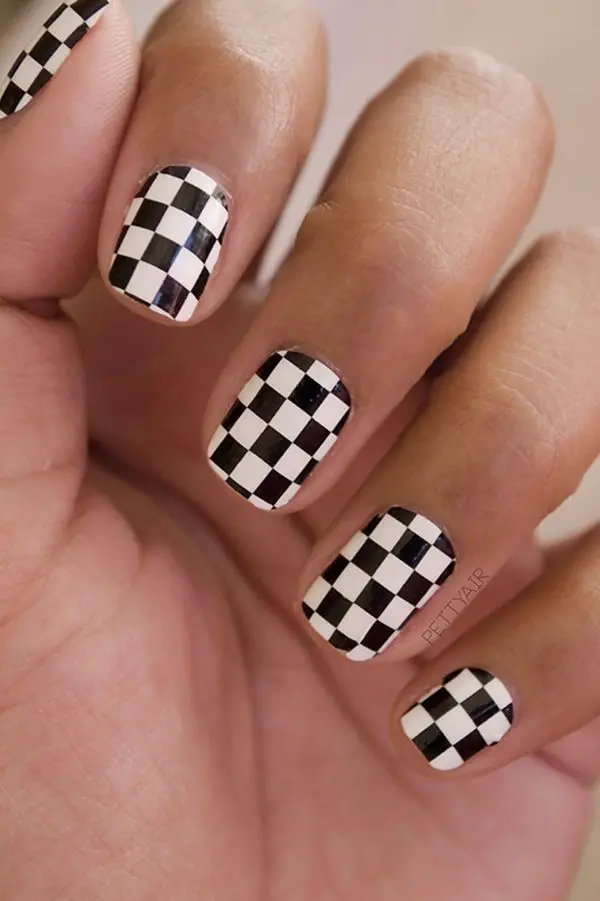
2. Checkerboard Frenzy
For a timeless yet trendy look, consider the Checkerboard Frenzy design, which features black and white squares in a classic pattern that’s surprisingly simple to achieve.
This design not only harks back to the 2000s fashion craze but also adds a modern twist to your summer nail repertoire.
Preparation and Application
Base Preparation: Begin with a clean, shaped nail. Apply a clear base coat to protect your nails and ensure a smooth surface for painting.
Base Color Application: Use a white nail polish as your base color, applying two to three coats until you achieve full opacity.
Creating the Checkerboard Pattern:
Draw a grid pattern resembling a tic-tac-toe board using a thin nail brush or a toothpick.
With a black nail striper, fill in alternate squares of the grid to create the checkerboard effect.
Detailing: For more precise squares, use scotch tape strips as guides. Place them on the nail to form squares and apply black polish in the open areas.
Top Coat Application: Finish with a clear top coat to enhance the shine and protect your design from chipping.
Tips for Best Results
Ensure each layer of polish is dry before applying the next to avoid smudging.
Use a dotting tool or the pointed end of a toothpick for touch-ups and perfecting the square edges.
For an edgy look, consider adding a matte top coat instead of a glossy one.
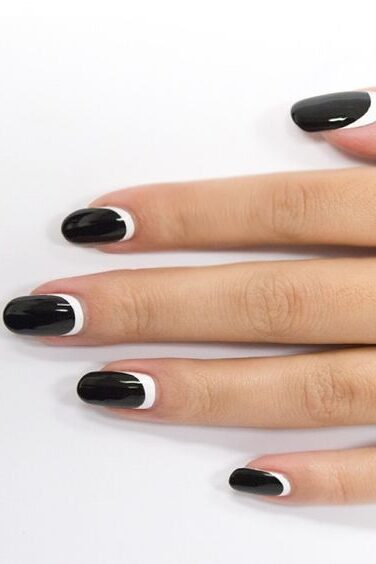
3. Negative Space Half-Moon
For a chic and minimalist touch, the Negative Space Half-Moon nail design is a perfect choice.
This style highlights the lunula, or half-moon shape at the base of each nail, emphasizing a striking contrast between the natural nail and the polish.
Originating as a popular trend in the 1950s, this design has made notable comebacks, gracing the nails of celebrities and featuring in modern fashion aesthetics.
Preparation and Application
Base Preparation: Start with a clean, shaped nail and apply a clear base coat to protect your nails and ensure a smooth painting surface.
Creating the Half-Moon: Use French tip guides placed at the cuticle line to shape the half-moon. Choose a bold black polish for the base of the nail, applying two coats for opacity.
Applying the White Crescent: Once the black base is dry, apply a white polish on the lunula area using a small striping brush for precision.
Finishing Touches: Carefully remove the French tip guides and seal your design with a top coat, choosing between a matte or glossy finish based on your preference.
Tips for Best Results
Ensure each layer of polish is completely dry before applying the next to avoid smudging.
For a more abstract look, freehand the white crescent with a polish brush, swooping down to the cuticle.
Maintain the health of your nails by applying cuticle oil regularly and using a strengthening base coat.
4. Marble Swirls
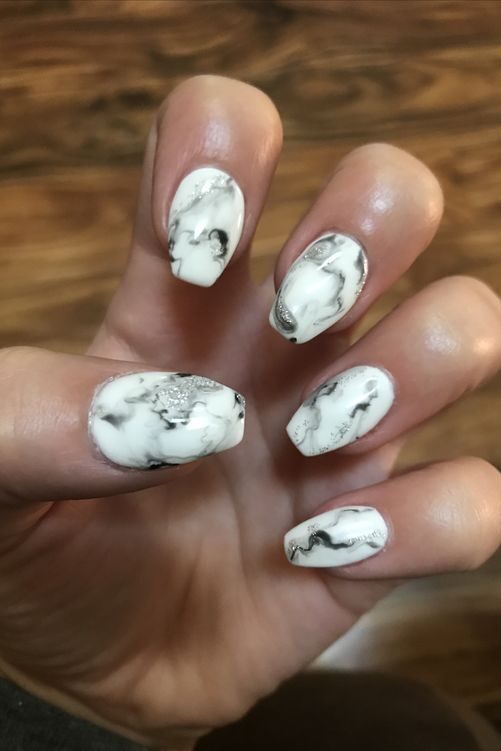
Creating the abstract black and white marble pattern, often just referred to as “Marble Swirls,” combines elegance with a touch of artistic flair.
Here’s a straightforward guide to achieving this sophisticated nail art design:
Preparation and Application
Base Coat: Start by applying two coats of white nail polish (e.g., R80 501 from Blue Sky) for a solid, opaque base.
Top Coat Application: Add a coat of top coat but do not cure it yet to keep the surface tacky for the next steps.
Creating Marble Effect:
Use a fine brush dipped in dark grey polish (805 3/1) to draw delicate, squiggly lines across the still-wet top coat.
To create a more realistic marble effect, gently dab a brush with isopropyl alcohol on the darker lines to thin and blend them seamlessly.
Curing: Cure the design under a UV or LED lamp to set the initial layers before proceeding.
Enhancing the Design
Adding Depth:
For added depth, apply another layer of top coat and repeat the process using white polish on areas that appear darker.
Use isopropyl alcohol to blend the white polish, enhancing the marble look.
Final Cure and Top Coat:
Cure the final design under a lamp.
Finish with a glossy top coat to seal in your artwork and add a durable, shiny finish.
Tips for Best Results
Ensure each layer is completely dry or cured before proceeding to the next to prevent smudging.
Experiment with the thickness and direction of your marble lines to create a unique pattern each time.
For a matte finish, opt for a matte top coat which can give a contemporary twist to this classic design.
This method not only ensures a stunning end result but also allows for creativity in the pattern and depth of your marble swirls. Whether you’re preparing for a special occasion or just want to enhance your everyday style, these marble swirls are sure to impress.
5. Mismatched French Tips
Mismatched French Tips offer a playful twist on traditional manicures by alternating colors on the nail tips, ideal for those who love a bit of variety.
Here’s how you can achieve this trendy look with ease:
Base Preparation and Color Selection
Base Coat: Start with a clean, shaped nail. Apply a clear base coat to protect your nails and ensure a smooth surface.
Grounding Tone: Paint three out of five nails with a neutral color. This serves as the grounding tone, preventing the design from appearing too chaotic.
Creating Mismatched French Tips
Tip Colors: Choose two contrasting colors for the tips. For a striking black and white theme, use black for one nail and white for the next.
Application Technique: Use a silicone stamper or a fine brush to create precise smile lines for the French tips.
Design Variations
Additional Designs: To add more flair, consider simple designs like spring flowers or abstract color blocking on one or two nails.
Finishing Touches
Top Coat: Seal your design with a top coat, choosing between a glossy or matte finish based on your preference.
This approach not only embraces the fun aspect of nail art but also ensures each nail stands out with its unique style, perfect for making a bold fashion statement during the summer.
6. Minimalist Stripes
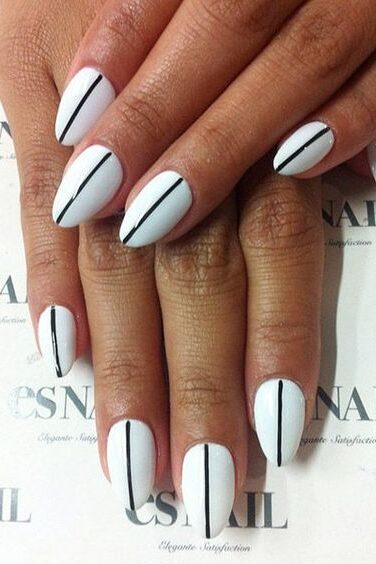
Creating minimalist black and white striped nails is a stylish yet simple way to make a statement.
Here’s a beginner-friendly guide to achieving this look using basic tools and techniques:
Preparation and Application
Base Coat: Begin with a clean, shaped nail. Apply a clear base coat to protect your nails and ensure a smooth surface.
Base Color Application: Use ‘Speechless’ by Pure Ice for a sleek, opaque white base. Apply two coats for full coverage.
Tape Placement: Once the base is dry, place three evenly spaced strips of regular tape across the nail. Add a fourth strip at the bottom to create uniform stripes.
Stripe Creation: Apply black nail polish over the exposed areas. Popular choices include ‘Black Out’ from Sally Hansen for its rich pigment.
Tape Removal: Allow the black polish to dry for about 20 seconds before carefully removing the tape to reveal your crisp stripes.
Additional Design Elements
Accent Designs: Consider adding a minimalist black and white striped accent nail to a hot pink base, such as ‘Hot Tub’ by Urban Outfitters, for a pop of color.
Curved Stripes: For a unique twist, use a striper brush to paint a black curved stripe under the side of the nail, followed by a white stripe halfway up. Add small black and white dots for added detail.
Water Marble Technique: For those feeling adventurous, minimalist stripes can also be achieved with a water marble design technique, creating a more fluid and organic stripe pattern.
Tools and Products
Striper Brush: A short striper brush is essential for detailed stripe work and adding fine dots.
Nail Stencils and Decals: Available on platforms like snailvinyls.com and Etsy, these tools can help achieve precise and intricate designs.
7. Delicate Lace Design
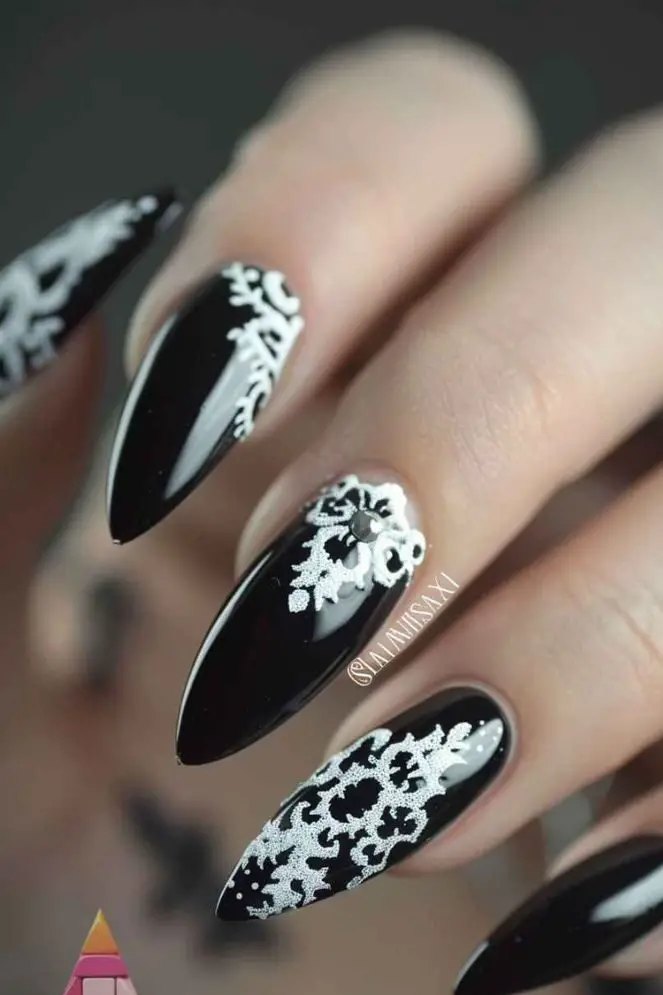
Delicate lace nail art, inspired by the elegance of fine fabric, offers a sophisticated touch perfect for formal events.
Here’s a straightforward guide to achieving this graceful look:
Preparation and Application
Base Coat: Start by applying a clear base coat to protect your nails.
Base Color: Use ‘Gel Effect Number 30’, a light pink-nude shade, for a subtle and elegant background.
Lace Design: Employ ‘Gel Effect Number 29’ and a fine nail art brush to intricately draw the lace patterns, which should mimic floral designs for a charming appearance.
Enhancing the Design
Dotting Details: With a dotting tool, add fine dust details in black or white to enhance the complexity and texture of the lace.
Top Coat: Apply a ‘Plump Effect Top Coat’ to give your nails a glossy, finished look.
Tips for Best Results
Ensure each layer is completely dry before proceeding to the next to avoid smudging.
Use a lace stencil for a more uniform design if freehand drawing is too challenging.
Consider adding tiny rhinestones or glitter accents for a touch of sparkle.
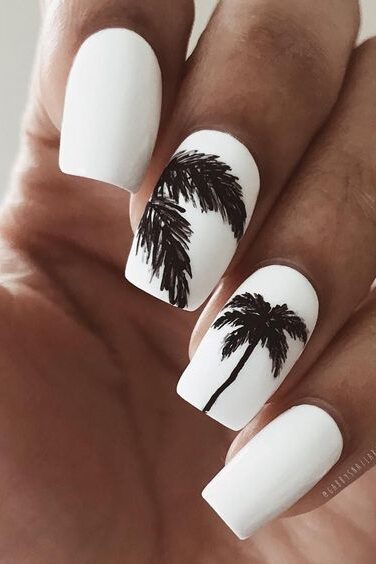
8. Negative Space Palm Trees
For a fresh, summer-inspired look, the Negative Space Palm Trees nail design is a perfect choice.
This design cleverly utilizes unpolished space to form the shape of palm trees, creating a striking visual contrast.
Preparation and Application
Base Preparation: Begin with a clean, shaped nail. Apply a clear base coat to protect your nails and provide a smooth surface.
Palm Tree Design: Using a thin brush and black nail art polish, carefully draw the outline of palm trees over the base. The spaces around the palm tree design remain clear, emphasizing the negative space.
Color Fill: Fill in the palm leaves with green nail polish to add a vibrant touch of color to the design.
Enhancing the Design
Iridescent Touch: Apply a coat of Julep’s “Regina” nail polish, which has an iridescent pink/purple finish, to add a subtle shimmer behind the palm trees.
Top Coat Application: Seal your design with a glossy top coat to enhance the shine and protect your artwork.
Tools and Products
Thin Brush: Essential for detailed palm tree outlines.
Black Nail Art Polish: Provides sharp, defined lines for the palm tree design.
Green Nail Polish: To color the palm leaves, enhancing the tropical feel.
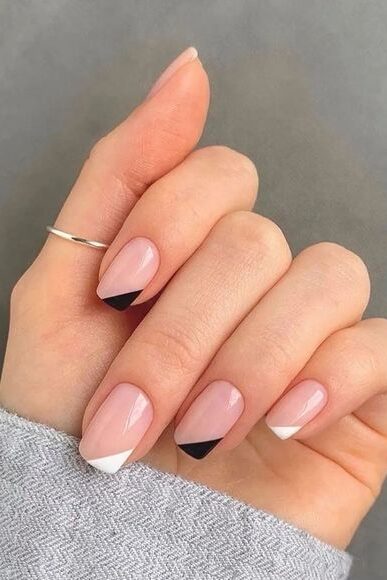
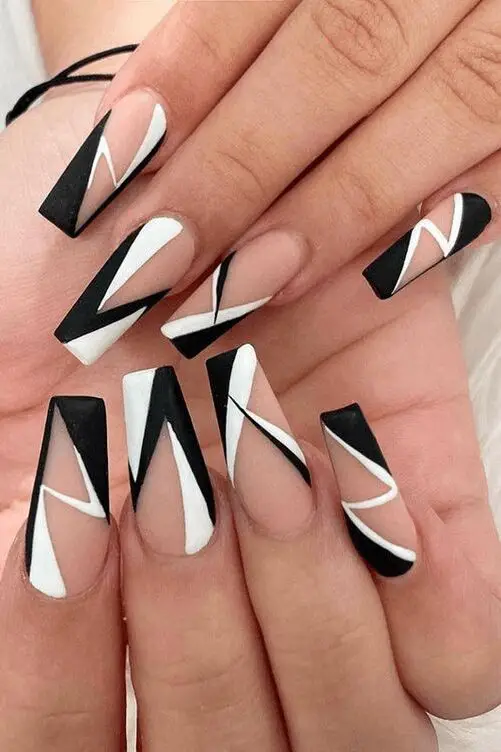
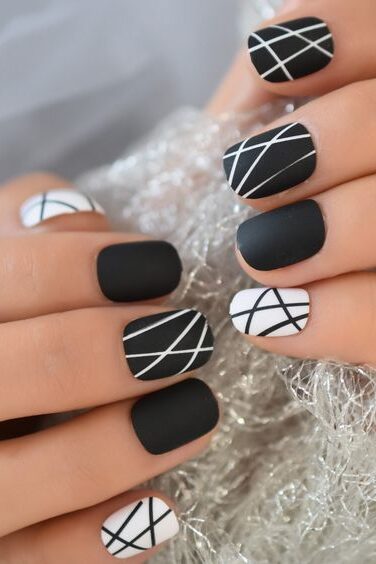
9. Geometric Shapes
For those who love to combine artistry with fashion, geometric shapes in nail art offer a playful and modern aesthetic.
This trend, which has seen a significant surge in popularity, involves a mix of sharp lines and bold contrasts that can elevate any look. Here’s how you can achieve this trendy geometric design with a black and white theme:
Preparation and Application
Base Preparation: Start with a clean, shaped nail. Apply a clear base coat to protect your nails and ensure a smooth surface.
Base Color: Apply a white or black base color—depending on the design contrast you desire. Let it dry completely.
Tape Technique: Use striping tape to create geometric patterns such as triangles, squares, or any angular shapes on the nail. Press down firmly to prevent polish bleeding.
Color Application: Apply the opposite color (black on white or white on black) over the taped area. Ensure full coverage with a steady hand.
Tape Removal and Clean Up: Carefully remove the tape while the polish is still slightly wet to achieve sharp lines. Clean up any imperfections with a small brush dipped in nail polish remover.
Enhancing the Design
Detailing: For more intricate designs, use a fine brush to add smaller geometric details like dots or thin lines within the larger shapes.
Top Coat: Seal your design with a glossy or matte top coat to enhance the finish and protect your artwork.
Tools and Products
Striping Tape: Essential for creating precise lines and shapes.
Fine Detail Brush: Perfect for adding intricate details and cleaning up edges.
Black and White Polishes: High-contrast colors that make the geometric patterns stand out.
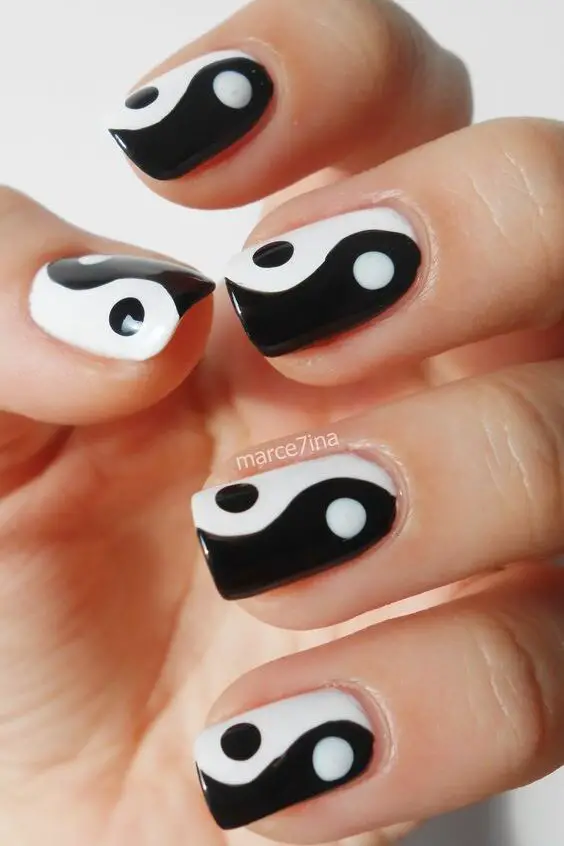
10. Yin & Yang Nails
Yin & Yang nail designs, rooted in the ancient Chinese philosophy of Taoism, symbolize balance and harmony through their iconic black and white swirls.
These designs range from simple to intricate, often incorporating glitter or monochrome colors for added flair. Here’s how to create this captivating look:
Step-by-Step Guide to Creating Yin & Yang Nails
Base Color Application:
Begin by applying a white base color to ensure the subsequent colors pop.
Drawing the Dividing Curve:
Use a thin liner brush to draw a smooth, curved line down the middle of each nail, dividing it into two equal halves.
Painting the Halves:
Paint one half of the nail black, matching the curve of your line for precision.
Adding the Dots:
Place a dot on each side of the nail using a dotting tool. The dot on the black side should be white, and vice versa, to maintain the theme of duality.
Applying a Top Coat:
Once the design is dry, seal it with a clear top coat to enhance durability and shine.
Tips for Perfect Yin & Yang Nails
Ensure each polish layer is completely dry before applying the next to prevent smudging.
Use a steady hand or French tip guides to achieve a clean, curved line.
Explore variations by using different accent colors for a modern twist on the traditional design.
11. French Ombré
Preparation and Application
Base Preparation: Start by applying a two-in-one base coat to protect your nails and ensure a smooth surface.
Shaping the Base: Carefully shape the base coat to cover the sidewalls of the nails for a flawless foundation.
Creating the French Ombré Effect
Initial Color Application: Apply a high pigmented white gel at the tip of the nail.
Blending Technique: Use an ombre sponge with soft pressure to blend the white gel into the base color, creating a smooth gradient effect.
Building Intensity: Gradually build color intensity from light at the base to dark at the tips, ensuring a seamless transition.
Common Mistakes to Avoid
Avoid applying an uneven base coat as it leads to a patchy finish.
Do not buff the base coat; it should remain smooth for effective blending.
Refrain from using too much product on the sponge to avoid a muddled look.
Additional Tips
Treat the ombre as an overlay that doesn’t fully cure until sealed.
Inform clients not to touch anything until the ombre has been properly sealed to prevent smudging.
Cleanup and Finishing Touches
Final Touches: Once satisfied with the gradient, seal the design with a top coat for a glossy finish and added durability.
Cleanup: Remove any excess polish around the nails using a brush and nail polish remover for a neat appearance.
12. Diagonal Stripes
Preparation and Application
Base Preparation: Begin by cleaning your nails thoroughly. Apply a base coat and let it dry completely.
Base Color: Apply two coats of a light base color, such as ‘lovey-dovey gel polish’, curing under a lamp for 45 seconds after each application.
Creating the Stripes
Stripe Formation: Use a square brush to draw diagonal lines across the nail. Alternate between ‘lovey-dovey’ and ‘just cruise’ gel polish for contrasting stripes.
Cleaning: As you work, wipe the brush on a cleanser pad to keep the lines neat and prevent color mixing.
Curing and Sealing: Cure the design under a lamp for 45 seconds. Apply a top coat to smooth any imperfections and cure for another 45 seconds.
Additional Tips
Creative Freedom: Feel free to experiment with different colors like yellow, red, or green for a personalized touch.
Glitter Option: Add a bit of red glitter for extra sparkle and a festive look.
Tools and Products
Nail Art Brushes: A thin, long nail art brush is crucial for achieving precise diagonal stripes.
Top Coat: Use a clear top coat to seal and protect your design.
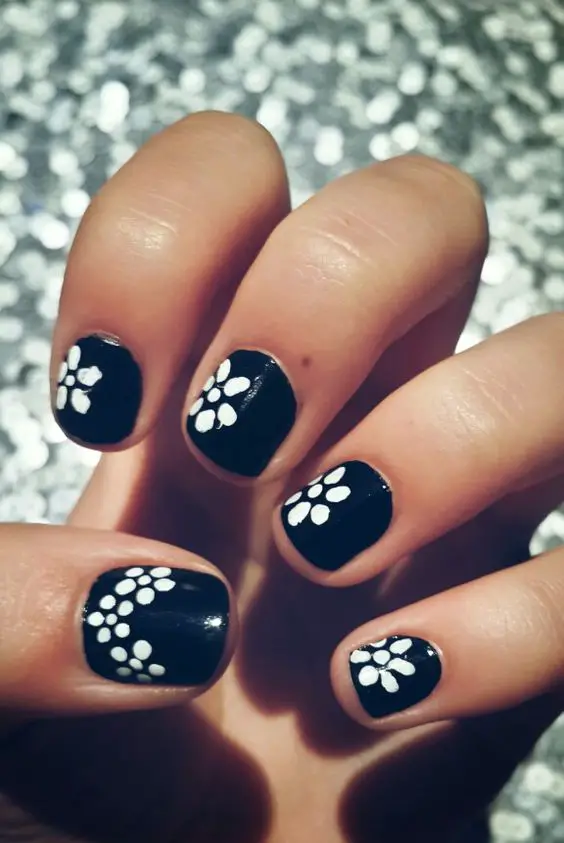
13. Daisy Nail Art
Preparation and Application
Base Coat Application: Begin with a clear base coat to protect your nails and ensure a smooth surface.
Base Color: Apply white nail polish as the base color, providing a vibrant background for your daisy design.
Creating the Daisy
Petal Formation: Using a larger dotting tool, create five dots in a circle with “Lovely-Dovey” polish. Keep the polish wet and do not cure yet.
Teardrop Shaping: Switch to the smaller end of the dotting tool, dip it into the same polish, and gently drag each dot towards the center to form teardrop shapes, creating the petals of the daisy.
Center Dot: Once the petals are shaped, clean your dotting tool and dip the larger end into “Lemon Meringue” polish. Place a single dot in the center of the daisy to complete the flower.
Partial Flowers: For daisies that are partially off the nail, estimate the center and add a small dot to maintain the design continuity.
Curing and Finishing Touches
Initial Curing: Cure the design under a Gel Moment LED lamp for 45 seconds.
Final Curing: After placing the center dot, cure the design for an additional 45 seconds to ensure durability.
Top Coat Application: Seal your artwork with a top coat to enhance the shine and protect the design.
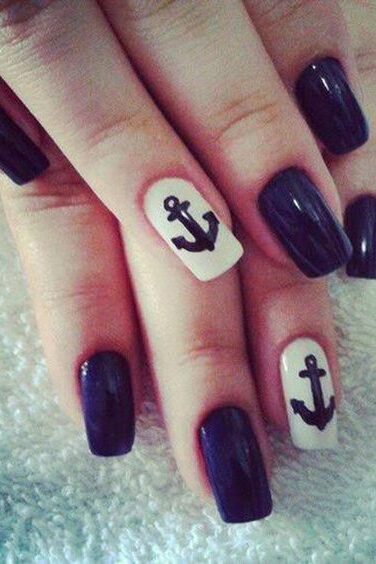
14. Negative Space Nautical Anchors
Nautical nails are a beloved trend, especially during the summer, and the Negative Space Nautical Anchors design is a standout choice.
This design cleverly uses the natural nail color as part of the art, creating a striking contrast with the anchor motif. Here’s how to achieve this maritime-inspired look:
Step-by-Step Guide
Base Preparation:
Start with a clean nail, applying a clear base coat to protect your nails and ensure a smooth canvas.
White Base Coat:
Apply one to two coats of white nail polish, such as Essie’s Blanc, and allow it to dry completely.
Anchor Vinyl Placement:
Place an anchor-shaped vinyl stencil in the center of the nail. Ensure it adheres well to prevent polish from seeping underneath.
Applying Textured Polish:
Use a textured nail polish, like Zoya PixieDust in Oswin, and apply it carefully within the bounds of the vinyl stencil.
Vinyl Removal:
Peel off the vinyl while the polish is still slightly wet to achieve crisp lines.
Enhancing the Design
Color Variations: While navy and gold are traditional nautical colors, feel free to experiment with other hues like classic red or deep ocean blue for a personalized touch.
Additional Details: For an extra maritime feel, consider adding small gold dots or stripes around the anchor using a fine brush or dotting tool.
Tools and Products
Vinyl Stencils: Anchor-shaped vinyls are crucial for achieving precise shapes.
Textured Polish: Zoya PixieDust in Oswin provides a unique sandy texture that adds depth to the design.
Fine Brush: Useful for adding detailed accents and cleanup around the stencil edges.
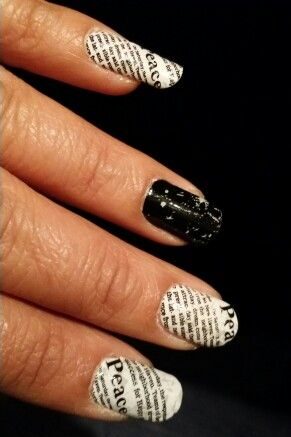
15. Newspaper Print
Preparation and Application
Base Preparation:
Start by ensuring your nails are clean and filed. Apply a peel-off base coat, like the one from ANTS, ensuring full coverage by capping the ends.
Allow the base coat to dry completely before moving to the next step.
Applying Base Color:
Apply a pale gray polish, such as CMD by Anna Lux in Cityscape. Use two even layers, allowing each to dry thoroughly.
Creating the Newspaper Print
Newspaper Preparation:
Select a newspaper with clear, crisp print; The Times is recommended for its quality. Cut the newspaper into squares slightly larger than your nails.
Transfer Process:
Dip your nail in 99% isopropyl alcohol for about 10 seconds, then press the newspaper square, print side down, onto the nail. Apply firm pressure evenly, especially down the sides, to ensure the print transfers accurately.
Alternative Transfer Solutions:
While isopropyl alcohol is preferred, alternatives like Listerine mouthwash or alcohol hand gel can also be used for transferring the print.
Sealing and Finishing Touches
Top Coat Application:
Once the print is transferred and the nail is dry, apply a top coat such as HK Girl Glisten and Glo to seal the design.
Finish by applying cuticle oil around the nails, massaging it in to moisturize.
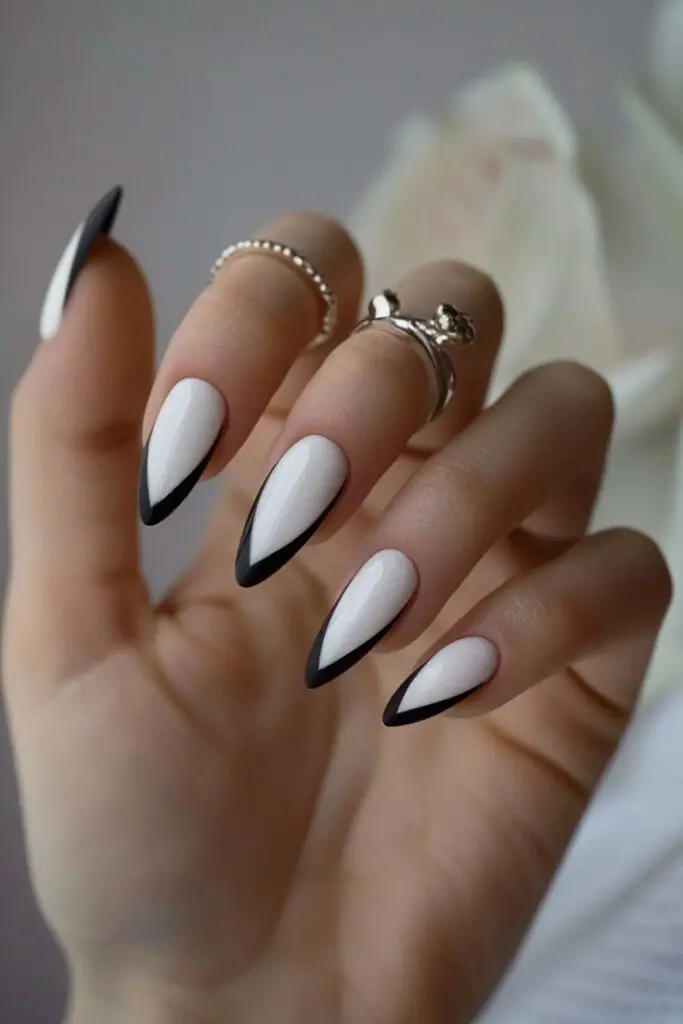
16. French Manicure with Black Tips
For a chic twist on the traditional French manicure, opting for black tips instead of the classic white can offer a stylish and modern aesthetic.
This variation maintains the elegance of the original while adding a bold contrast that’s perfect for both casual and formal settings. Here’s a straightforward guide to achieving this sophisticated look:
Preparation and Application
Base Coat: Start by applying a base coat to protect your natural nails and provide a smooth surface for further application.
Base Color: Choose a nude or light pink polish as your base color. Apply two coats for a solid, opaque look. Let it dry completely.
Black Tips: Using a thin brush or a nail art striper, carefully paint the tips of your nails with black polish. For a crisp line, you can use tape as a guide.
Top Coat: Once the black tips are dry, apply a top coat to seal the design and add a glossy finish.
Customization Options
Glitter Accents: Add a strip of glitter polish over the black tips for a sparkly effect.
Rhinestones: Embellish one or two nails with rhinestones at the base or on the tips for a luxurious touch.
Maintenance Tips
Regular Touch-Ups: Keep your manicure looking fresh by doing regular touch-ups on the tips, especially if you frequently work with your hands.
Nail Care: Use cuticle oil daily to keep your nails and cuticles well-moisturized, enhancing the overall health and appearance of your manicure.
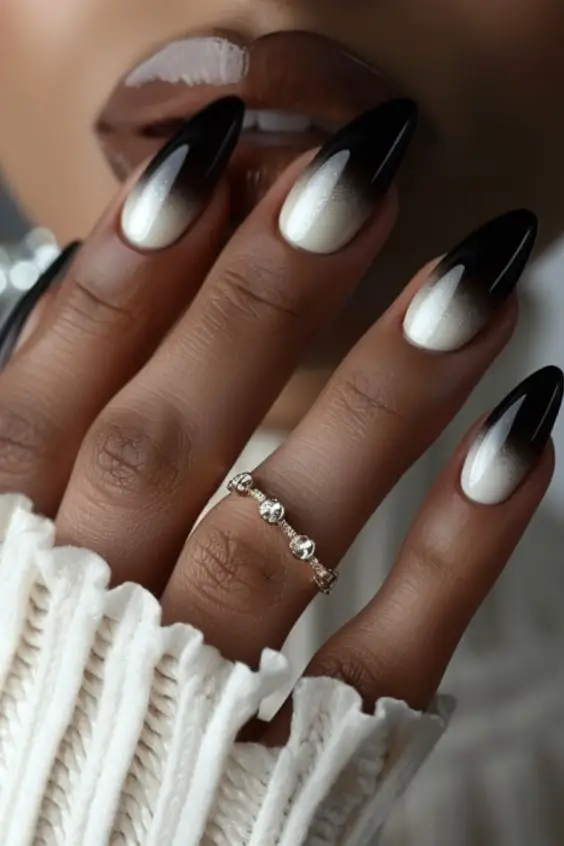
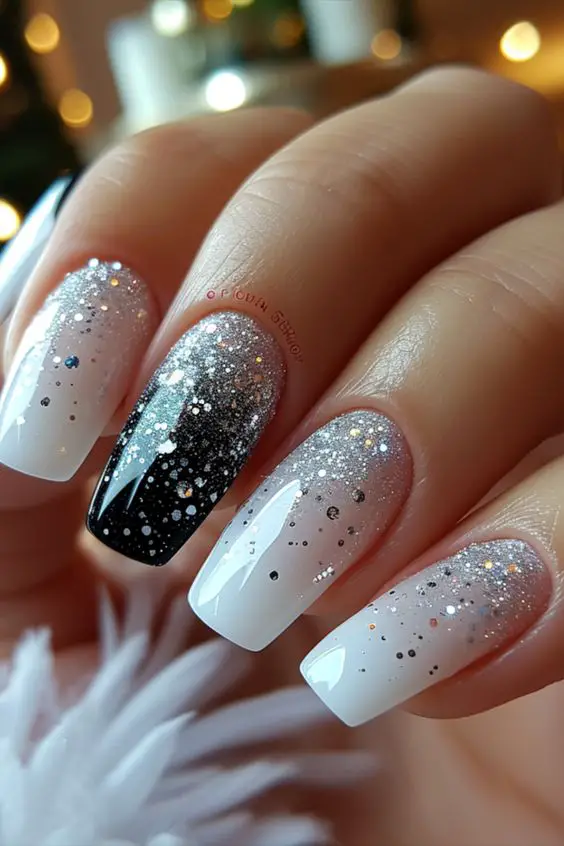
17. Ombre French with Glitter Fade (black fading to white with a subtle silver glitter)
Preparation and Application
Base Preparation: Start with a clear base coat to protect your nails and provide a smooth canvas for the ombre effect.
Applying Base Color: Use a light sheer shimmery pink as the base color, applying two coats and leaving space at the tip for the glitter.
Creating the Ombre Effect
Initial Color Layer: Apply a soft white polish at the tip of the nail, blending it downwards towards the base to create a gradient.
Adding Glitter: Before the white dries, apply a subtle silver glitter, starting from the tip and fading towards the middle of the nail.
Finishing Touches
Sealing the Design: Apply a clear top coat to seal in the design and add a glossy finish.
Nail Shaping: File your nails to create a straight wall from the cuticle to the tip, tapering the sides for a sleek contour.
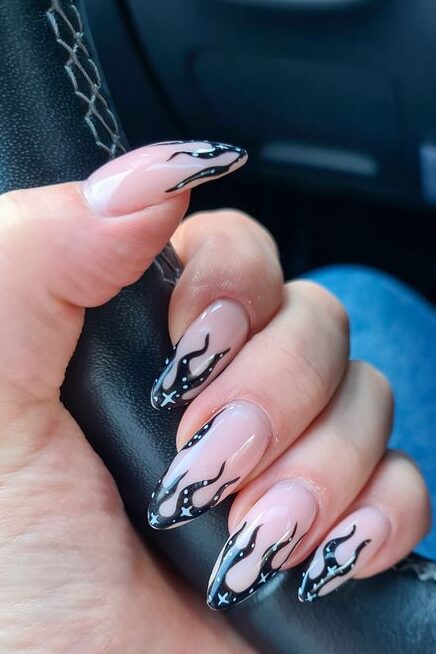
18. French Flames (black flames outlined in white for a fiery touch)
Necessary Materials and Preparation
Before beginning your French Flames nail design, gather the following essentials:
Natural gel color
Nail striper with a long brush
Acetone
Cleanup brush
Shiny top coat
First, ensure that your nails are thoroughly cleansed to provide a clean canvas for your artwork.
Step-by-Step Flame Design
Drawing the Base Flame:
Start by sketching a ‘C’ shape in the center of the nail. Extend this into a flick to form the base of your flame.
Enhancing the Flame:
Add layers of gel to thicken and define the flame shape. Use a steady hand to maintain the sharpness of the edges.
Cleanup:
Dip your cleanup brush in acetone to correct any errors or smudges, refining the flame’s contours for a crisp finish.
Practice and Techniques
Flames require confidence and skill in nail art, making practice crucial. Utilize platforms like Instagram for visual inspiration and technique tips.
Finishing Touches
Conclude your design by applying a shiny top coat. This not only enhances the visual appeal with a glossy finish but also protects your nail art.
Cleanse the nail once more after completing the design to ensure a neat and polished look.
Final Thoughts
Having journeyed through the trendsetting realm of black and white summer nail ideas, it’s evident that these designs offer a timeless yet contemporary flair that can elevate any summer ensemble.
From the playful whimsy of polka dots and geometric shapes to the sophisticated elegance of French ombré and delicate lace patterns, each suggestion stands as a testament to the versatility and striking appeal of the black and white palette.
These ideas not only cater to diverse aesthetic preferences but also underscore the potential for personal expression through nail art.
As the summer of 2024 unfolds, embracing these black and white nail designs can transform your style narrative, adding a touch of sophistication or playful charm to your look.
The assortment provided serves as a foundation for exploration and creativity, inviting you to blend classic elegance with modern trends.

Leave a Reply
You must be logged in to post a comment.