The summer vibes call for a vibrant transformation, and what better way to do that than by donning Coffin Nail Designs for Summer?
This season, get ready to dazzle with a myriad of design options that promise to make your nails stand out.
This post will walk you through 16 must-try coffin nail designs that will capture the essence of summer fun and fashion.
Busy? Save this pin for later.

1. Summer Sunset Ombre
The Summer Sunset Ombre design captures the breathtaking hues of a summer evening sky on your nails.
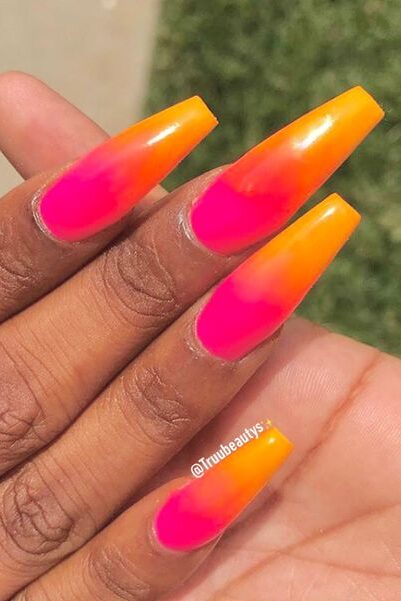
Utilizing a gradient of warm colors, this style blends shades seamlessly, mimicking the natural transition seen in sunsets. It’s perfect for those who enjoy vibrant, eye-catching nail art.
Best Features
Vibrant Color Palette: Incorporates a stunning range of sunset colors, from deep oranges to soft yellows.
Gradient Effect: Achieves a smooth transition between colors, offering a subtle yet striking visual impact.
Versatility: Suitable for various occasions, from casual outings to more formal events.
Limitations or Cons
Skill Level: Requires some practice to perfect the gradient effect, especially if DIY-ing at home.
Maintenance: May need regular touch-ups to maintain the gradient’s crisp appearance.
How to DIY
Prepare Your Nails: Start with clean, shaped nails for the best results.
Base Coat: Apply a clear base coat to protect your nails.
Apply Colors: Use a makeup sponge to dab on the polish in layers, starting with the lightest color at the base and working up to the darkest at the tip.
Blend: While the polish is still wet, use the sponge to softly blend the edges of each color into the next.
Top Coat: Seal your design with a top coat for a glossy finish and extended wear.
Trendy Variations
Pastel Ombre: Swap out the bright sunset colors for softer pastel tones.
Glitter Tips: Add a touch of glitter over the ombre for a sparkling effect.
Ombré with Accents: Incorporate small decals or stamps, such as stars or tiny palm trees, to enhance the summer vibe.
2. Neon French Tip
Neon French tip coffin nails bring a vibrant twist to the classic French manicure.
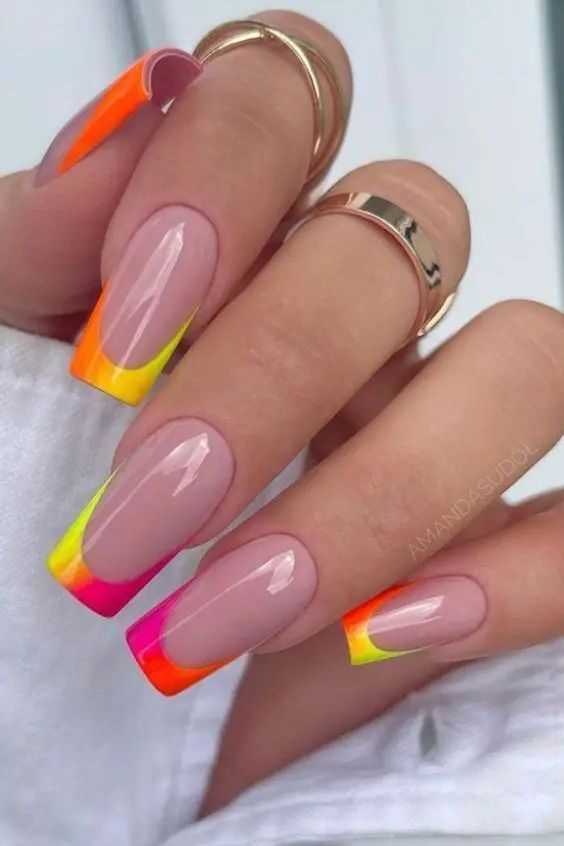
This design highlights the use of bright neon colors at the tips of the nails, creating an eye-catching contrast that’s perfect for summer.
Best Features
Striking Contrast: The neon tips starkly contrast with the natural or nude base, making the colors pop.
Customizable: You can choose any neon color to match your outfit or mood.
Versatile Design: Works well with both short and long coffin nail shapes.
Limitations or Cons
Color Fading: Neon colors may fade faster, requiring more frequent touch-ups.
Precision Needed: Achieving a clean and precise tip can be challenging without professional help.
How to DIY
Prepare Your Nails: Shape your nails into a coffin shape and apply a base coat.
Apply Base Color: Choose a nude or light pink shade as the base color and let it dry.
Tape for Precision: Use thin tape to demarcate where the neon tip starts.
Apply Neon Polish: Paint the tips with your chosen neon polish. Remove the tape while the polish is still wet.
Finish with a Top Coat: Apply a clear top coat to seal in the design and add shine.
Trendy Variations
Multiple Neon Colors: Instead of one, use multiple neon colors on different nails for a fun, eclectic look.
Neon with Glitter: Add a glitter top coat over the neon tips for extra sparkle.
Neon and White Combo: Incorporate a thin white line between the base color and the neon tip for a more defined and stylish look.
These neon French tip coffin nails are a fun and trendy choice for anyone looking to add a splash of color to their summer style.
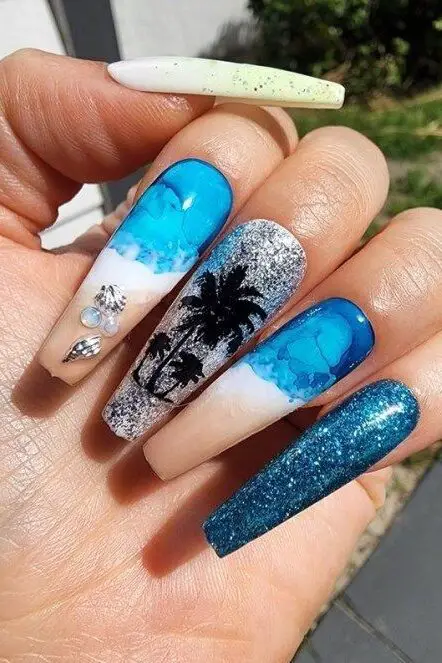
3. Palm Print Paradise
Palm Print Paradise is a stunning choice for those who love to incorporate a touch of the tropics into their summer style.
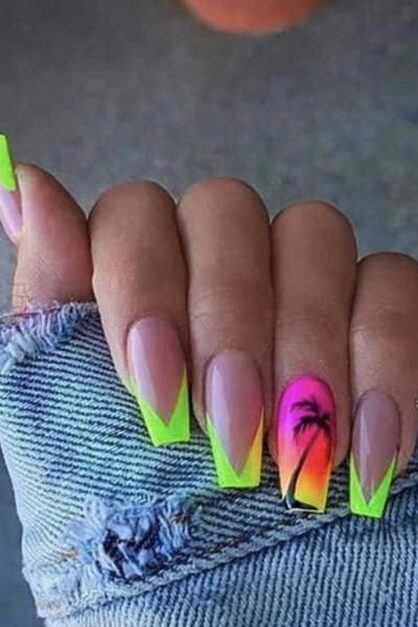
These coffin nail designs feature iconic palm tree prints, often combined with other summer-themed elements, creating a vibrant and playful look perfect for beach days or any sunny outing.
Best Features
Diverse Design Integration: Palm prints can be creatively paired with various nail art styles including French tips, matte finishes, and even intricate marble patterns.
Summer Vibes: Instantly evokes a beachy feel, perfect for summer vacations or just to brighten your day-to-day look.
Customization Options: Offers flexibility in design by allowing different color schemes and additional elements like seashells or starfish for a more personalized touch.
Techniques to DIY
Base Preparation: Start with a base coat to protect your nails.
Palm Print Stamping: Use a stamping kit with a palm tree design or freehand the palm print with a thin brush.
Color Choices: Opt for greens for the palms and a sandy beige or ocean blue as the base to stick with the theme.
Detailing: Add small accents like glitter or tiny rhinestones to mimic the sparkle of water or sandy beaches.
Seal the Design: Finish with a top coat to ensure your palm paradise lasts as long as your summer adventures.
Trendy Variations
Neon Palms: Swap traditional green for neon shades to make the palm design pop against a neutral base.
Ombré Background: Blend blues and greens in an ombré style behind the palm prints for a more dynamic look.
Textured Sands: Integrate a sandy texture on selective nails using specialized nail art powders or fine glitter.
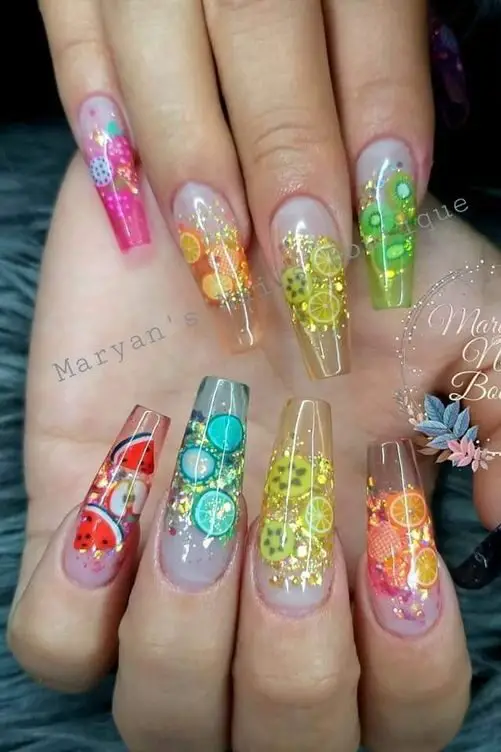
4. Tropical Fruit Frenzy
Tropical Fruit Frenzy is a celebration of vibrant colors and playful designs, perfect for those summer days.
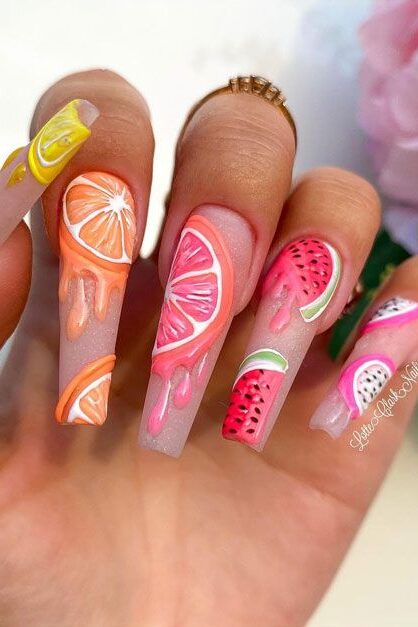
This style features coffin nails adorned with a variety of fruit-inspired art, from peachy pink nails with delicate strawberry accents to intricate designs that mimic a colorful fruit platter.
Best Features
Vivid Imagery: Each nail serves as a canvas displaying a variety of tropical fruits, enhancing the summer aesthetic.
Color Diversity: Utilizes a bright palette, including shades like peachy pink and other fruit-inspired hues.
Theme Consistency: Maintains a fun, tropical theme with elements like flowers and leaves complementing the fruit designs.
Limitations or Cons
Complexity in Design: The intricate details of fruit designs require precision and might need professional assistance for perfect results.
Maintenance: Due to the detailed artwork, these designs may require more maintenance to keep the intricate details pristine.
Techniques to DIY
Prepare Your Nails: Ensure nails are clean and shaped into a coffin or ballerina style.
Base Color Application: Apply a base coat of peachy pink or a light color that complements the fruit design.
Fruit Art Detailing: Use a fine brush to hand-paint fruit designs or apply decals that match the tropical theme.
Accent Additions: Enhance the design with glitter or tiny rhinestones to mimic dew on the fruit.
Protective Top Coat: Seal your art with a clear top coat to ensure longevity and gloss.
Trendy Variations
Fruit Mix Designs: Combine different fruits on each nail for a diverse and colorful display.
Glitter Integration: Add a layer of glitter over the fruits for a shimmering, sun-kissed look.
Matte Finish: Opt for a matte top coat for a modern, chic twist on the glossy traditional finish.
5. Beach Vibes Glitter
Beach Vibes Glitter coffin nails encapsulate the essence of sunny shores and sparkling seas.
These nails feature a long, sharp shape adorned with multicolored glitter that catches the light beautifully, reminiscent of sunlight dancing on ocean waves.
Best Features
Sparkling Multicolored Glitter Finish: Captures the vibrant energy of the beach.
Long, Sharp Shape: Enhances the dramatic effect of the glitter.
Techniques to DIY
Prepare Your Nails: Ensure your nails are clean and filed.
Base Coat: Apply a base coat to protect your nails.
Colored Nail Polish: Choose a base color that complements the glitter.
Glitter Polish: Apply glitter polish for the sparkling effect.
Top Coat: Seal with a top coat for durability and shine.
Care Tips
Keep Nails Dry: Avoid prolonged exposure to water to maintain the glitter’s sparkle.
Use Cuticle Oil: Nourish your nails regularly to keep them healthy.
Avoid Using Nails as Tools: Protect your nails from damage to preserve the design.
Popular Trends
Baby Pink Chrome Glitter: Achieve with chrome powder or polish for a soft, reflective look.
Alternating Pink and Blue Glitter: A simple yet striking two-toned design.
Neutral Plaid Designs: Offers a sophisticated touch for a more natural look.
Nude with White Daisies: Adds a delicate floral element to your nail art.
High-Contrast Black and White Glitter: For a chic and versatile appearance.
Vibrant Rainbow French Tips: Use a nail stamping plate for a fun, three-dimensional effect.
6. Ocean Waves Art
Ocean Waves Art on coffin nails is a captivating design that uses a blend of blue, white, and green shades to mimic the serene and rhythmic movement of ocean waves.
This design is perfect for summer, bringing a piece of the sea to your fingertips.
Best Features
Vivid Color Scheme: The use of various shades of blue mixed with greens and whites creates a realistic oceanic appearance.
Gradient Effect: This technique offers a visual depth that mimics the natural gradient seen in ocean waves.
Enhanced Details: Adding glitter or rhinestones can simulate the sparkling water under sunlight.
Techniques to DIY
Base Coat Application: Start with two coats of light sea foamy blue polish.
Adding Depth: Once dry, apply a medium blue polish on two-thirds of each nail.
Creating Waves: Use a dotting tool to place dots of the medium blue along the edge, then drag a pin through these dots to form a wave pattern.
Wave Definition: After the medium blue dries, define the waves with a lighter blue to enhance the layered look.
Dark Blue Waves: Repeat with a dark blue polish, curving the waves in the opposite direction for contrast.
Drying and Top Coat: Allow each layer to dry before applying the next. Finish with a top coat to protect the design.
Care Tips
Maintenance: Regular touch-ups can extend the life of the design, keeping it looking fresh for up to two weeks.
Protection: Use a top coat to seal the design, and reapply it every few days to prevent chipping.
Popular Trends
Blue Skies Style: Incorporates clear, cloudless sky designs that complement the ocean theme, perfect for a full summer nail art ensemble.
7. Seashell Delights
Seashell Delights offer a stunning tribute to oceanic beauty, perfect for summer outings or beach-themed events.
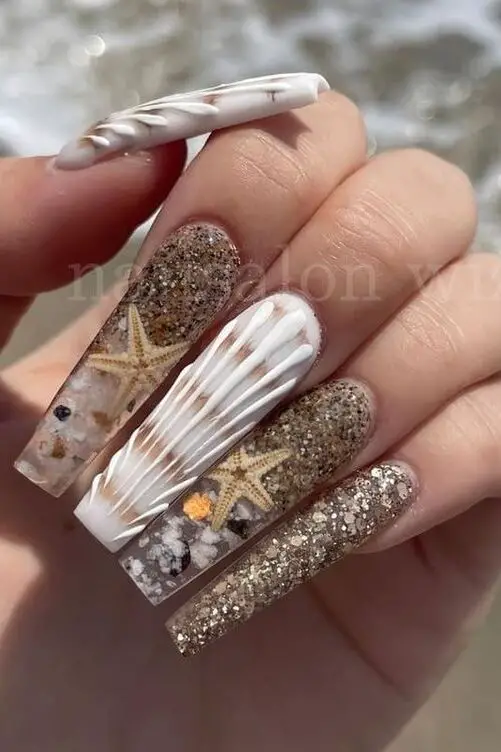
These designs incorporate elements like iridescent shells and pearl decorations, bringing the allure of the sea right to your fingertips.
Best Features
Intricate Designs: From Reverse French Tip Shells to Long and Pointy Shells, the variety provides numerous styling options.
Colorful and Creative: Utilizes a palette that complements seashell motifs, such as translucent blue and matte white.
3D Embellishments: Features like 3D crystals and sea-inspired decorations enhance the tactile beauty of the nails.
Techniques to DIY
Base Preparation: Apply a rubber base to clean nails for enhanced adhesion.
Color Application: Choose a seashell-inspired color and apply two coats.
Decoration Placement: While the second coat is still tacky, gently place pearl decorations or 3D crystals.
Sealing the Design: Use a top coat to secure the decorations and add a glossy finish.
Care Tips
Regular Maintenance: Check and reapply the top coat every few days to prevent wear and tear.
Gentle Use: Avoid using your nails as tools to keep the intricate designs intact.
Popular Trends
Iridescent Shells: These catch the light and mimic the inside of a real shell.
Pastel Seashell: Soft pastel backgrounds make the shell designs stand out.
Go Maximalist: Combine multiple elements like glitter, rhinestones, and various shell types for a bold look.
8. Neon Flames
Neon Flames is a striking design that brings the heat with its vibrant neon green flames on a bare or clear acrylic nail base.
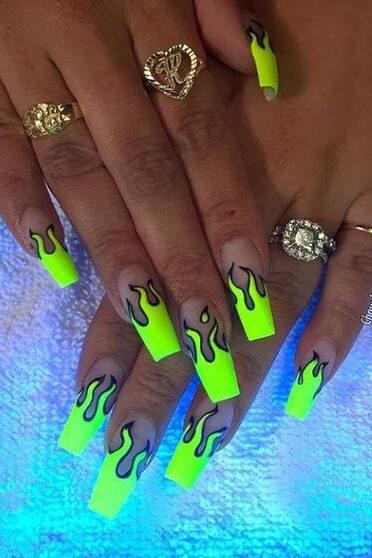
Originating from the creative minds at MixuNails, this design is showcased on coffin-shaped nails, making it a trendy choice for those looking to make a bold statement.
Best Features
Vivid Neon Green: The neon green flames are eye-catching and perfect for summer.
Dynamic Visual Impact: The flame design adds movement and an edgy look to your nails.
Versatility: Looks great on both bare nails and clear acrylic tips, offering flexibility in style.
Techniques to DIY
Prepare Your Nails: Start with clean, shaped coffin nails.
Apply Base Coat: Choose a clear or bare base to make the neon color pop.
Paint the Flames: Use a thin brush to paint the neon green flames starting from the nail bed up.
Detailing: Add depth by using different shades of green to highlight the flames.
Finish with a Top Coat: Seal your design with a glossy top coat for durability and shine.
Care Tips
Regular Maintenance: Retouch the neon paint as it can fade with exposure to sunlight.
Protective Measures: Apply a UV top coat to preserve the neon color from sun damage.
Popular Trends
Glow in the Dark: Add a glow-in-the-dark top coat for a stunning night-time effect.
Color Variations: Experiment with other neon colors like pink or blue for a personalized touch.
Metallic Accents: Incorporate metallic lines within the flames for a more luxurious look.
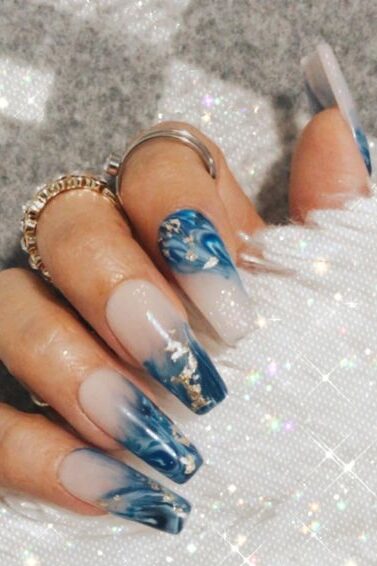
9. Neon Marble
Neon Marble nails blend the electrifying charm of neon colors with the swirling elegance of marble patterns.
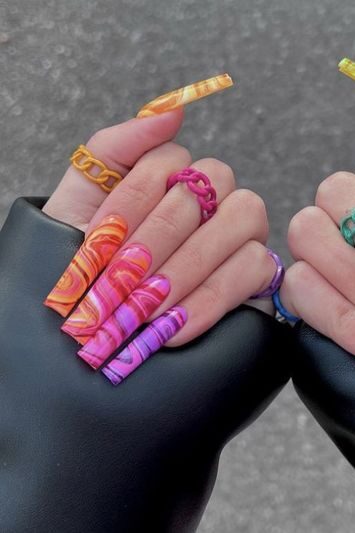
Adapted to coffin nails, this design offers a unique, eye-catching look that’s perfect for those who want to make a bold summer statement.
Best Features
Striking Color Combinations: You can choose from a wide range of neon colors mixed into a marble design.
Customizable Patterns: Each nail can feature a different swirl pattern, making every manicure unique.
Accessorization Options: Elevate the design with crystals and beads for an extra touch of glam.
Techniques to DIY
Base Coat Application: Start with a base coat of white gel polish to make the neon colors pop.
Creating the Marble Effect: Apply drops of Cherry Times nail job marble tints and swirl with a fine brush.
Neon Highlights: Incorporate neon pigments into the design for added vibrancy.
Top Coat for Sparkle: Finish with a holographic nail wipe top coat to enhance the overall sparkle.
Care Tips
Regular Maintenance: Keep the nails looking fresh with regular top coat reapplications.
Smooth Finish: Use a buffing technique after the top coat to ensure a smooth, neat finish.
Popular Trends
Neon Melt: For a twist, blend neon colors in a melted design across the nails.
Matte Finish: Apply a matte top coat for a contemporary look that stands out.
10. Neon French Fade
The Neon French Fade design blends traditional French manicure elegance with a punch of neon, creating a gradient that fades into the nail bed.
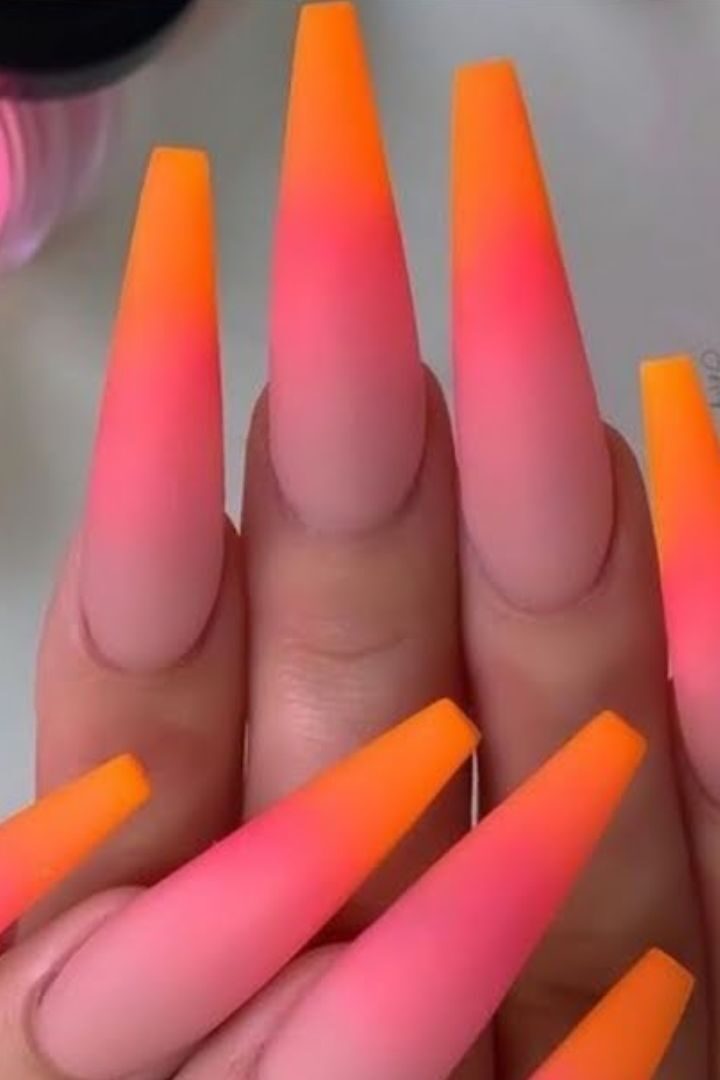
This design is perfect for those who love a classic look with a twist of modern vibrancy, making it ideal for summer.
Best Features
Vivid Neon Edges: Bright neon colors at the tips fade into a softer shade towards the nail bed.
Versatile Style: Suitable for both casual and formal occasions.
Customizable: Choose any neon color to tailor the fade to your personal style.
Techniques to DIY
Prepare Your Nails: Start with clean, shaped coffin nails for the best canvas.
Base Coat: Apply a sheer pink or nude base coat and let it dry.
Apply Neon Polish: Start at the tip with a neon polish, using a sponge for the fade effect.
Blend: Gently dab the sponge moving towards the nail bed to create a smooth gradient.
Top Coat: Apply a clear top coat to protect the design and add shine.
Care Tips
Maintenance: Regular touch-ups on the tips will keep the neon looking bright.
Hydration: Keep your cuticles and nails hydrated for a flawless finish.
Popular Trends
Neon Pink to Nude: A soft fade from vibrant pink to a subtle nude base.
Electric Blue Fade: Start with a bold blue and fade into a clear or light blue.
Sunset Blend: Use a mix of neon orange and pink for a sunset effect.
11. Holographic Dreams
Holographic Dreams brings a futuristic twist to coffin nail designs, combining iridescent shimmer with the sleek, angular shape of coffin nails.
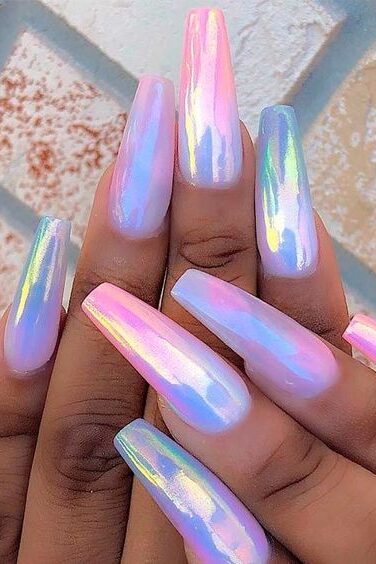
This style is perfect for those looking to add a touch of magic and dimension to their nail art.
Best Features
Iridescent Shimmer: Captures and reflects light, giving a multi-dimensional look.
Versatile Color Palette: Works well with a range of colors, enhancing both bold and subtle designs.
Unique Visual Appeal: Offers a striking look that stands out from traditional nail art.
Techniques to DIY
Base Preparation: Start with a clean, smooth base coat to ensure an even application.
Apply Holographic Powder: Gently brush on the holographic chrome powder over a gel base coat.
Seal the Design: Apply a top coat to protect the holographic effect and enhance its shine.
Cure Under Light: Use a UV or LED lamp to cure the polish, ensuring durability and a high gloss finish.
Care Tips
Regular Top Coat Application: Reapply the top coat every few days to maintain the gloss and protect the holographic effect.
Gentle Use: Avoid hard impacts to preserve the integrity of the holographic design.
Popular Trends
Pink Holographic Nails: Incorporate a soft pink base with a holographic top for a subtle yet enchanting look.
Bold Holographic Accents: Use holographic designs as an accent on one or two nails for a more understated approach.
Full Holographic Coverage: Go all-in with a full set of holographic nails for a truly captivating look.
12. Metallic Mermaid Scales
Metallic Mermaid Scales coffin nails combine the sleek, edgy coffin shape with shimmering metallic colors and the enchanting look of mermaid scales.
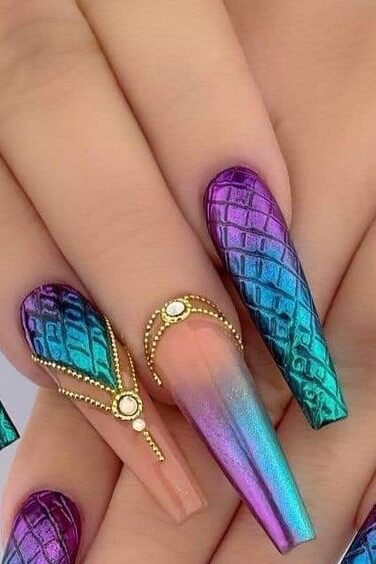
This design is versatile, suitable for both casual and formal occasions, and can be tailored to individual preferences.
Best Features
Shimmering Metallic Shades: Includes options like silver, gold, and bronze, often enhanced with holographic or glitter effects for extra shine.
Mermaid Scale Artistry: Achieved through techniques like nail stamping, gradient color applications, or meticulous freehand painting.
Elongated Elegance: The coffin nail shape extends the fingers, providing a modern and sophisticated appearance.
Techniques to DIY
Prepare Your Nails: Ensure your nails are clean and shaped into a coffin style.
Apply a Base Coat: Start with a base coat to protect your nails and prevent staining.
Metallic Base Color: Choose a metallic shade as the base color and apply it evenly.
Creating Scales: Use a stamping plate with a scales pattern or paint scales freehand with a thin brush.
Add Details: For a 3D effect, apply small beads or crystals at the intersection of the scales.
Seal with Top Coat: Finish with a no-wipe top coat to enhance durability and shine.
Nail Care Tips
Maintenance: To extend the life of your manicure, avoid using your nails as tools and apply cuticle oil daily.
Longevity: Opt for gel or dip powder polish to keep your design looking fresh for up to three weeks.
Customization Options
Color Variations: Experiment with different metallic shades or combine them for a multi-toned scale effect.
Accent Features: Integrate elements like opal crystals or fish-scale glitter for added texture and sparkle.
13. Neon Animal Print
Neon Animal Print nails bring a wild and vivid flair to your summer nail wardrobe.
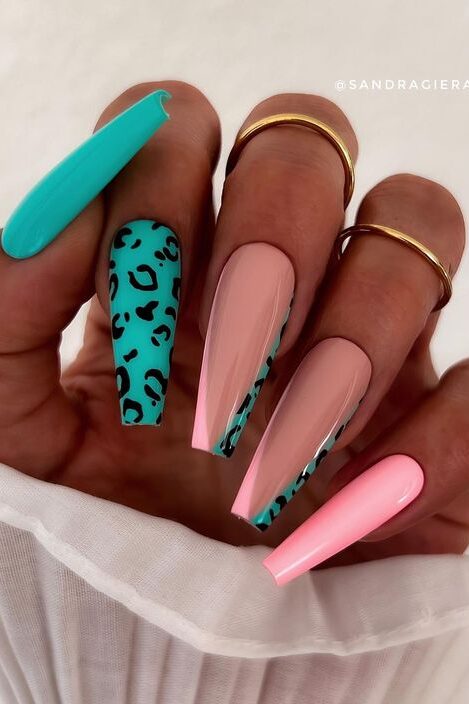
These designs, particularly popular in zebra and leopard patterns, utilize bright neon colors to create striking contrasts that are both eye-catching and stylish.
Best Features
Vibrant Colors: Neon hues replace traditional black in animal patterns, offering a fresh and lively look.
Versatile Designs: From zebra stripes to leopard spots, these prints can be adapted to various nail shapes and sizes, including the trendy coffin style.
Customization: Easily mix and match colors and patterns to suit your personal style or seasonal trends.
Techniques to DIY
Prepare Your Nails: Clean and shape your nails into the desired coffin shape.
Base Coat: Start with a neutral base coat to enhance the neon colors.
Apply Neon Colors: Use a thin brush to create animal patterns with your chosen neon polishes.
Detailing: Add small touches like glitter or a matte top coat for a textured look.
Seal the Design: Finish with a glossy top coat to protect your artwork.
Care Tips
Maintenance: Neon colors may require occasional touch-ups to keep them vibrant.
Protection: Regularly apply a top coat to prevent chips and wear.
Popular Trends
Mix and Match: Combine different animal prints on various nails for a dynamic look.
Accent Nails: Use animal prints on just one or two nails as accents, paired with solid neon colors on others.
Glowing Effects: Some neon polishes offer a glow-in-the-dark effect, adding an extra element of fun in low-light environments.
14. Fruit Salad Mix
The Fruit Salad Mix design for coffin nails is a delightful celebration of summer, featuring a vibrant blend of colors and patterns that resemble a refreshing fruit salad.
This design is perfect for those who appreciate a playful and colorful manicure, making it a popular choice for warm-weather festivities.
Best Features
Vibrant Color Palette: A mix of bright colors that capture the essence of various fruits.
Diverse Patterns: Includes designs like pineapple, watermelon, and tropical birds.
Creative Customization: Allows for personalization with a choice of fruits and colors.
Techniques to DIY
Prepare Your Nails: Clean and shape your nails into the coffin style.
Base Coat Application: Start with a neutral base coat to enhance the colors.
Fruit Designs: Paint fruit patterns using a fine brush or use decals for precision.
Detailing: Add small touches like seeds or leaves to enhance realism.
Top Coat Application: Seal your design with a glossy top coat for durability and shine.
Care Tips
Maintenance: Regular touch-ups to keep the design vibrant.
Protection: Apply a top coat every few days to prevent chipping.
Customization Options
Base Shade Selection: Choose from various base shades to match your preferred style.
Top Coat Finish: Opt for glossy or matte top coats based on your finish preference.
Nail Size and Shape: Customize the size and shape of your press-on nails for a perfect fit.
15. Neon French Chevron
Neon French Chevron nails combine the boldness of neon colors with the elegance of a chevron, or V-shaped, pattern.
This style is versatile and can be tailored to various occasions and seasons, making it a perfect choice for those looking to add a dynamic and modern twist to their nail art.
Best Features
Vibrant Neon Colors: The use of neon enhances the visual appeal and makes the nails stand out.
Chevron Pattern: Offers a geometric aesthetic that is both sharp and stylish.
Versatility: Suitable for numerous nail shapes including square, ballerina, coffin, oval, and round.
Techniques to DIY
Prepare Your Nails: Ensure your nails are clean and shaped to your desired style.
Apply Base Coat: Start with a clear or neutral base coat.
Chevron Stencils: Use chevron stencils or tapes to create the V-shaped pattern.
Apply Neon Polish: Paint over the stencil with your chosen neon polish.
Peel and Finish: Carefully remove the stencil and apply a top coat for shine and durability.
Customization Options
Mixed Patterns: Combine different neon colors on each nail or use a gradient effect within the chevron pattern.
Embellishments: Add glitter, foil, or 3D elements like tiny rhinestones to enhance the design.
Base Color Variations: Experiment with different base colors to contrast or complement the neon chevron.
16. Tie-Dye Explosion
Tie-Dye Explosion brings a burst of color to your summer style with its vibrant, swirling patterns on coffin nails.
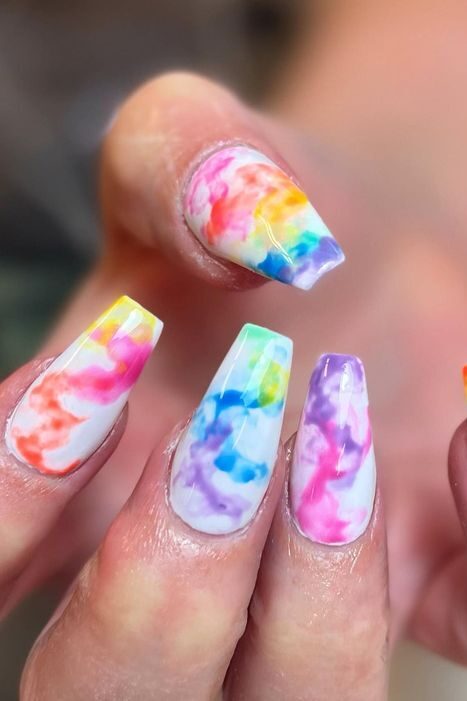
This design is perfect for those who love to stand out with bold, artistic expressions on their nails.
Best Features
Vibrant Swirls: Each nail features a unique tie-dye pattern, ensuring no two nails are exactly alike.
Color Variety: A wide range of colors can be used, allowing for endless customization.
Summer Theme: Ideal for seasonal events or just adding a splash of color to your everyday look.
Techniques to DIY
Prepare Your Nails: Start with clean, shaped coffin nails.
Base Coat: Apply a light-colored base coat to enhance the tie-dye colors.
Apply Colors: Dot different colored polishes on the nail.
Swirl Patterns: Use a toothpick or small brush to swirl the colors together.
Top Coat: Seal the design with a glossy top coat for durability and a vibrant finish.
Trendy Variations
Neon Tie-Dye: Use neon colors for a more striking look.
Pastel Tie-Dye: Opt for pastels for a softer, more subtle appearance.
Glitter Accents: Add glitter to some of the swirls for a sparkling effect.
Final Thoughts
Throughout this post, we’ve explored an extensive array of coffin nail designs perfect for enhancing your summer style, from the serene gradients of Summer Sunset Ombre to the playful vibrancy of Neon Flames and Tropical Fruit Frenzy.
Each design offers a unique way to celebrate the season’s spirit, providing a spectrum of options whether you seek simplicity and elegance or boldness and flair.
As we draw this exploration to a close, it’s important to remember that choosing the right nail design is about what resonates with your personal style and summer adventures.

Leave a Reply
You must be logged in to post a comment.