As the leaves start to change color and the air becomes crisp, updating your nail style to fit the autumn season feels almost essential.
Elegant autumn nail ideas, blending classic shades and innovative designs, perfectly capture the essence of the season.
Embracing these seasonal trends can effortlessly elevate your style, making you feel refreshed and in tune with nature’s palette.
This post will show you through a carefully curated selection of 15 elegant autumn nail ideas that you’ll love to try.
Busy? Save this pin for later.

1. Pumpkin Orange Glitter Nails
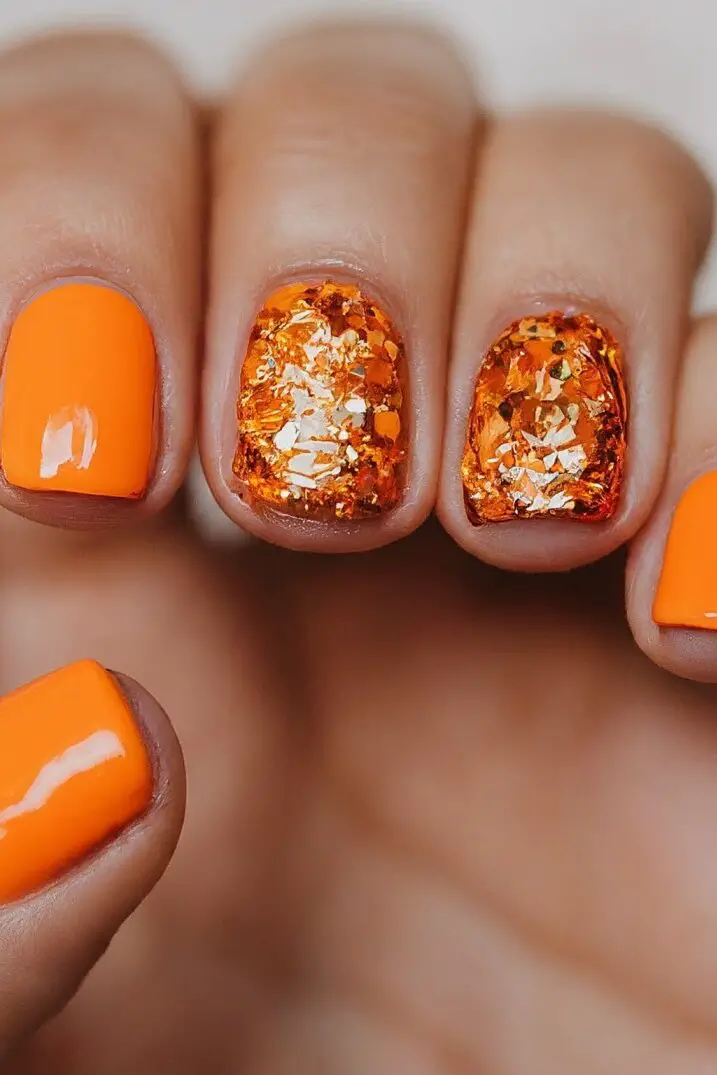
Pumpkin Orange Glitter Nail Design
This design captures the essence of autumn by combining a dazzling orange glitter polish with a playful pumpkin motif.
It’s perfect for both Halloween and Thanksgiving festivities.
The pumpkin can be easily drawn on your nails, starting with an almond-shaped outline and adding details to depict the stem and creases. If you’re new to nail art, don’t worry; the design is straightforward and forgiving for beginners.
Pumpkin Orange Glitter Nail Application
Starting off, apply a base coat of your choice, which could be grey, nude, or even a clear polish to enhance the orange’s pop.
Use orange polish to paint the pumpkin body, and once dry, you can optionally add darker orange lines to give it more dimension.
For a professional finish, use a black Sharpie for detailing over gel polish, drawing the pumpkin’s outline and features. Seal your artwork with a glossy top coat to protect and add a mesmerizing shine.
Pumpkin Orange Glitter Nail Styling Tips
For a seamless look, blend neon orange acrylic down the nail, tapping lightly with a brush to diffuse the color transition.
This technique creates a stunning ombre effect, making the glitter appear as if it’s vanishing beneath the nail bed.
2. Autumn Leaf Ombre
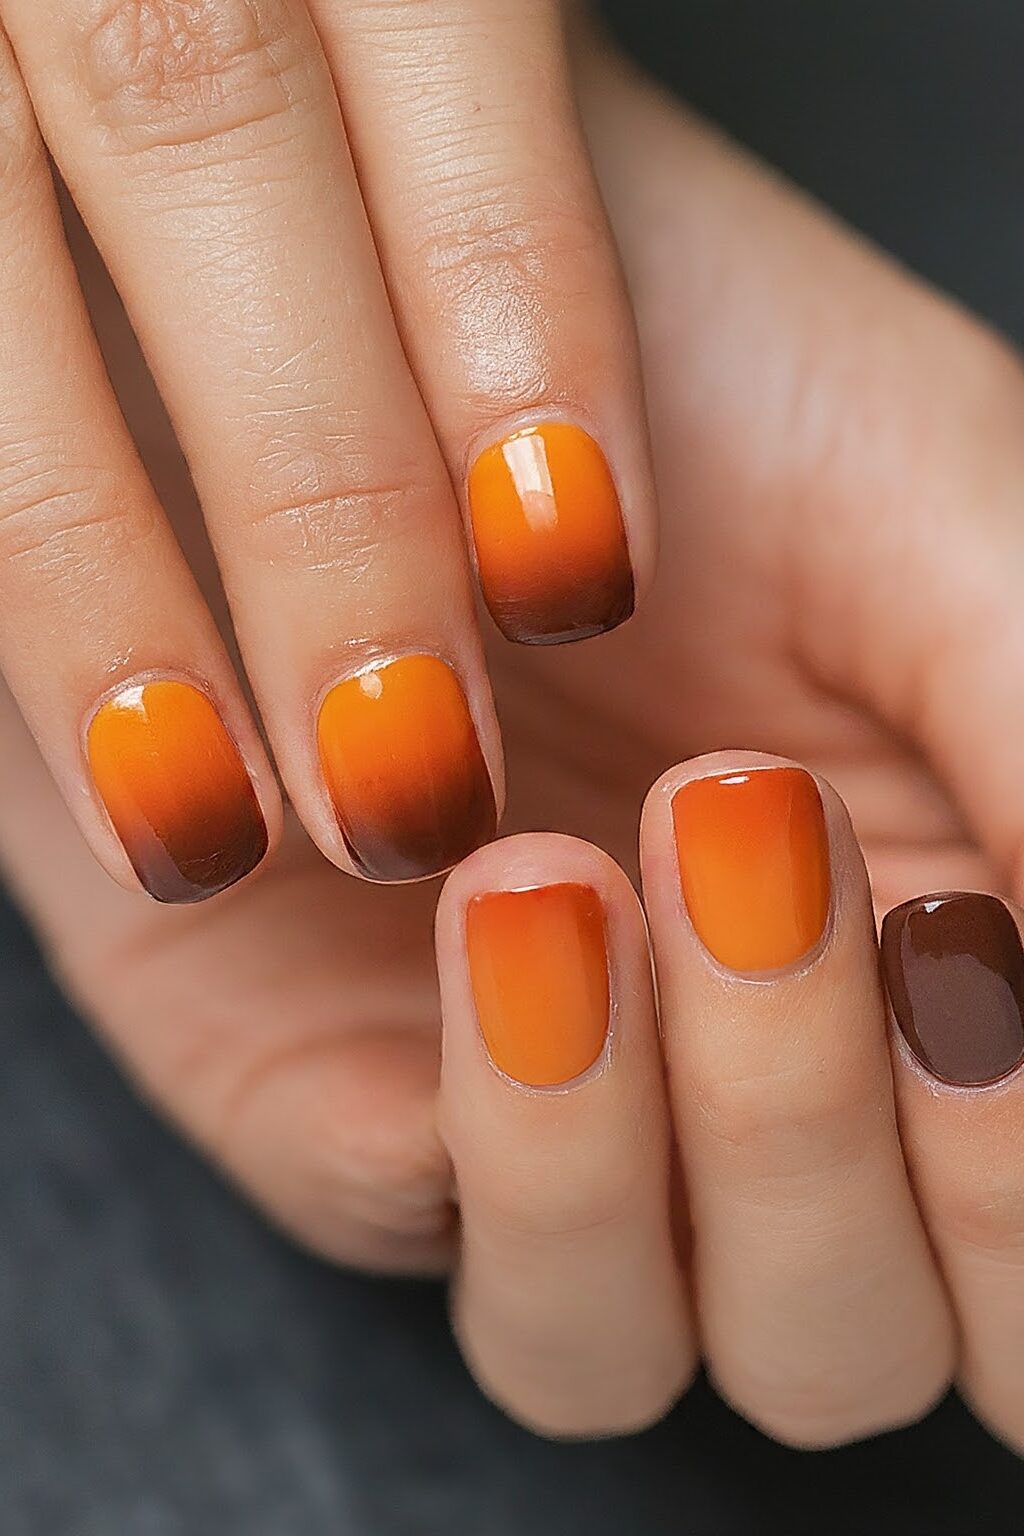
Autumn Leaf Ombre Design
Start with a rich, chocolatey brown base, then layer on the vibrant colors of autumn leaves using yellow, orange, and red gel paints.
The beauty of this design lies in its imperfection, much like the natural fall foliage. Each leaf should be unique, featuring jagged, spiky edges and a variety of shapes.
Autumn Leaf Ombre Application
Begin by painting your base color. Once it’s dry, use a small brush to apply the yellow gel paint, creating the inner part of the leaves.
Add orange gel paint next, blending it outward for a fiery ombre effect. Finish with touches of red at the tips of the leaves to enhance depth and realism.
Autumn Leaf Ombre Styling Tips
To achieve a flawless ombre transition, keep the paints wet while you work, allowing the colors to blend seamlessly.
If you’re aiming for a more intricate look, consider adding small swirls or gold accents around the leaves. These subtle details can elevate the overall design, making your nails a standout piece this autumn season.
3. Sage Green Matte Polish
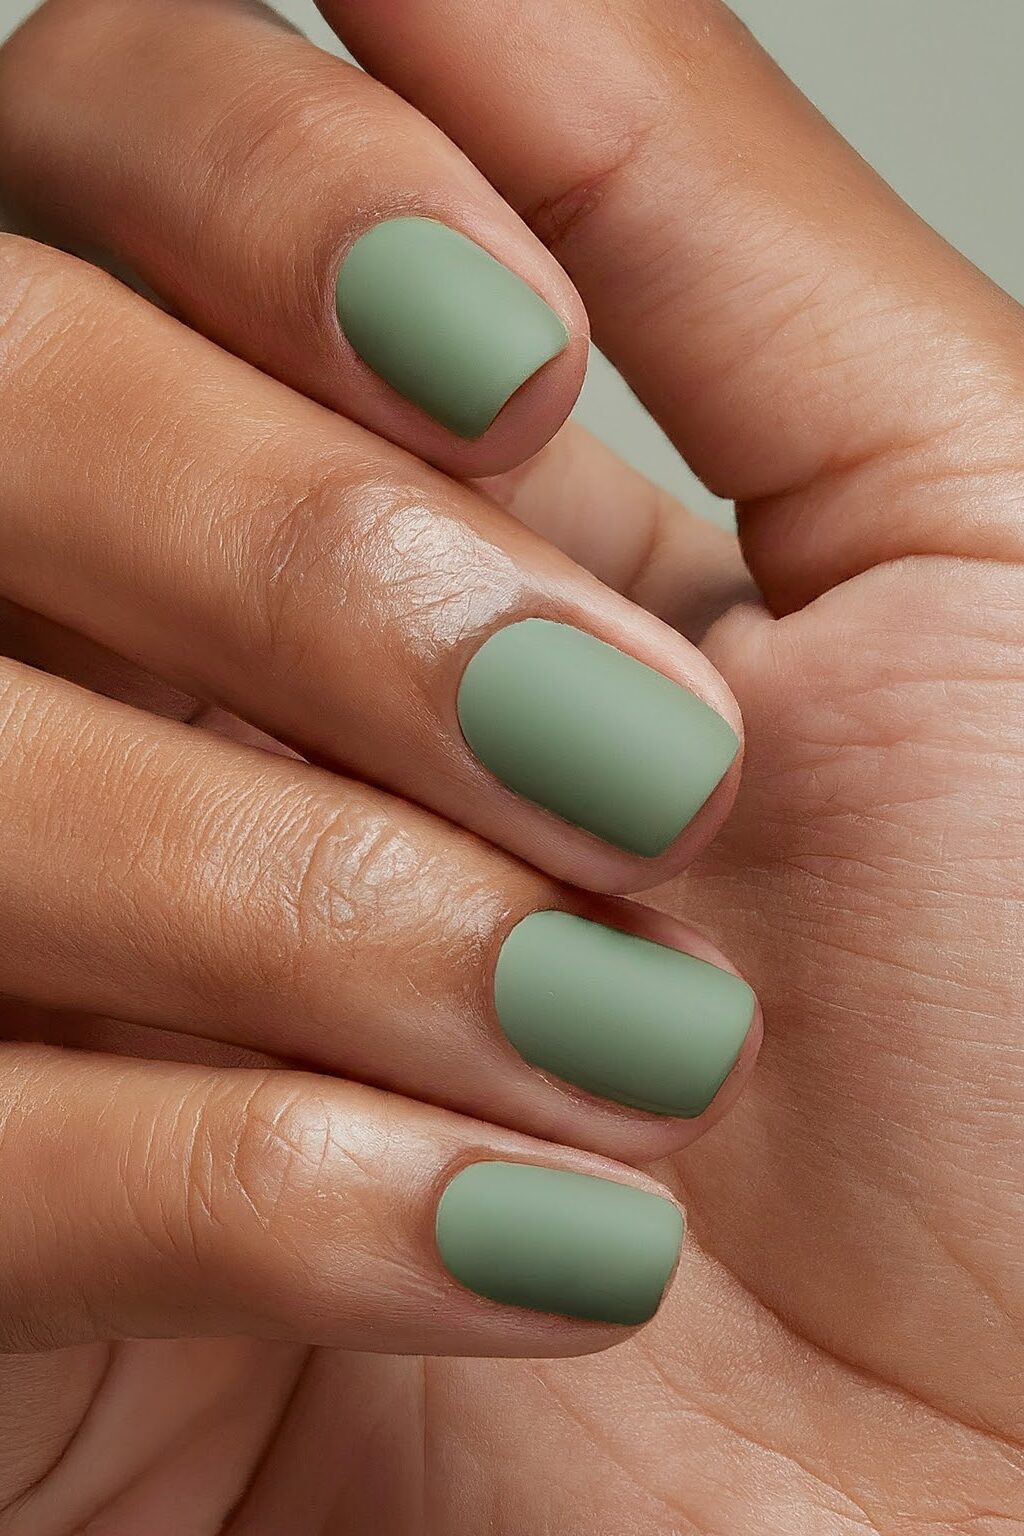
Sage Green Matte Nail Design
Elevate your style with the sophisticated Sage Green Matte Nail Design. This design is perfect for those who appreciate elegance and a touch of natural tranquility in their look.
The matte finish provides a chic, modern vibe, making it a great choice for both casual and formal occasions.
Sage Green Matte Nail Application
To achieve the perfect Sage Green Matte look, start by applying a base coat to protect your nails and ensure a smooth application.
Next, apply two coats of sage green nail polish, allowing each coat to dry thoroughly. Finish with a matte top coat to give your nails that trendy, velvety finish.
This technique ensures your nails remain stunning and sophisticated without the extra shine.
Sage Green Matte Nail Styling Tips
For an added touch of creativity, consider incorporating marble or swirl designs into your Sage Green Matte Nails.
Use a toothpick or a small dotting tool to swirl together white and sage green polishes directly on the nail or on a palette before applying.
This can create a beautiful, unique pattern that enhances the overall elegance of your matte nails. Remember, the key to a mesmerizing matte finish is a steady hand and patience during the drying process.
4. Caramel Swirl Nails
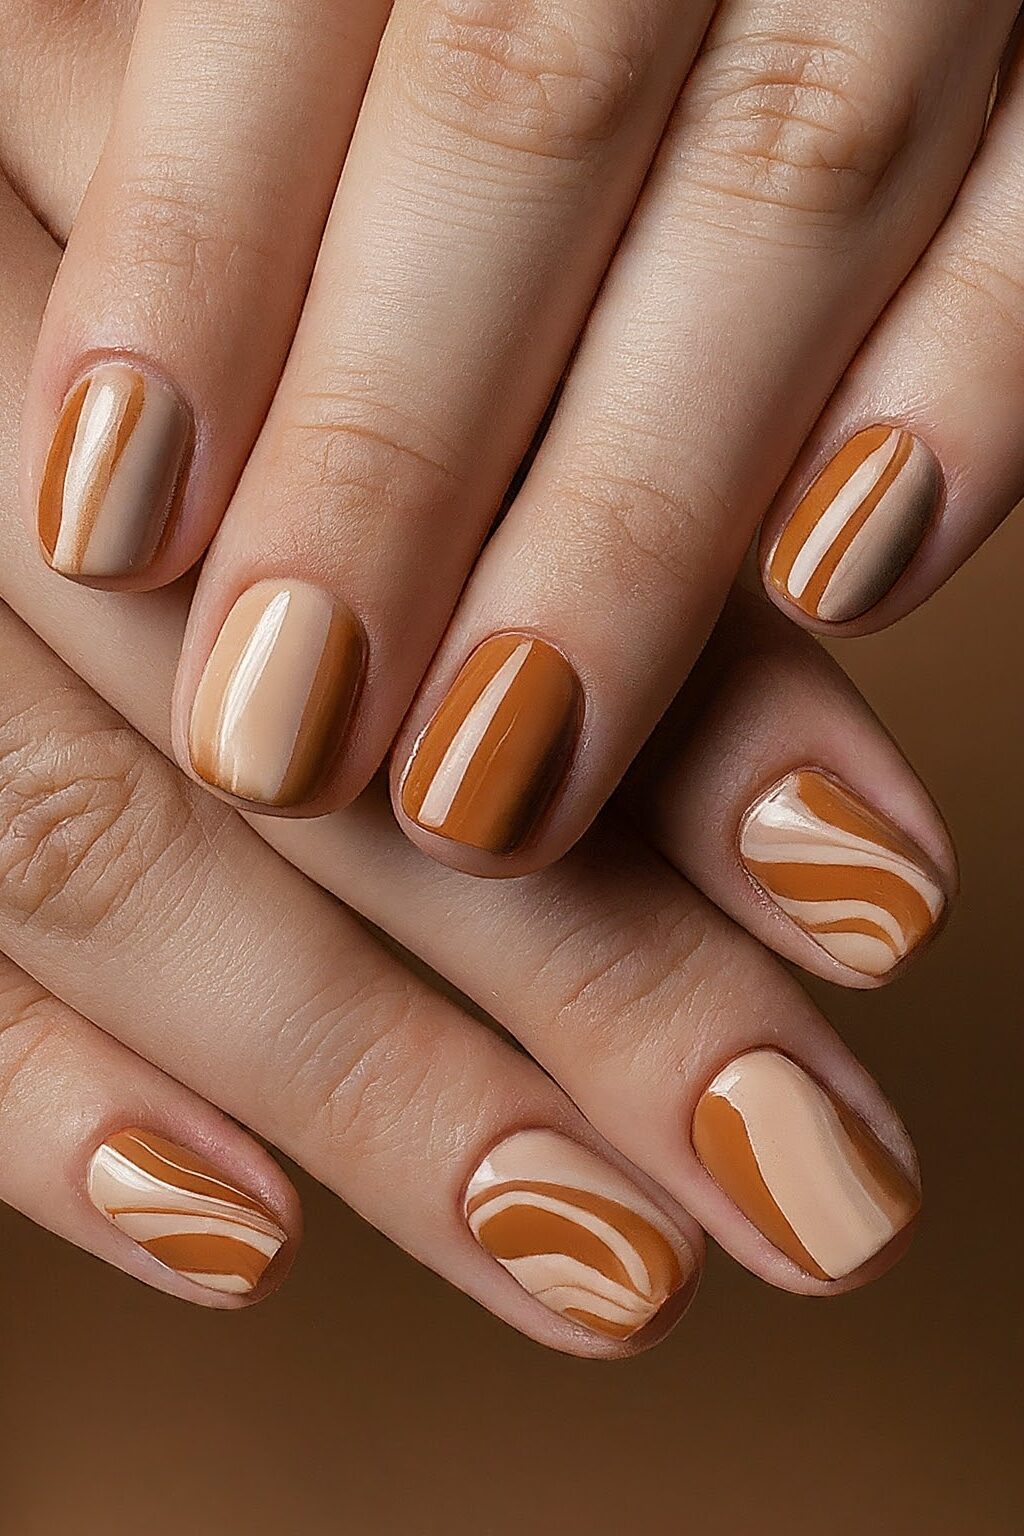
Caramel Swirl Nail Design
A design that perfectly captures the essence of the season.
This nail art style features creamy orange swirls, golden French tips, and even tortoiseshell prints, offering a variety of looks that match the chilly weather and your fall wardrobe.
Imagine the golden swirls on top of a caramel macchiato or the toasted amber of a pumpkin latte—these nails bring that warm, inviting feeling right to your fingertips.
Caramel Swirl Nail Application
To create this stunning look, start with a base coat of a light orange or nude color to enhance the caramel hues.
Apply the caramel polish in swirling motions to mimic the natural flow of melted caramel. For a chic French manicure twist, paint marbled amber tips, adding a sophisticated touch.
Caramel Swirl Nail Styling Tips
Take your Caramel Swirl Nails to the next level by experimenting with 3D nail art. Consider adding acrylic bubbles or raindrop effects to create a standout look.
For a groovy ’70s vibe, incorporate wavy swirls of caramel, brown, and orange. These intricate designs not only enhance the visual appeal but also celebrate the dynamic colors and textures of autumn.
5. Burgundy and Gold Accent Nails
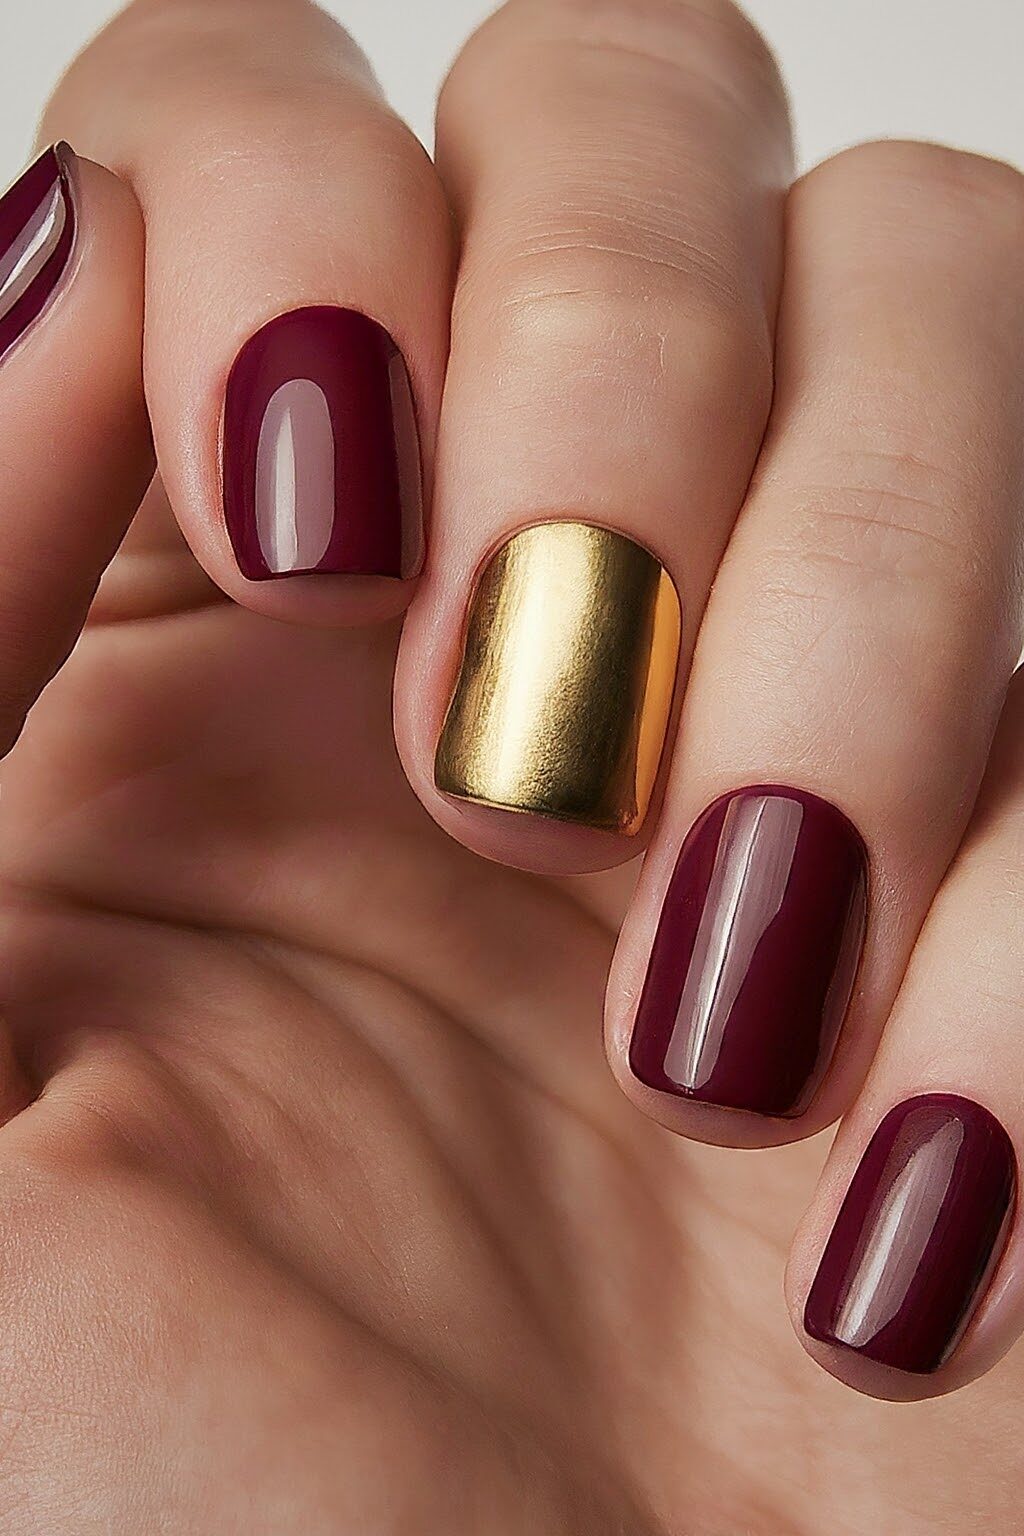
Burgundy and Gold Accent Nail Design
This luxurious combination pairs deep, velvety burgundy with shimmering gold accents for a look that’s both elegant and festive.
Perfect for autumn gatherings or as a glamorous everyday style, these nails draw inspiration from the warm hues of fall leaves and festive occasions.
Burgundy and Gold Accent Nail Application
To create this stunning look, start with a thorough application of a burgundy base coat. Once dry, use a thin brush or a stencil to add gold accents.
These could be delicate tips, intricate geometric patterns, or even bold, scattered glitter. For a standout effect, try using gold foil or metallic polish for the accents, ensuring each design element shines beautifully against the burgundy backdrop.
Burgundy and Gold Accent Nail Styling Tips
Elevate your Burgundy and Gold Accent Nails by experimenting with different textures and finishes. A matte burgundy combined with glossy gold can offer a striking contrast.
Alternatively, a full glossy look helps to unify the burgundy and gold, creating a seamless blend of color and sparkle.
6. Chocolate Brown French Tips
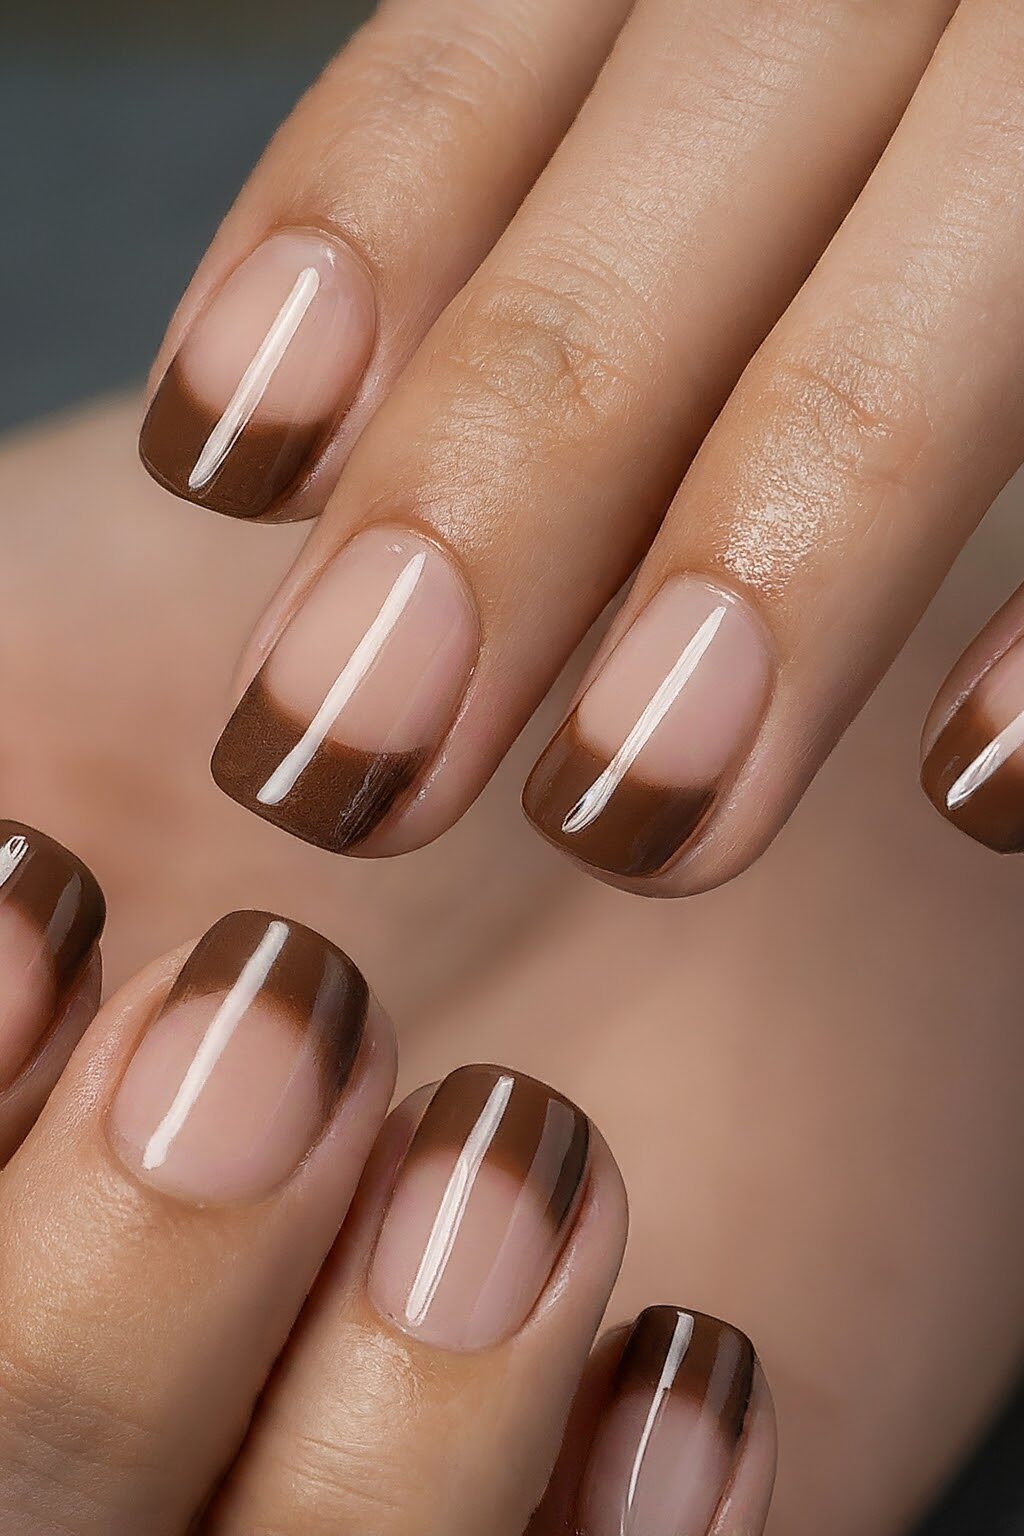
Chocolate Brown French Tip Design
Classic French manicure that’s perfect for the autumn season.
This design combines the timeless appeal of French tips with the rich, warm tones of chocolate brown, creating a sophisticated look that complements the earthy colors of fall.
Chocolate Brown French Tip Application
To achieve this chic look, start with a nude base coat to enhance the natural beauty of your nails. Carefully apply the chocolate brown polish to the tips of your nails, creating the iconic French tip shape.
For those with a less steady hand, French manicure stencil stickers can be a great aid. Ensure the polish is completely dry before peeling off the stencils.
Chocolate Brown French Tip Styling Tips
Personalize your Chocolate Brown French Tips by experimenting with various finishes and accents. For a subtle yet striking effect, add a thin white line just below the brown tips or incorporate a few accent nails in the same chocolate shade.
If you’re feeling adventurous, why not try a matte topcoat for a modern twist? These styling variations allow you to make the manicure uniquely yours while still keeping the refined elegance of the French tip design.
7. Autumn Sunset Gradient
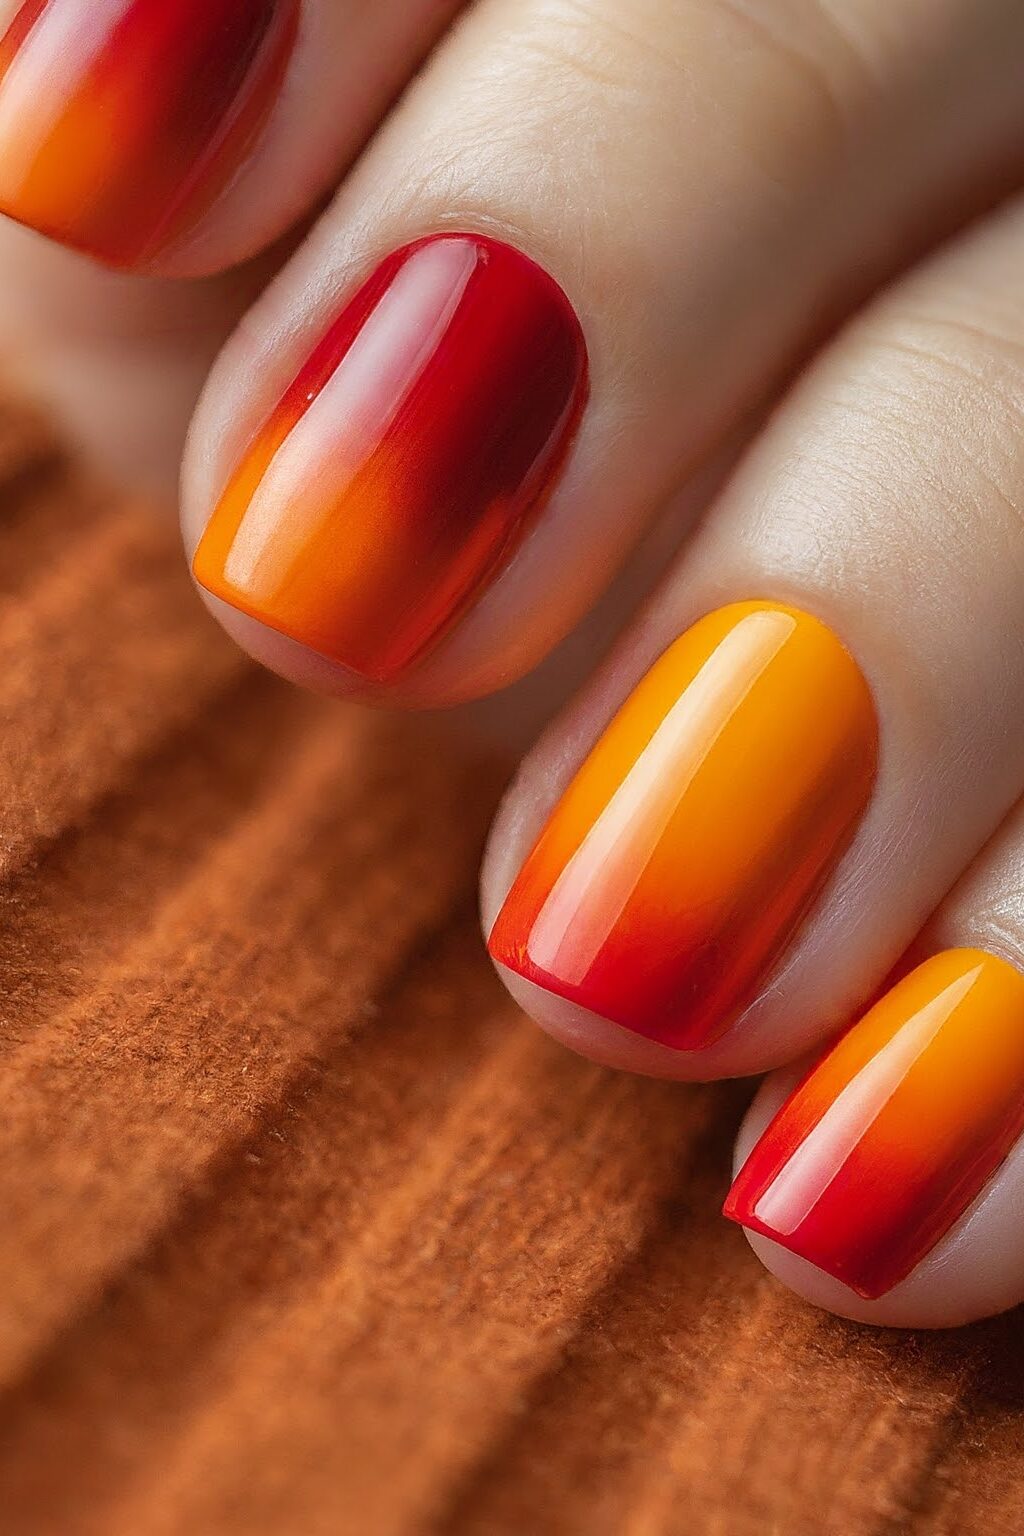
Autumn Sunset Gradient Design
Capture the breathtaking beauty of an autumn sunset on your nails with this vibrant gradient design. This look combines shades of orange, yellow, and pink to mirror the stunning sky at dusk.
The addition of flame-like tips on select nails enhances the fiery effect, making this design a dynamic choice for your fall manicure.
Autumn Sunset Gradient Application
Start by applying a base coat to protect your nails and ensure a smooth canvas. Next, apply a light yellow polish as the base layer.
While it’s still wet, blend in orange polish, starting from the middle of the nail and working towards the tip.
Add pink at the very tip, and use a small sponge to dab and blend the colors together, creating a seamless gradient effect. Finish with a top coat for a glossy, long-lasting finish.
Autumn Sunset Gradient Styling Tips
For an extra touch of autumn magic, incorporate a bit of glitter into the gradient. This can be done by adding a glitter top coat or by sprinkling loose glitter over the wet polish.
The sparkle will mimic the shimmering setting sun. If you prefer a subtler look, consider a matte top coat to soften the bright colors, giving your nails a sophisticated, velvet-like appearance.
8. Olive Green Negative Space
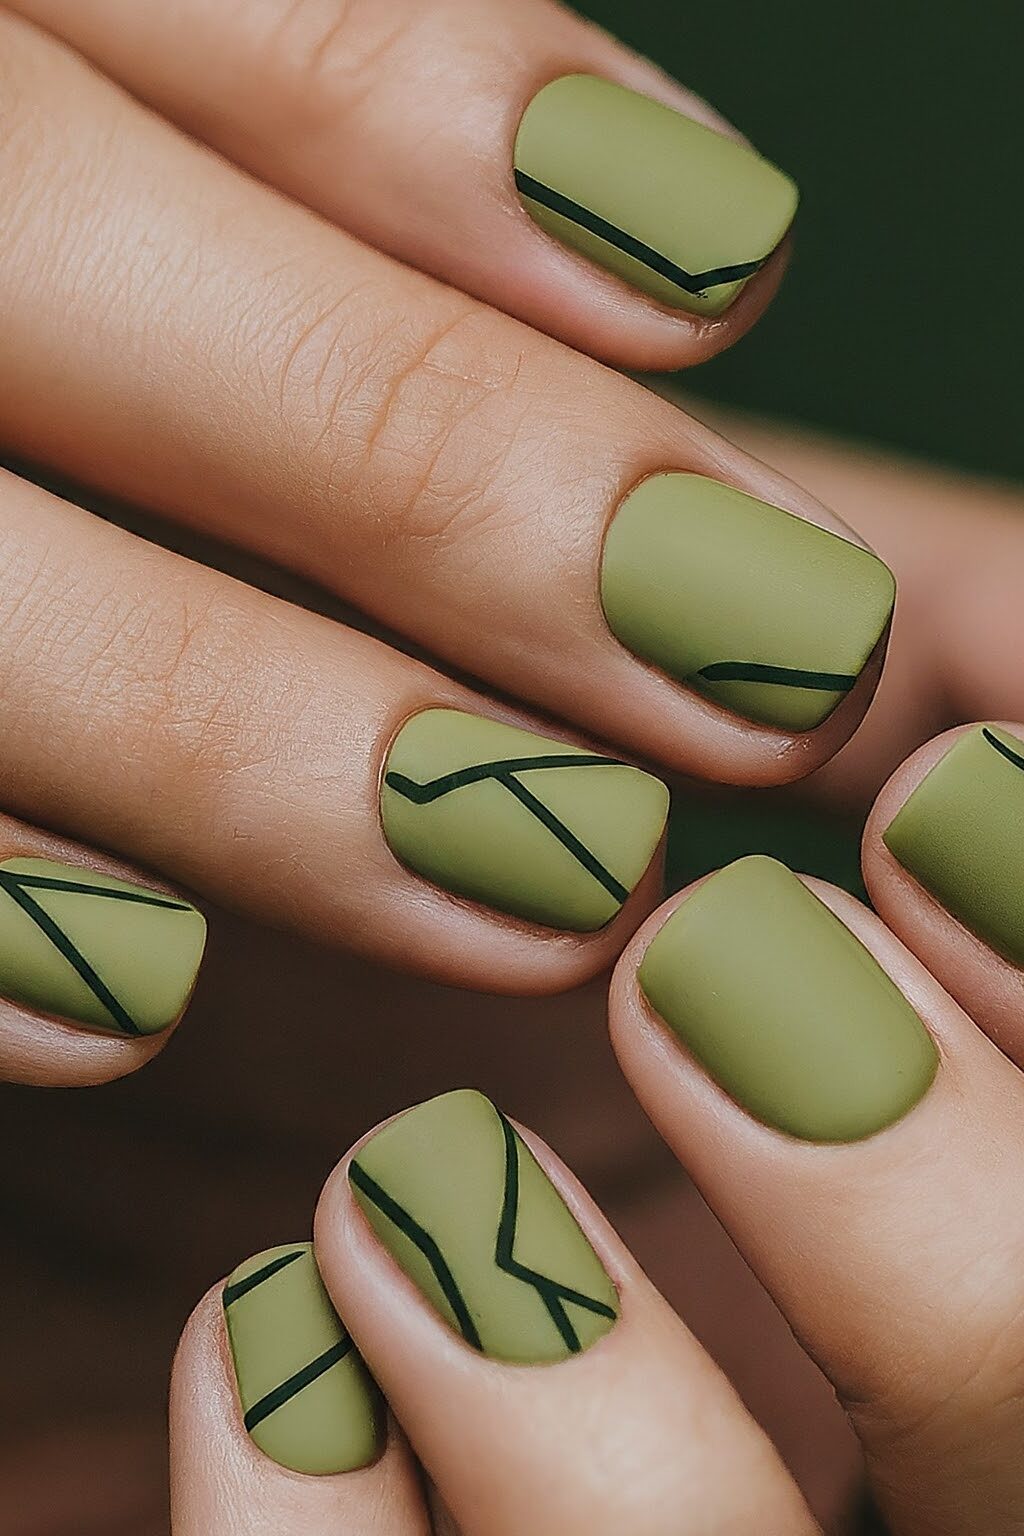
Olive Green Negative Space Design
This design combines a rich olive green with uncolored spaces, creating a striking visual contrast.
The addition of metallic green-gold accents offers a touch of sophistication and dimension, making your nails not just a style statement but a piece of art.
Olive Green Negative Space Application
Start with a clean, buffed nail as your canvas. Apply a base coat of olive green, leaving parts of the nail bare to achieve the negative space effect.
Use tape or stencils to help create precise lines and shapes, ensuring that the green pops against the natural color of your nail.
Olive Green Negative Space Styling Tips
To elevate your Olive Green Negative Space nails, experiment with different patterns such as swirls or geometric shapes in an almond-cream hue.
These designs can be drawn freehand or with the help of a thin brush for more intricate details.
The key is to maintain a balance between the bold olive green and the subtle negative spaces, allowing each feature to stand out beautifully. This style is perfect for adding a modern twist to your fall nail fashion.
9. Copper Foil Accents

Copper Foil Accent Design
Elevate your nail art with the luxurious touch of Copper Foil Accents. This design integrates hints of bronze and copper, creating a sophisticated and chic appearance.
The clear base allows the metallic shimmer to stand out, mimicking the elegant look of a peeled-back foil that’s both modern and stylish.
Copper Foil Accent Application
Start by applying a smooth, clear base coat to your nails. Once dry, carefully place small pieces of copper foil on your nails. You can tear or cut the foil into various shapes for a more dynamic design.
Gently press the foil onto the nail, ensuring it adheres well, then seal everything with a clear top coat for a glossy finish and extended durability.
Copper Foil Accent Styling Tips
For a party-ready look, combine your Copper Foil Accents with a matte black or deep maroon background.
The contrast between the dark colors and the bright metallic copper creates a stunning visual impact. If you prefer a subtler style, scatter a smattering of copper foil over a nude or light pink base.
This will give your nails a delicate, refined sparkle perfect for any autumn occasion.
10. Warm Neutral Marble
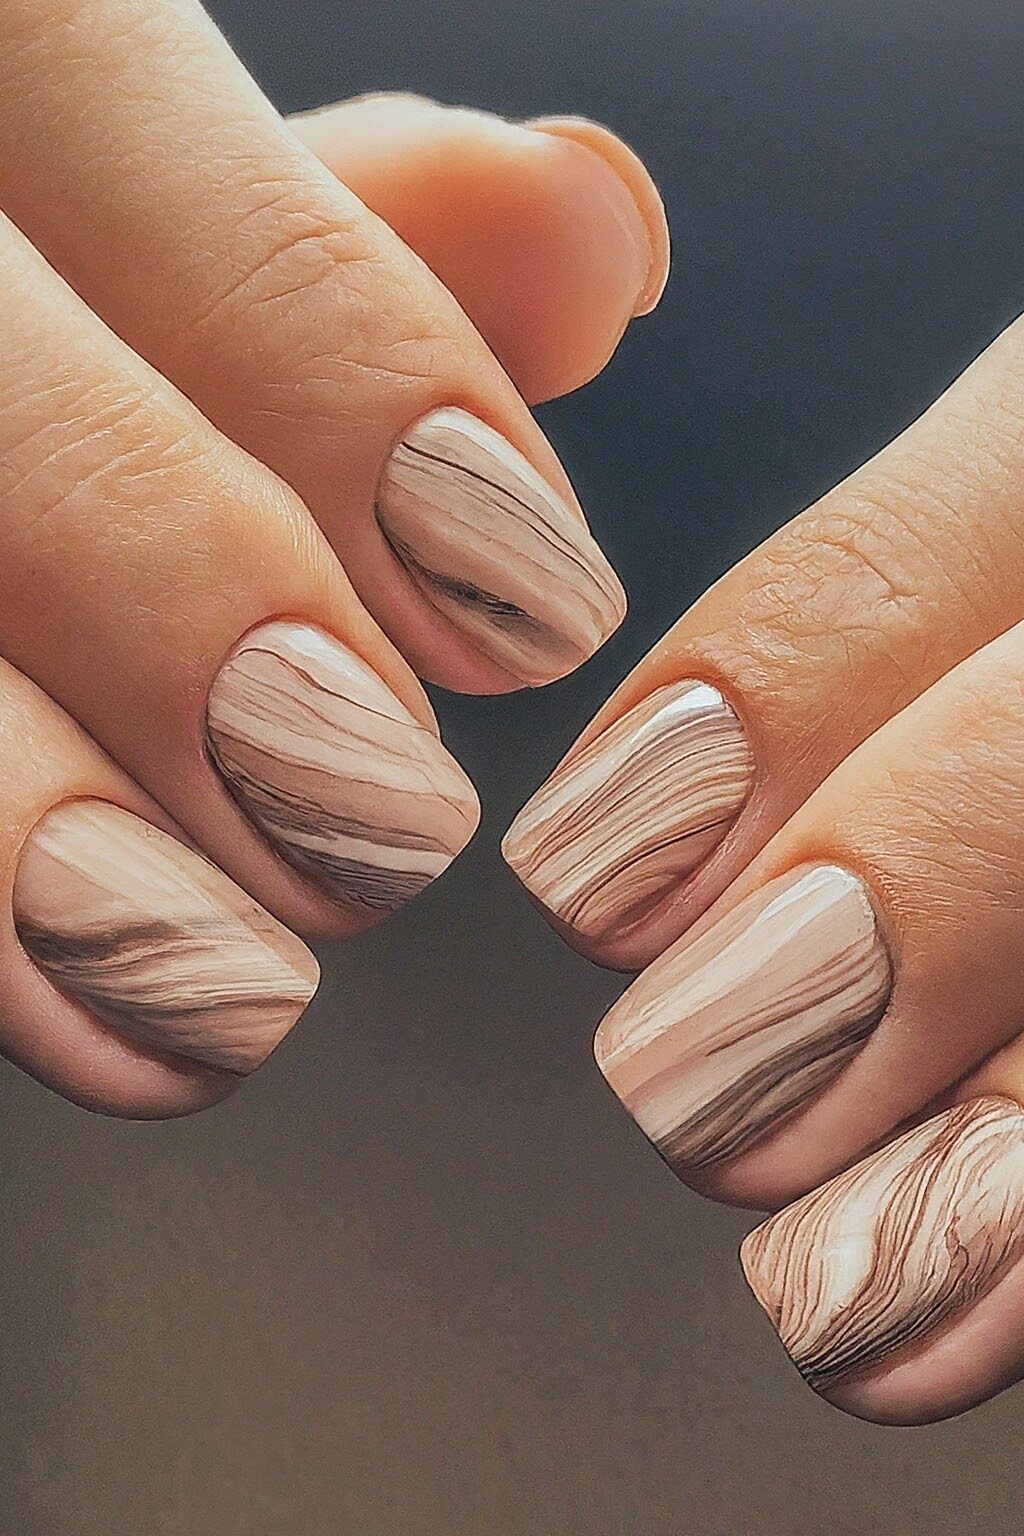
Warm Neutral Marble Design
Timeless elegance of Warm Neutral Marble nails, a design that brings the luxurious feel of marble into your nail art. This style is perfect for anyone seeking a sophisticated yet understated look.
The swirls of light and dark browns mixed with a hint of gold flecks mimic the natural veining of marble, making each nail a unique piece of art.
Warm Neutral Marble Application
To achieve this chic look, start with a base coat of a light cream or beige to set the perfect backdrop for your marble effect.
Drop small amounts of darker brown and gold polish onto the wet base, and use a fine brush or a toothpick to swirl the colors gently, creating the marbled effect.
Allow each nail to have its own distinct pattern, just like real marble. Seal your design with a top coat for a glossy finish that enhances the depth of the marble design.
Warm Neutral Marble Styling Tips
For an added touch of elegance, incorporate subtle glitter into your Warm Neutral Marble nails. This can be achieved by mixing a bit of glitter polish with your brown shades before applying or by sprinkling loose glitter over the wet polish.
The sparkle subtly embedded in the swirls catches the light beautifully, giving your nails a refined shimmer that’s perfect for any autumn occasion.
11. Chestnut Brown Glossy Nails
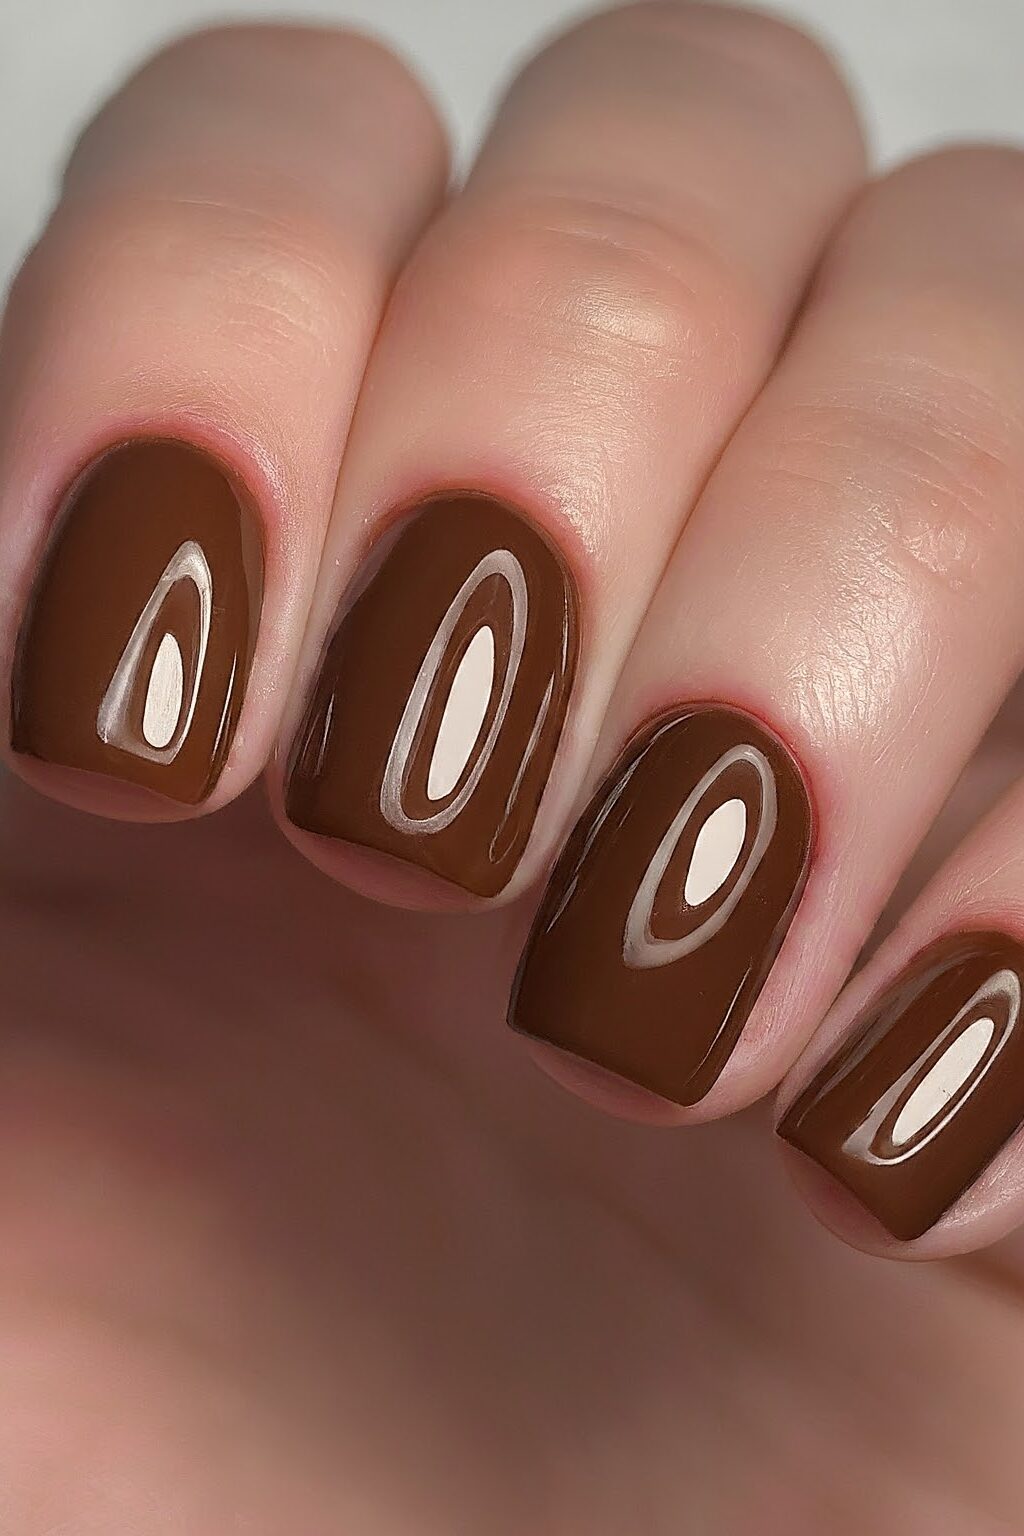
Chestnut Brown Glossy Nail Design
This design is all about capturing the earthy tones of the season, offering a sophisticated and versatile look that pairs effortlessly with any outfit.
The glossy finish adds an extra layer of elegance, making your nails shine with a mirror-like sheen that’s both captivating and chic.
Chestnut Brown Glossy Nail Application
To achieve this stunning look, start with a clean, well-prepped nail surface. Apply a base coat to protect your nails and enhance the polish adherence.
Next, choose a high-quality chestnut brown polish and apply two coats for full coverage. Allow each coat to dry completely before applying the next to avoid smudging.
Chestnut Brown Glossy Nail Styling Tips
For a truly elegant autumnal look, consider pairing your Chestnut Brown Glossy Nails with subtle gold accents.
Use a thin brush to add delicate gold stripes or dots to one or two accent nails, creating a luxurious contrast.
12. Mustard Yellow Abstract Art
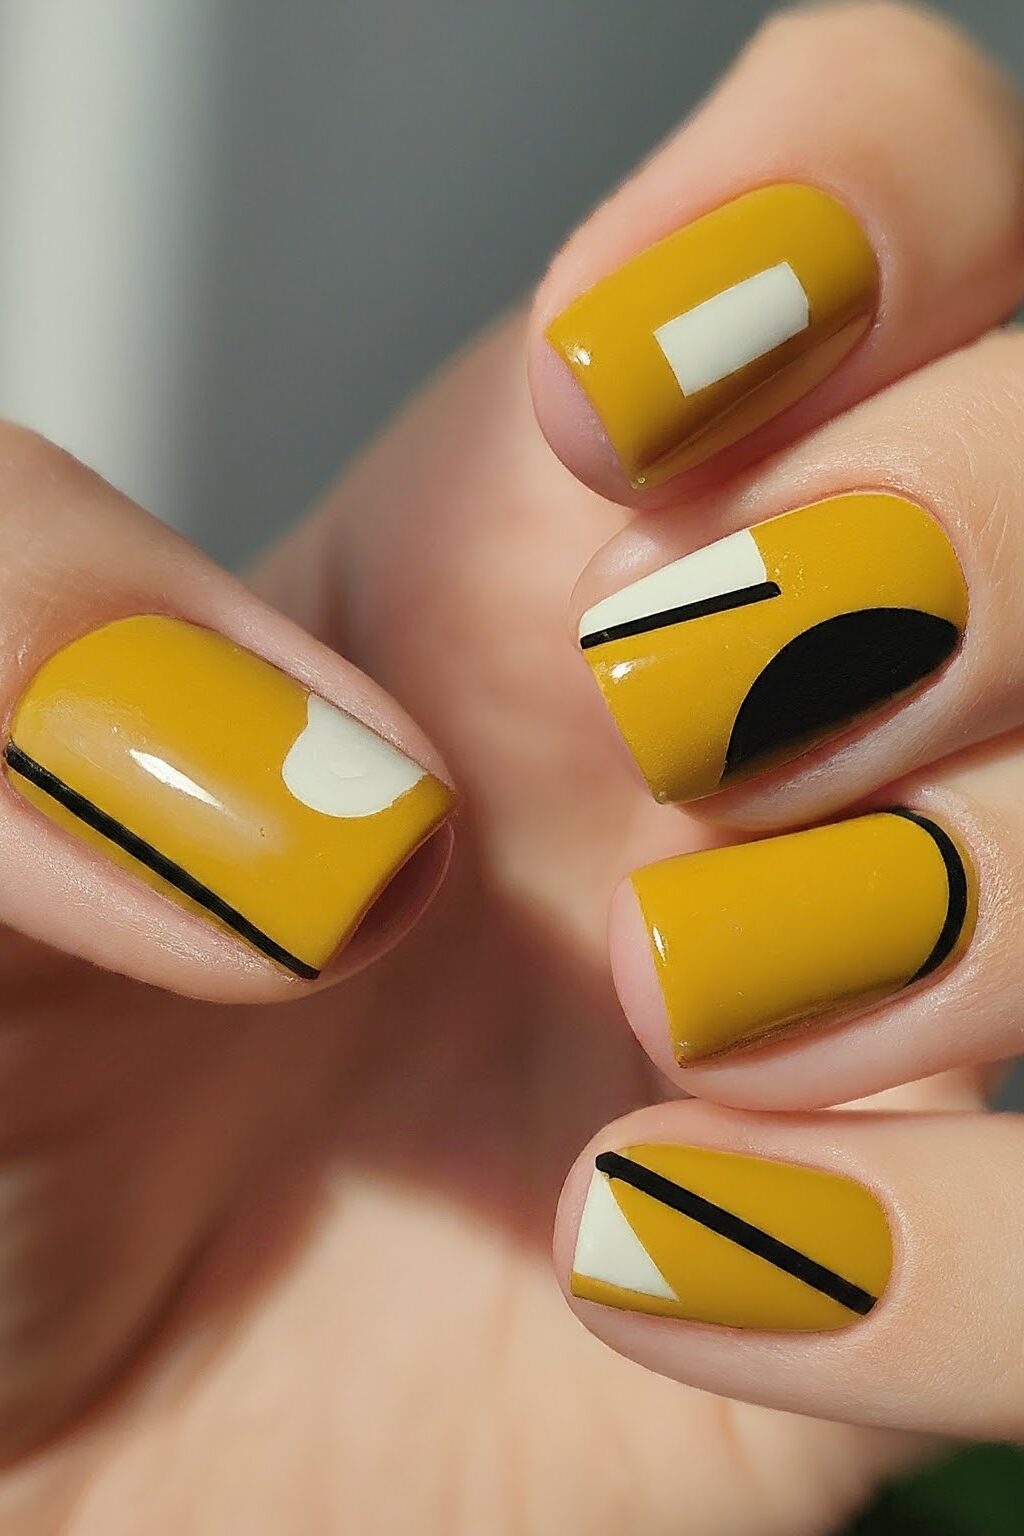
Mustard Yellow Abstract Art Design
This nail design is a beautiful blend of mustard hues with a classic pastel yellow base.
Over this, geometric designs in a deeper mustard shade are meticulously painted, creating a striking contrast that’s both bold and subtle.
Mustard Yellow Abstract Art Application
To achieve this look, start by painting your nails with a pastel yellow as the base. Once dry, use a thin brush to apply the mustard yellow polish for the geometric patterns.
The key here is precision and creativity—feel free to experiment with different shapes and overlaps, ensuring each nail has its own distinct style.
This method allows you to play around with the intensity of the mustard color, making it as bold or as understated as you like.
Mustard Yellow Abstract Art Styling Tips
Enhance your Mustard Yellow Abstract Art by incorporating varied textures or a matte top coat to give a modern twist to the glossy base.
For an added dimension, you can also apply a glitter accent on one or two nails, which complements the mustard yellow with a sparkle, perfect for catching the light.
This style is versatile and can be adapted to both casual and formal settings, making it a fantastic choice for those who love to stand out with their nail art.
13. Deep Forest Green with Gold Flakes
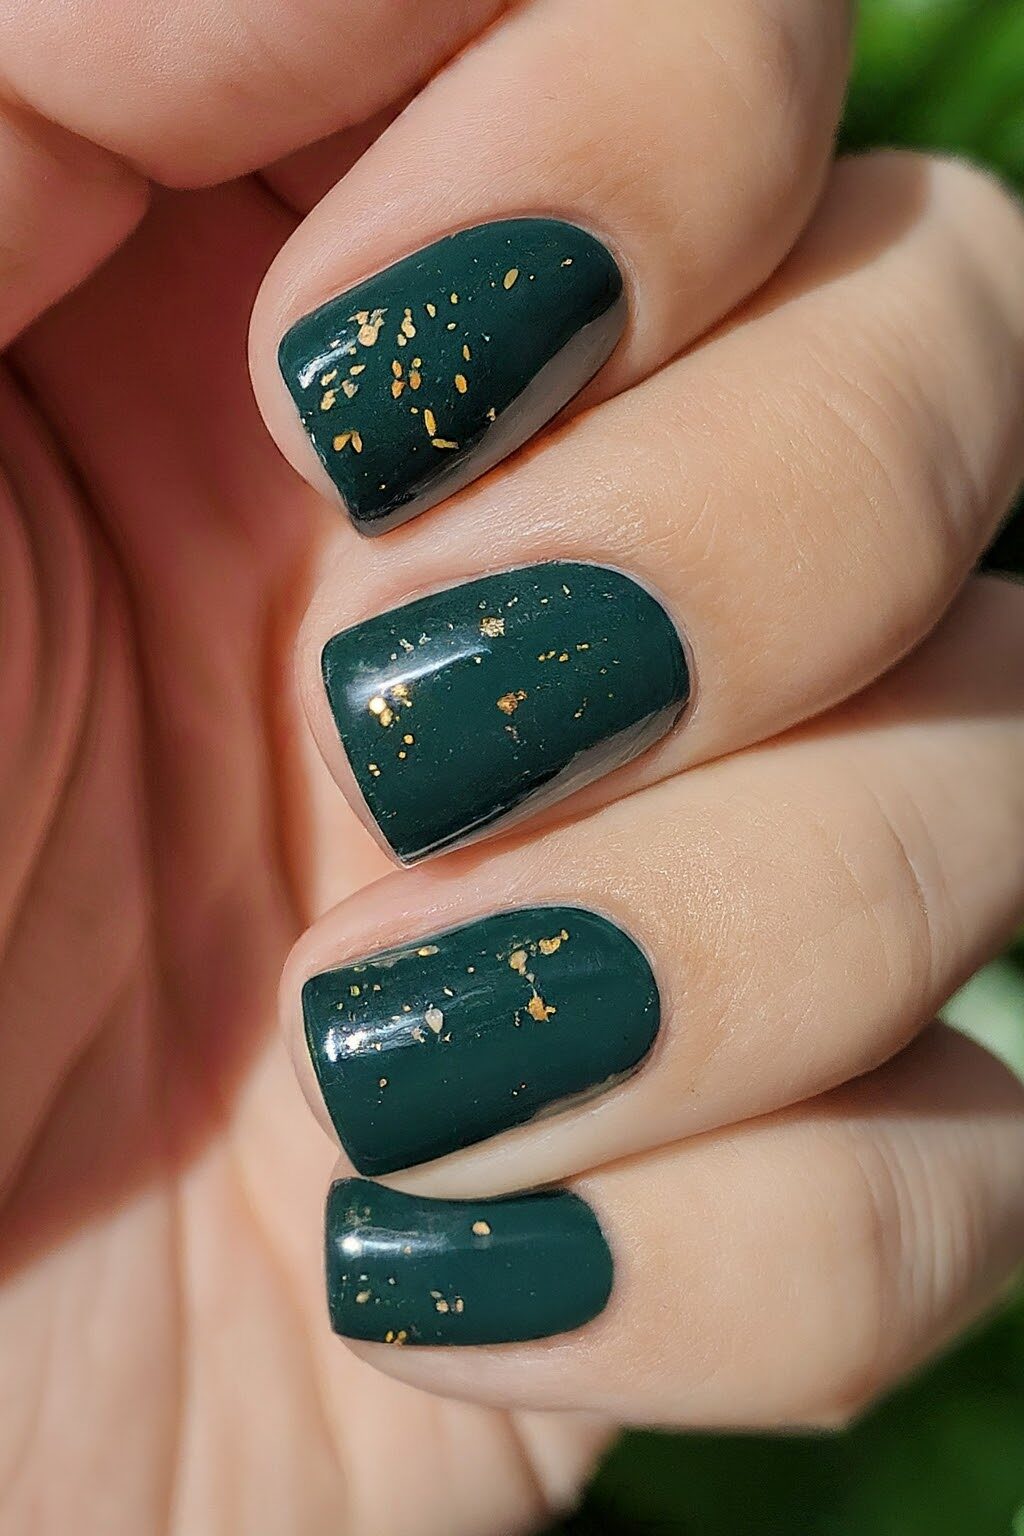
Deep Forest Green with Gold Flake Design
This design pairs the rich, earthy tone of deep forest green with the luxurious shimmer of gold flakes, creating a look that’s both sophisticated and eye-catching.
Perfect for autumn, this design captures the essence of the season with its reminiscent colors of evergreen forests and golden leaves.
Deep Forest Green with Gold Flake Application
To achieve this stunning look, start by applying a base coat of deep forest green. Once dry, gently apply gold flakes to the nails.
Use a piece of tissue or a dry brush to pick up the flakes and press them onto the nail surface. Apply a top coat to seal in the design, ensuring longevity and a glossy finish that enhances the depth of the green and the sparkle of the gold.
Deep Forest Green with Gold Flake Styling Tips
For an added touch of glamour, consider varying the size and placement of the gold flakes. Smaller flakes can be used to create a subtle shimmer, while larger pieces can make a bold statement.
This customization allows you to tailor your nails to match your personal style or specific occasions, making your Deep Forest Green with Gold Flakes nails truly unique.
14. Rustic Plaid Nail Art
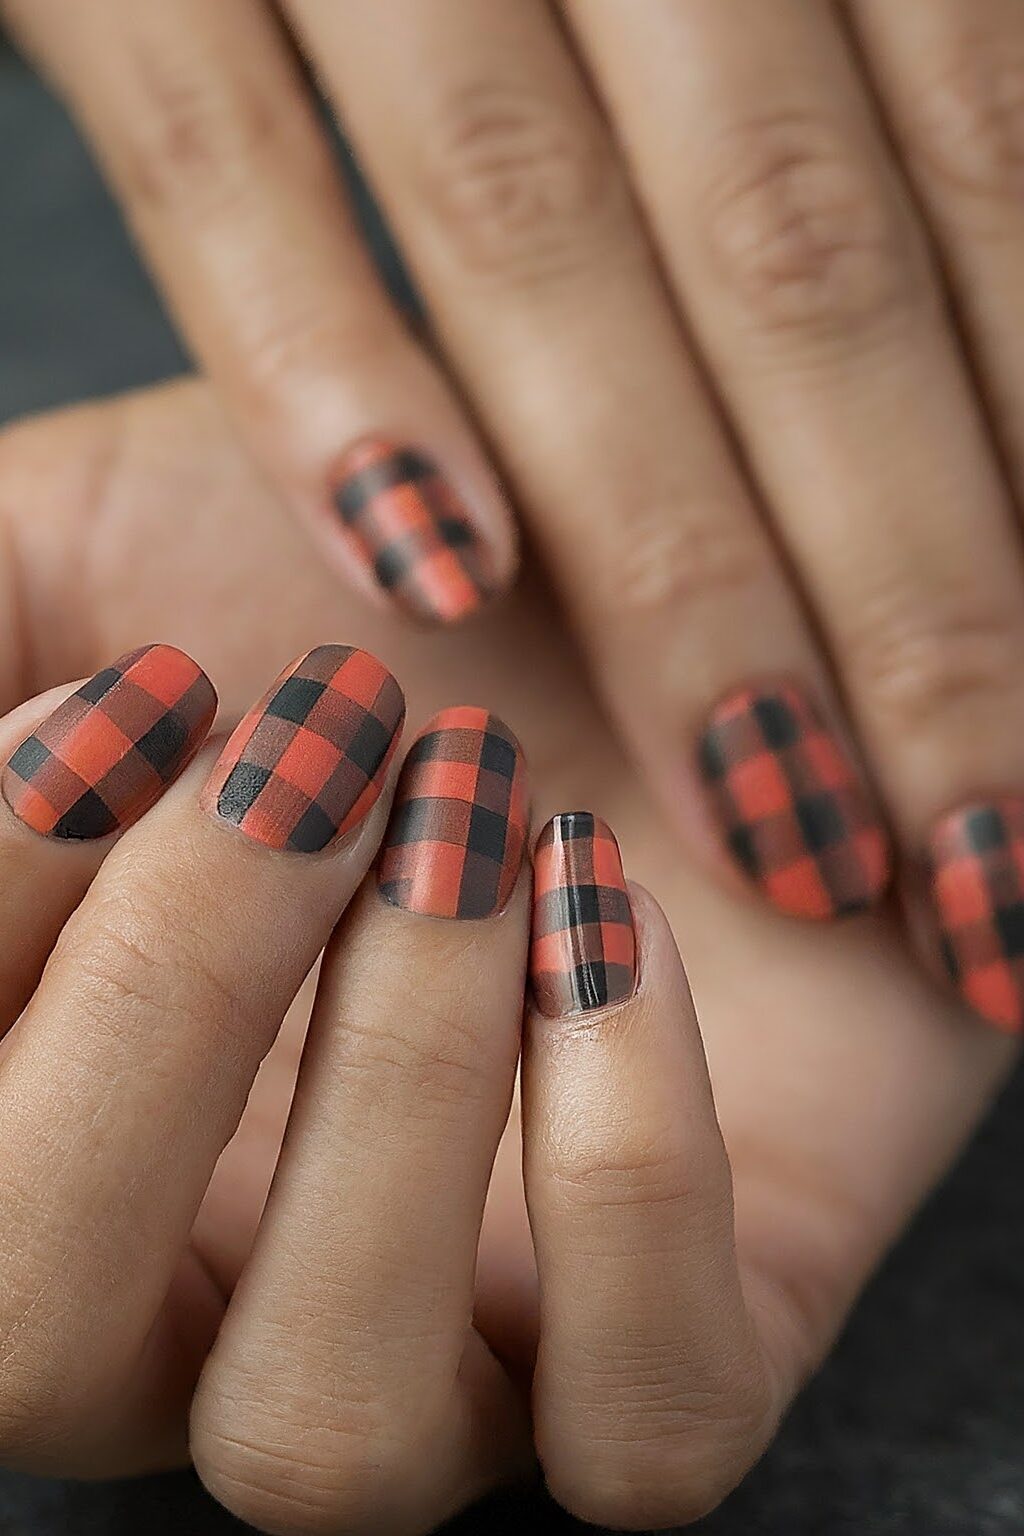
Rustic Plaid Nail Art Design
This style features bold black and white tips with red and grey details, perfectly capturing the essence of a cozy cabin.
The classic buffalo check plaid pattern brings a touch of rustic elegance to your nails, making them a fabulous choice for the season.
Rustic Plaid Nail Art Application
Starting with a base coat to protect your nails, apply your chosen base color, which will show through in the finished plaid pattern.
Next, use your accent color to paint vertical stripes, ensuring they are as thick as the space between them. Overlay these with horizontal stripes to form a plaid pattern.
Add thin lines within these stripes using a contrasting color to add depth and intricacy to your design. Remember, patience and a steady hand will yield the best results!
Rustic Plaid Nail Art Styling Tips
To personalize your Rustic Plaid Nail Art, consider using colors that reflect your style or the season. While traditional reds and blacks are popular, experimenting with shades like deep greens or blues can offer a unique twist.
For a more complex look, overlay additional thin stripes in a third color, spacing them well to create a layered effect. This technique enhances the plaid, making it appear more intricate and tailored.
15. Muted Rainbow Fall Colors
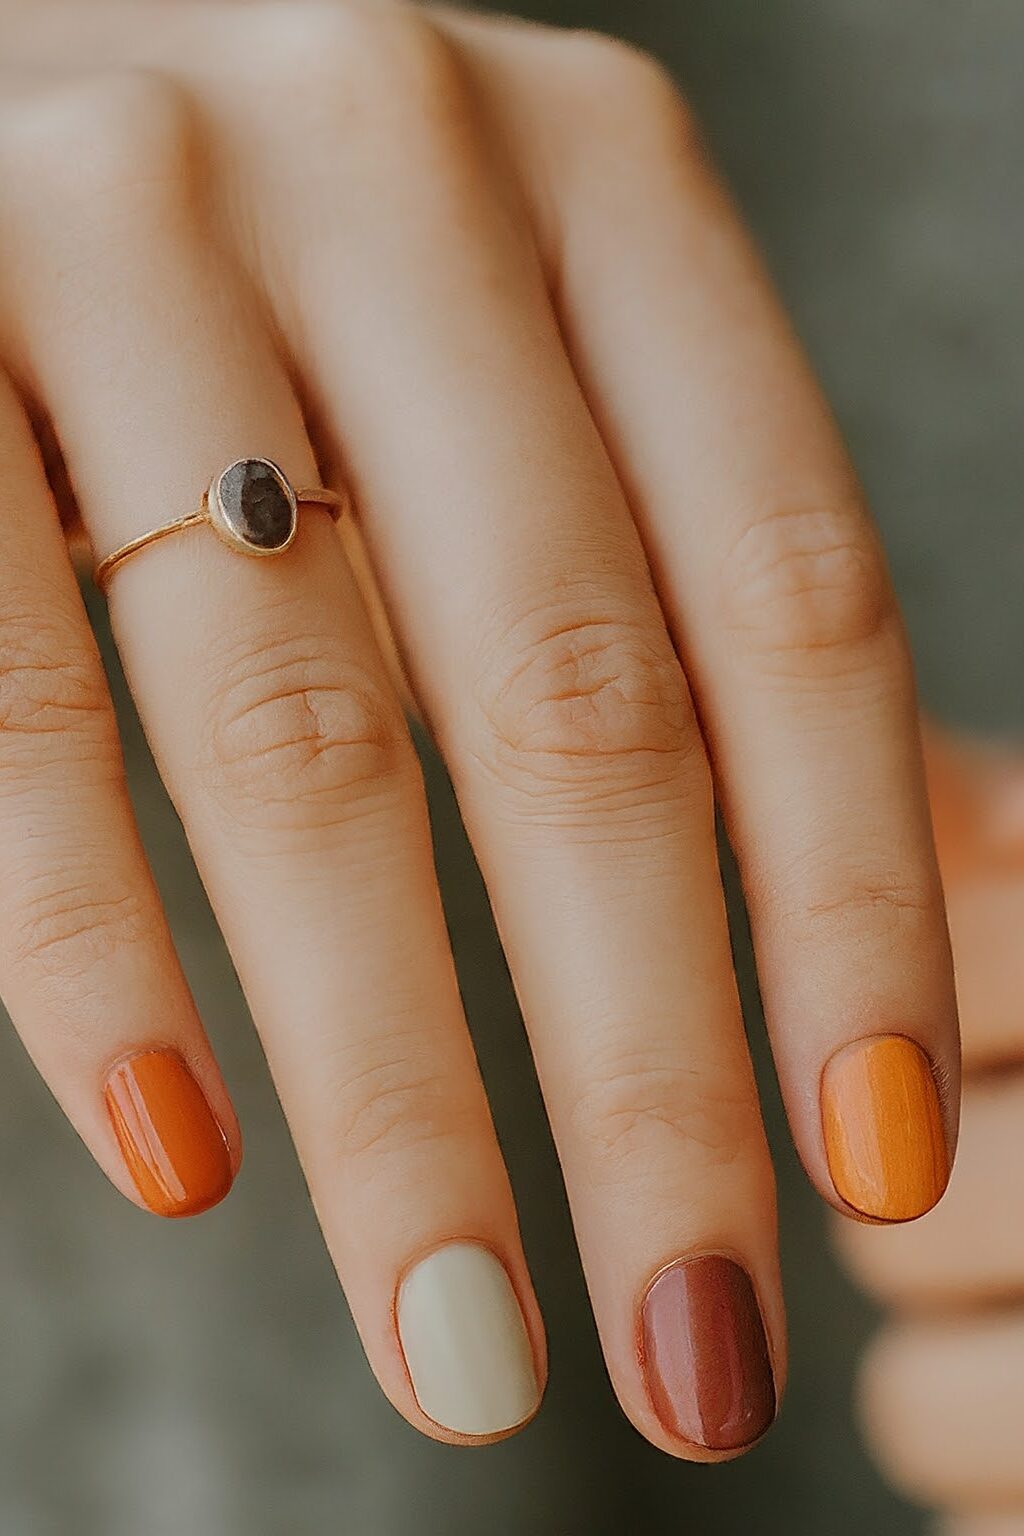
Muted Rainbow Fall Color Design
Inspired by the natural hues of autumn, these designs incorporate muted versions of rainbow colors, providing a fresh twist on traditional fall nail art.
Muted Rainbow Fall Color Application
Start by applying a nude base coat to ensure the colors pop without overpowering. Next, select pastel shades that reflect the muted rainbow palette—think soft pinks, gentle yellows, and subdued greens.
Apply each color in thin, delicate strokes, either in a striped pattern across each nail or as random splotches for a more abstract look.
Muted Rainbow Fall Color Styling Tips
To enhance the Muted Rainbow theme, consider adding matte topcoats over the glossy base to give a modern touch to your manicure.
Mixing finishes provides a contrast that catches the eye, making your nails a subtle yet striking statement piece this autumn.
Conclusion
Throughout this exploration of elegant autumn nail ideas, we have delved into a variety of designs, each possessing its own unique charm and reflecting the rich hues and textures of the season.
The significance of adopting such seasonal trends extends beyond mere aesthetics; it symbolizes a celebration of change and the beauty inherent in transformation.
As we conclude, it’s clear that experimenting with these autumn nail designs provides an opportunity for personal reinvention and a way to partake in the seasonal shift visually and emotionally.

Leave a Reply
You must be logged in to post a comment.